
The Highs and Lows of Ceiling Soundproofing
Why Ceiling Noise Is Harder to Stop Than You Think
The best way to soundproof a ceiling depends on your situation, but here is the short answer most people need:
- Seal all gaps first – use acoustical caulk around fixtures, vents, and edges (biggest ROI, costs $20-$50)
- Add mass – install a second layer of 5/8″ drywall with Green Glue damping compound between layers (STC 42-46)
- Decouple the ceiling – use resilient clips like RSIC or Whisper Clips to isolate the structure from vibration (STC 50-55)
- Fill the cavity – pack acoustic insulation between joists to kill the drum effect
For renters, hang mass-loaded vinyl (MLV) panels and seal gaps. For homeowners doing a full renovation, resilient clips plus double drywall is the gold standard.
You’re trying to work. You’ve got a deadline. And then it starts – footsteps, dragged chairs, bass thumping through the ceiling above your home office.
It’s one of the most common complaints from remote workers, and one of the most misunderstood problems in home improvement.
Most people search for a quick fix and end up buying acoustic foam panels or egg-crate tiles. Here’s the problem: those products do almost nothing to block sound coming through a ceiling. They reduce echo inside your room. That’s a completely different thing.
Blocking noise from above requires mass, decoupling, and airtight sealing – not soft foam. A standard apartment ceiling sits at around STC 33, which means a neighbor’s normal footsteps come through clearly. Getting to STC 50+ requires a real strategy.
The good news? You don’t have to gut your ceiling to make a serious difference. There are solutions at every budget level, from a $30 tube of acoustical caulk to a full decoupled ceiling renovation.
This guide walks you through all of it – clearly, step by step.
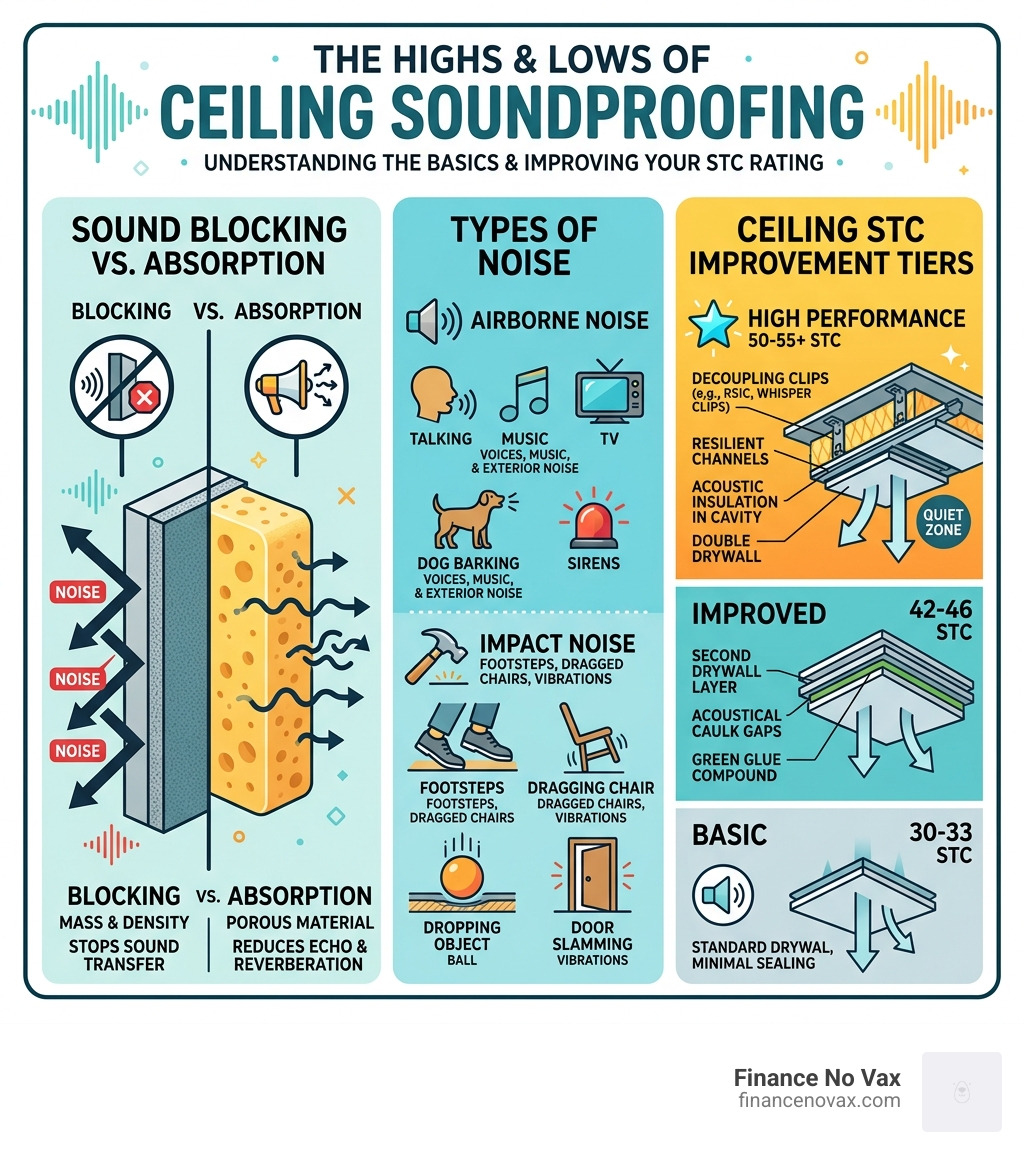
Best way to soundproof a ceiling definitions:
Understanding the Physics: Airborne vs. Impact Noise
Before we start throwing materials at your ceiling, we need to understand what we are fighting. Sound isn’t just one thing; it’s a vibration that travels in two distinct ways. If you don’t know which one is bothering you, you might spend thousands of dollars on the wrong solution.
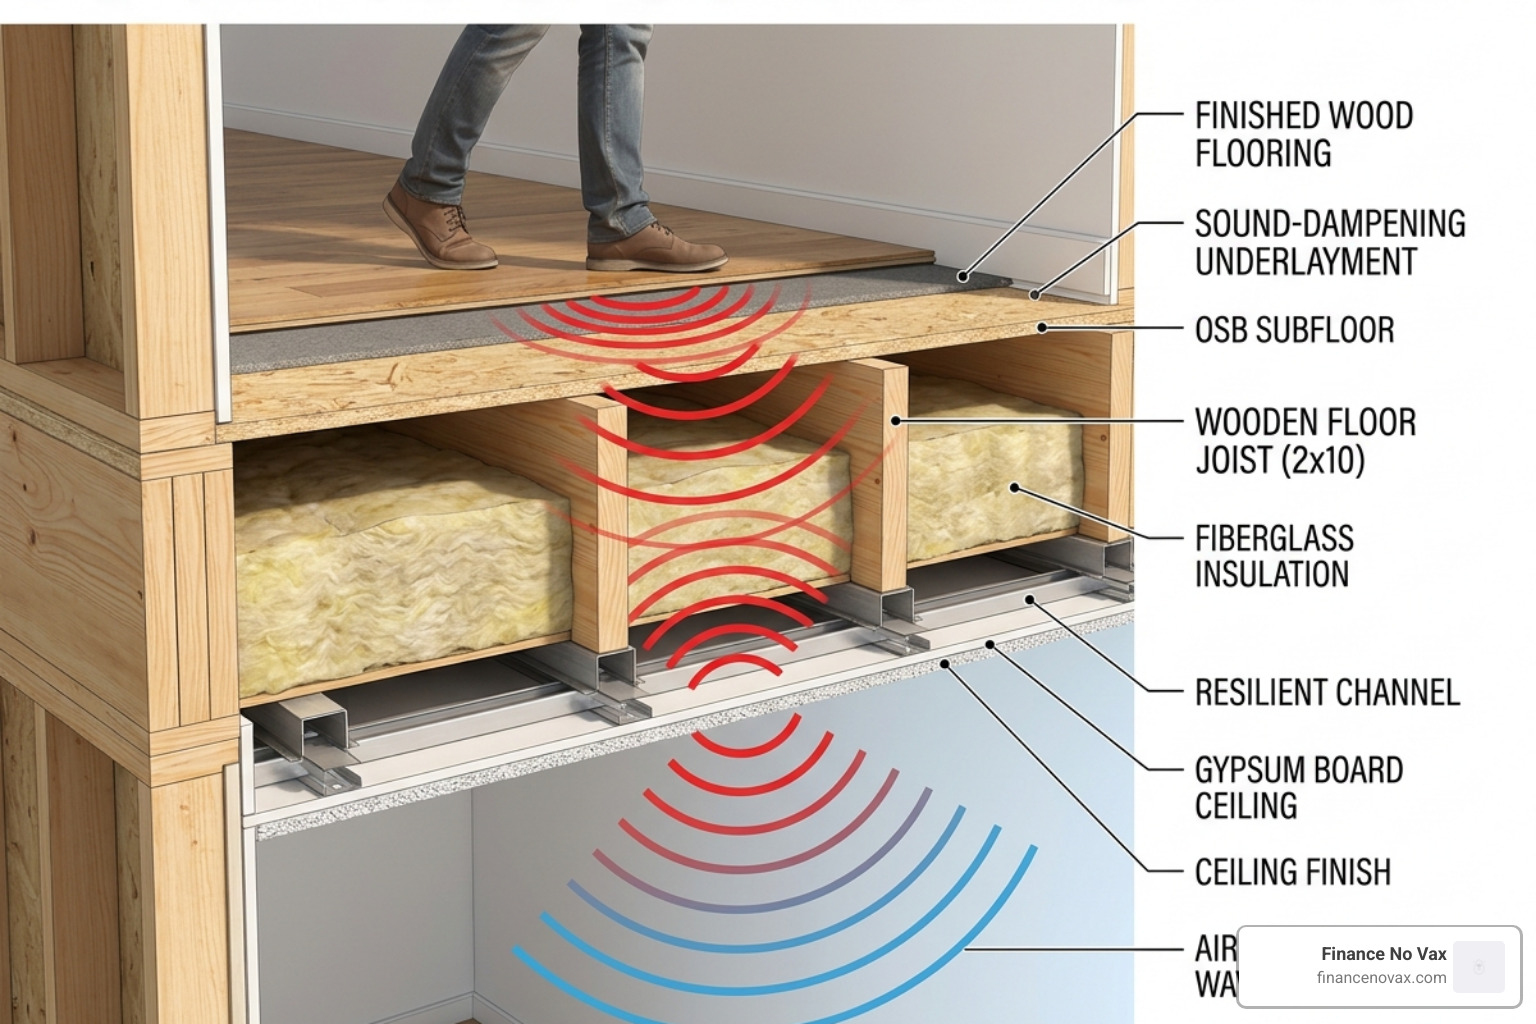
Airborne Noise is exactly what it sounds like: sound traveling through the air. Examples include people talking, the TV in the apartment above, or a dog barking. These sound waves hit your ceiling and cause it to vibrate, passing the sound into your room.
Impact Noise (also called structural noise) is the real villain for most people. This happens when a physical object strikes the floor above—think footsteps, a dropped phone, or furniture being dragged. These vibrations travel directly through the floor joists and into your ceiling.
To measure how well a ceiling stops these noises, we use two ratings:
- **STC:** Measures how well a barrier blocks airborne noise. A standard ceiling is around STC 33. We want to aim for STC 50 or higher to make loud music sound like a faint hum.
- IIC (Impact Insulation Class): Measures how well a floor/ceiling assembly stops impact noise. This is much harder to fix from below because the vibration is already in the wood or concrete structure.
If you’re wondering how to soundproof a ceiling without losing your mind, the first step is a simple diagnosis. If you can hear the lyrics to the song upstairs, you have an airborne problem. If you feel the vibration of footsteps in your chest, you have an impact problem.
The Difference Between Blocking and Absorption
This is where most DIYers go wrong. They see “acoustic panels” online and think they’ve found the best way to soundproof a ceiling.
- Sound Absorption uses soft, porous materials (like foam or fiberglass) to stop sound from bouncing around. It reduces echo inside the room. It has an NRC (Noise Reduction Coefficient) rating.
- Sound Blocking requires mass and density. You need heavy materials like lead, concrete, or specialized drywall to physically stop sound waves from passing through.
If your neighbor is loud, you don’t need absorption; you need a barrier. You need mass. According to “Mass Law,” every time you double the weight of your ceiling, you reduce noise by about 6 decibels (dB).
Why Standard Dropped Ceilings Fail
Many offices and basements use suspended or “dropped” ceilings. While they look tidy, they are acoustic nightmares. The tiles are usually lightweight (no mass) and sit loosely in a metal grid (not airtight).
Sound travels through the “flanking paths”—the gaps between the tiles and the grid—and bounces off the structural ceiling above, creating a “drum effect.” Unless you use heavy-duty acoustic tiles and seal the perimeter, a dropped ceiling is mostly decorative when it comes to sound.
The Best Way to Soundproof a Ceiling: A Tiered Approach
We know that not everyone can rip out their drywall. In April 2026, the costs of materials and labor mean we have to be smart about our budgets. We’ve broken down the best way to soundproof a ceiling into three tiers based on your living situation.
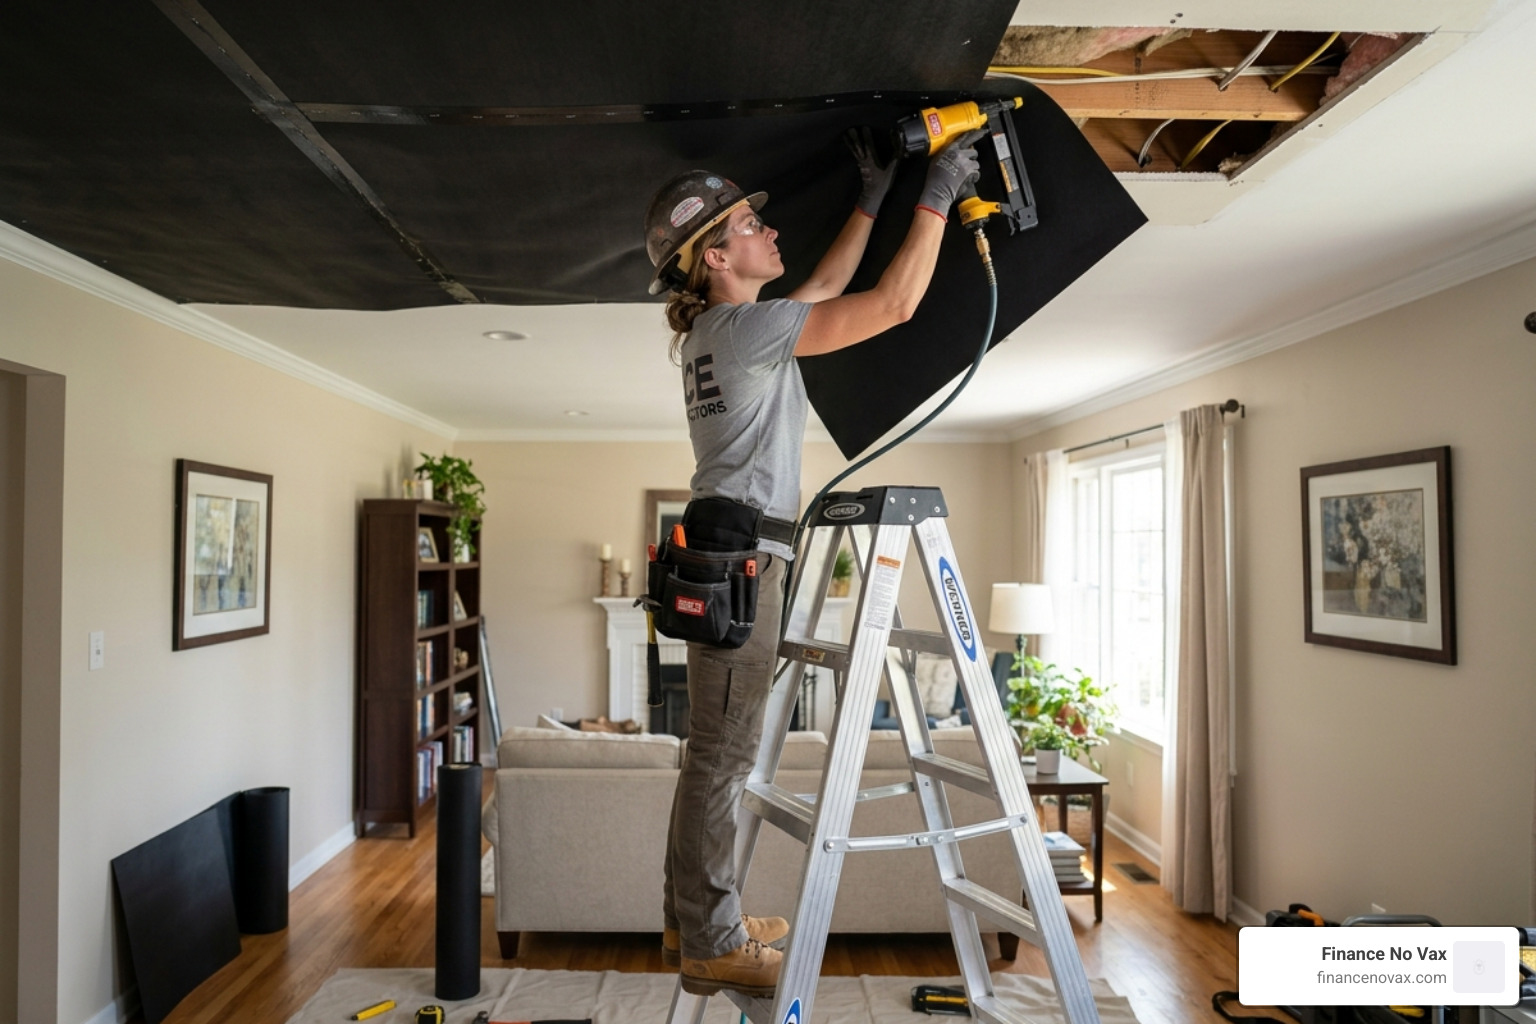
The Best Way to Soundproof a Ceiling for Renters
If you don’t own the place, you can’t exactly install resilient clips. However, you aren’t stuck with the noise.
- The 1% Rule: A gap covering just 1% of a surface can allow 50% of the sound to pass through. Start by using acoustical caulk around the edges of your ceiling and light fixtures. It’s non-permanent (you can remove it later) and provides the highest ROI.
- Mass-Loaded Vinyl (MLV) Panels: You can hang MLV panels from the ceiling using heavy-duty hooks or industrial Velcro. MLV is a dense, rubber-like material that acts as a massive sound barrier.
- The “Upstairs” Fix: Sometimes the best way to soundproof your apartment windows and ceilings for less is to talk to your neighbor. Offering to buy them a high-quality, thick rug with a dense felt pad can reduce impact noise by 10-15 dB for a fraction of the cost of ceiling work.
DIY Solutions for Homeowners
If you own your home and are comfortable with a drill, you can achieve professional results. The “Drywall Sandwich” is a classic move.
You apply a damping compound like Green Glue to a new sheet of 5/8″ soundproof drywall and screw it directly into your existing ceiling. Green Glue isn’t an adhesive; it’s a viscoelastic polymer that converts sound energy into tiny amounts of heat. This “sandwich” can raise your STC rating from 33 to 45+, making a massive difference in airborne noise. Check out these top ceiling soundproofing kits for your home to get started.
Professional Renovation Methods
For those who want total silence—or are building a home theater—you need to “decouple” the ceiling. This means breaking the physical connection between your ceiling and the floor joists above.
We use resilient sound isolation clips (RSIC or Whisper Clips) and metal hat channels. The clips act like shock absorbers. When the neighbor walks upstairs, the vibration hits the clip and dies there, rather than traveling into your drywall. This is the art of making your ceiling float and your neighbors disappear, and it can push your STC rating above 55.
Step-by-Step: How to Soundproof New vs. Existing Ceilings
The process changes significantly depending on whether you are looking at bare joists or a finished room.
The Best Way to Soundproof a Ceiling During New Construction
If you are currently building or have the ceiling open, follow this “Gold Standard” sequence:
- Acoustic Insulation: Fill the joist cavities with mineral wool insulation (like Rockwool). Aim for a density of 60kg/m³. This prevents the “drum effect” where sound echoes in the empty space.
- Decouple: Screw resilient clips into the joists every 24 inches. Snap 25-gauge metal hat channels into the clips.
- Mass: Attach a layer of 5/8″ drywall to the channels.
- Dampen: Apply Green Glue to a second layer of drywall and screw it into the first (be careful not to screw into the joists, which would “short-circuit” the decoupling).
- Seal: Use acoustical sealant on every single seam and perimeter gap.
This method is one of the ultimate list of acoustical ceiling solutions for long-term peace.
Retrofitting an Existing Finished Ceiling
Don’t want to tear down what’s already there? You can build “up.”
- Locate Joists: Use a stud finder to find your structural supports.
- Damping Layer: Apply Green Glue to a new sheet of 5/8″ drywall (2 tubes per 4×8 sheet).
- Install: Screw the new drywall through the old ceiling and into the joists.
- Finish: You will need “box extenders” for your light fixtures because your ceiling is now about an inch lower.
- Seal: Use the best ceiling panels to stop overhead noise or simply finish the drywall and paint.
Cost Analysis and Material Breakdown for 2026
Soundproofing isn’t cheap, but it’s an investment in your mental health. Here is what we are seeing for average costs in early 2026.
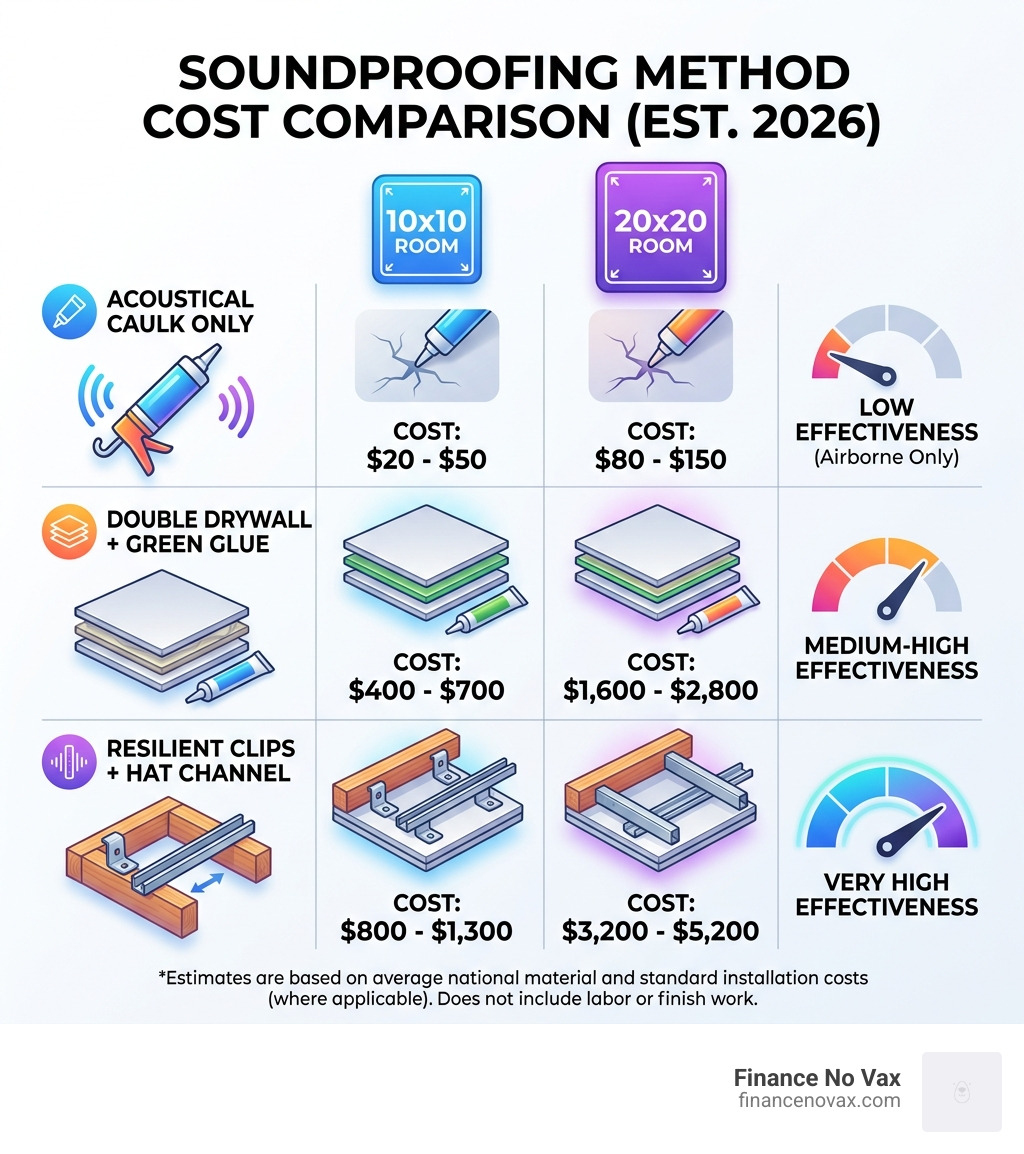
| Material/Method | Cost (10×10 Room) | Cost (20×20 Room) | Effectiveness |
|---|---|---|---|
| Acoustical Caulk Only | $20 – $50 | $80 – $150 | Low (Airborne only) |
| Double Drywall + Green Glue | $400 – $700 | $1,600 – $2,800 | Medium-High |
| Resilient Clips + Hat Channel | $800 – $1,300 | $3,200 – $5,200 | Very High |
| Mass-Loaded Vinyl (MLV) | $300 – $500 | $1,200 – $2,000 | High (Mass) |
Generally, professional installation adds another $1,000 to $2,700 to these totals. If you are on a budget, doing the labor yourself with the best tools to decouple your ceiling and kill the noise is the way to go.
Common Pitfalls and Professional Tips for Success
Even with the best materials, a small mistake can ruin the entire project.
- The Triple Leaf Effect: This is a common error where you leave an air gap between two rigid layers without any damping. This creates a resonance chamber that can actually make low-frequency noise worse. Always fill gaps with insulation or use damping compounds.
- Short-Circuiting: If you use resilient clips but then drive a long screw through the drywall and into the wooden joist, you’ve created a “bridge.” The vibration will bypass the clip and travel through that screw.
- Neglecting the “1% Rule”: We can’t say it enough. If you don’t seal the gaps around your recessed lights or HVAC vents, you are wasting your money on the rest of the ceiling.
Handling Penetrations and HVAC
Lights and vents are holes in your armor.
- Recessed Lights: Standard “can” lights are noise chimneys. Replace them with surface-mounted LED pucks or build “putty pad” boxes behind them.
- HVAC Ducts: Sound travels through metal ducts easily. Use “baffled vents” or inline duct silencers to allow air to flow while forcing sound waves to bounce and die.
Frequently Asked Questions about Ceiling Soundproofing
Should I soundproof the ceiling or the floor above?
If you have access, soundproofing the floor above is almost always more effective for impact noise. Adding a high-quality rubber underlayment under the upstairs flooring stops the vibration before it ever enters the structure. However, if you don’t own the upstairs, the ceiling is your only option.
How much ceiling height will I lose?
A “drywall sandwich” will cost you about 5/8 of an inch. A full decoupled system with clips and channels will cost you about 1.5 to 2 inches. Most people find this a small price to pay for silence.
Can I use acoustic foam to block neighbor noise?
No. Foam is for echoes. It is too light to block sound. If you can blow air through a material, sound can pass through it. You need mass.
Conclusion
Finding the best way to soundproof a ceiling is about understanding the balance between mass, damping, and decoupling. Whether you are a renter sealing gaps with caulk or a homeowner installing a full floating ceiling, the physics remain the same: you must stop the vibration and block the air.
At Finance No Vax, we believe your home should be your sanctuary. While no room can ever be 100% “silent,” following these professional methods can reduce noise by 50% to 80%, finally giving you the peace you deserve.
Ready to start your project? More info about soundproofing services is available to help you choose the right path for your specific home layout. Don’t let the neighbors keep you up another night—take control of your space today.
