How to Draw a Rose From the Side With Stem, Leaves and Thorns
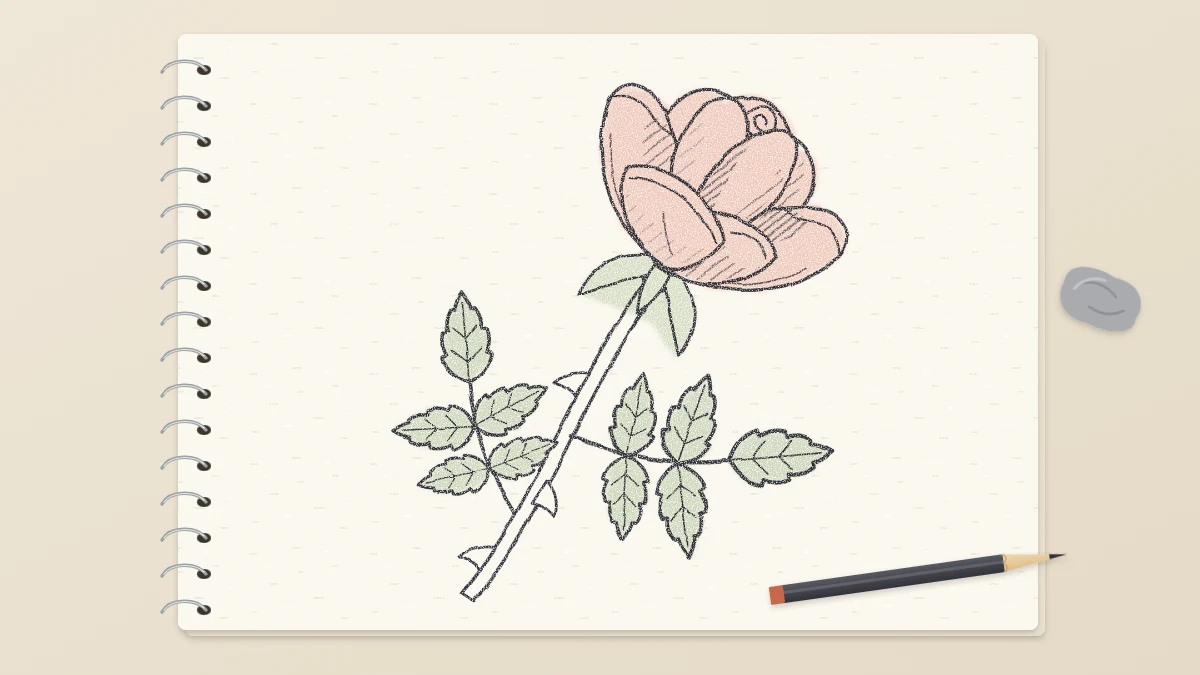
Draw the classic long-stemmed rose in profile. Build the bloom from a cup sitting in a shallow bowl, then add sepals, a curved stem, hooked thorns and a leaf of five toothed leaflets.
Tutorial at a glance
What you need
- HB pencil
- 2B pencil
- 4B pencil
- Kneaded eraser
- Pencil sharpener
- Sketchbook or drawing paper
The long-stemmed rose in profile is the version most people picture first: a bloom at the top, a curving stem, a few thorns and a leaf. Seen from the side, the spiral heart is hidden, so the drawing depends on a clear silhouette instead.
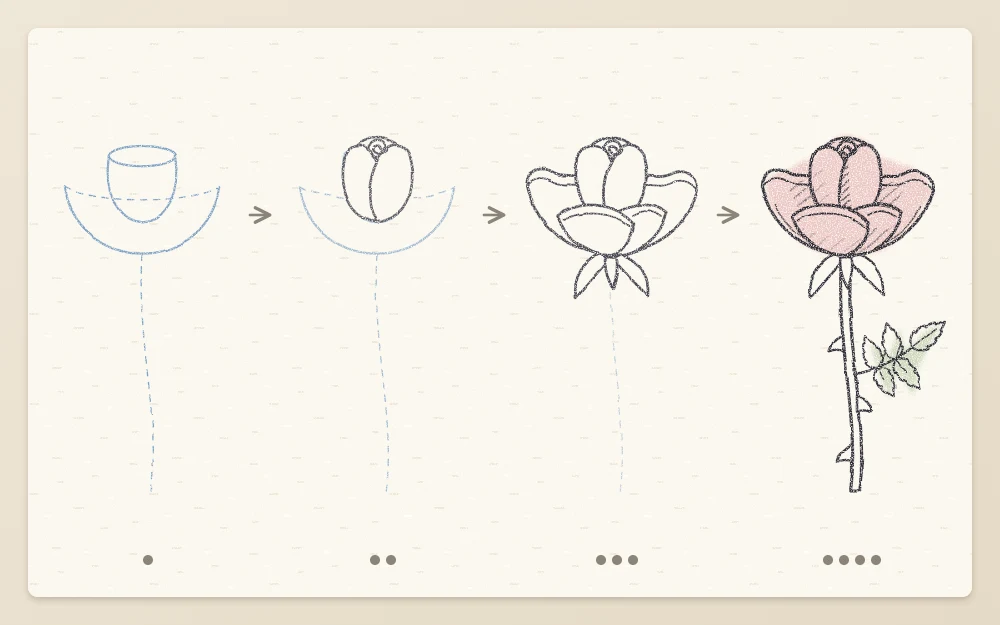
The method below for how to draw a rose from the side uses two construction shapes, a cup sitting in a shallow bowl. The cup holds the tight inner petals. The bowl becomes the outer petals that flare and roll back. The stem, thorns and leaf come after the bloom.
Step 1: Stem line, bowl and cup
- Stem line. Turn the page upright. With an HB pencil and light pressure, draw one gentle curve about 6 in (15 cm) long from the lower part of the page upward, bending slightly like a shallow letter C. The bloom sits on its top end.
- Bowl. At the top of the stem line, draw a shallow bowl: a wide curve like a smile, about 2.5 in (6 cm) across and about a third as deep as it is wide. Its lowest point rests on the stem line. Tilt it to follow the lean of the stem.
- Cup. Draw a U shape that sits inside the bowl. Make it about two thirds as wide as the bowl and about as tall as it is wide, so its bottom rests in the bowl and its upper half rises above the bowl’s rim. Close the top with a slightly curved line.
The two shapes together should look like an egg sitting in an egg cup.
Step 2: Inner petals in the cup
Switch to a 2B pencil, still pressing lightly. The cup is the closed heart of the rose.
- Wrapping line. Start at the top left corner of the cup. Draw a long S-shaped line that crosses the front of the cup and ends on its right side, about a third of the way up from where the cup meets the bowl. This is the edge of a petal wrapped across the front.
- Second edge. From the top right corner, draw a shorter curve down and to the left that stops when it meets the wrapping line. The two lines form a V-shaped opening at the top.
- Top edge. Replace the cup’s closing line with an uneven edge: two or three low overlapping humps, each a petal tip seen edge-on. Inside the V, add one small curl to hint at the rolled center.
This wrapped form is the same structure used for a rosebud and a half-open rose.
Step 3: Outer petals and sepals
The bowl now turns into three outer petals that open away from the cup.
- Front petal. Starting at the bottom of the bowl, draw a broad petal that covers the lower front of the cup. Its sides follow the bowl up, and its top edge is a wavy line that crosses the cup about a third of the way up, dipping in the middle.
- Left petal. From the base of the bowl, draw a line up along the bowl’s left side and continue it past the rim, flaring outward by about a quarter of the bowl’s width. At the tip, turn the line over and back down in a small hook, then return to the cup with an inner line. The hook is the edge rolling back.
- Right petal. Repeat on the right, a little lower and wider.
- Swelling. Under the bowl, on the stem line, draw a small rounded shape about a quarter as wide as the bowl. It joins the bloom to the stem.
- Sepals. From the top of the swelling, draw three narrow pointed sepals curving outward and down, like a small drooping star. Make each about a third as long as the bowl is wide, and let one twist at its tip.
Step 4: Stem and thorns
- Stem. Draw two lines down from the swelling, one on each side of the stem line. Keep them about an eighth of an inch (3 mm) apart at the top and let them widen slightly toward the bottom.
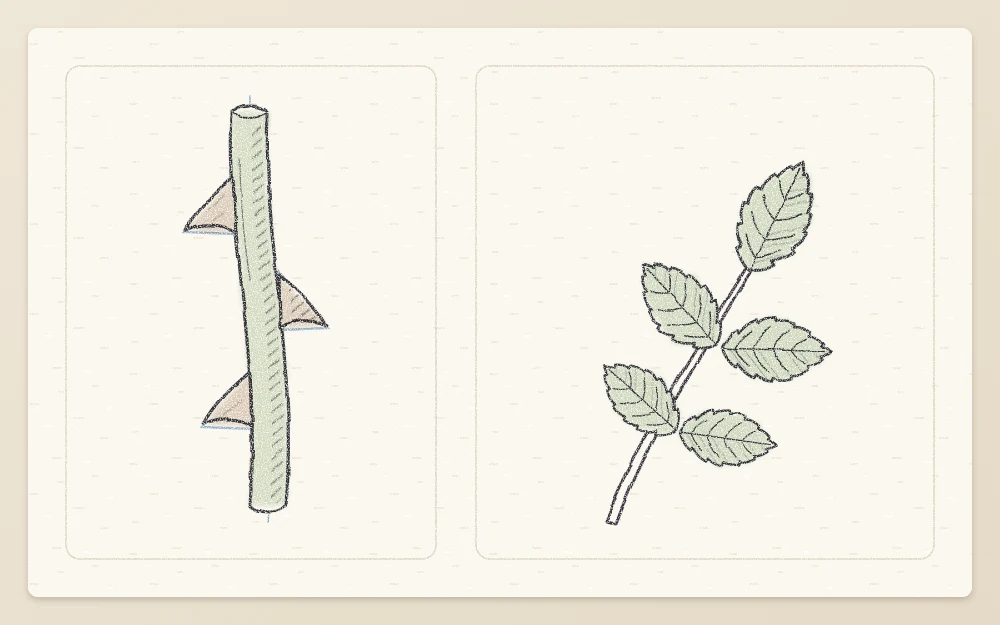
- Thorns. Add three or four thorns. Each is a small triangle with a wide base on the stem, about as long as the stem is wide, and a sharp tip that hooks slightly downward.
- Placement. Put the thorns on alternating sides with uneven gaps between them, and keep the top inch of the stem bare.
Step 5: The leaf
A rose leaf is made of several toothed leaflets, often five, on one stalk. Draw the stalk first and hang the leaflets on it.
- Joint and stalk. About halfway down the stem, mark a small bump for the joint. From it, draw a thin line angled upward and outward, about 2 in (5 cm) long.
- End leaflet. At the tip of the stalk, draw an oval with a pointed tip, about 1 in (2.5 cm) long. Give it a midrib first, then the outline on each side.
- Side leaflets. Add two pairs along the stalk, one pair just below the end leaflet and one pair lower down. Each leaflet sits opposite its partner on a very short stalk, and each is slightly smaller than the end one.
- Teeth and veins. Go around each outline with small forward-pointing notches, like a fine saw edge. Add four or five side veins angling from the midrib toward the tip.
For how rose leaves compare with those of other flowers, see the guide to matching leaf shapes to flowers.
Step 6: Clean up and finish
Lift the remaining guides with a kneaded eraser, including the stem line. Restate the contours with the 2B, heavier under the rolled petal edges and along the shadow side of the stem.
Add light hatching inside the V-shaped opening, under each outer petal where it leaves the cup, and beneath the sepals. Touch the deepest gaps with a 4B pencil, and shade one half of each leaflet along the midrib.
Common problems
- The bloom looks like a tulip. The outer petals hug the cup. Flare them past the bowl rim and roll the tips back.
- The bloom is too small for the stem. The stem should be roughly two to three times the height of the bloom.
- The leaf looks like five separate leaves. Make sure every leaflet joins the same stalk.
To turn the same flower toward the viewer, continue with the tutorial on drawing an open rose from the inside out.
Frequently asked questions
Is a side-view rose easier than a rose from the front?
Many people find it easier, because the spiral of inner petals is mostly hidden and only a handful of petal edges show. The challenge moves to the silhouette instead: the cup and bowl need good proportions, and the stem, thorns and leaf have to be drawn with care.
How many thorns should I draw on a rose stem?
Three or four is enough for a stem of this length. Place them on alternating sides with uneven spacing, and keep the stretch just under the bloom bare. Each thorn should be wide at the base and hook slightly downward. Too many evenly spaced thorns make the stem look like a zipper.
How do I draw a rose leaf correctly?
Draw one thin stalk from a joint on the stem, then attach the leaflets to it: one at the end and the others in opposite pairs below. Five leaflets is a common number. Give each a midrib, a pointed tip and a finely toothed edge, and make the end leaflet the largest.