How to Draw a Rose Step by Step
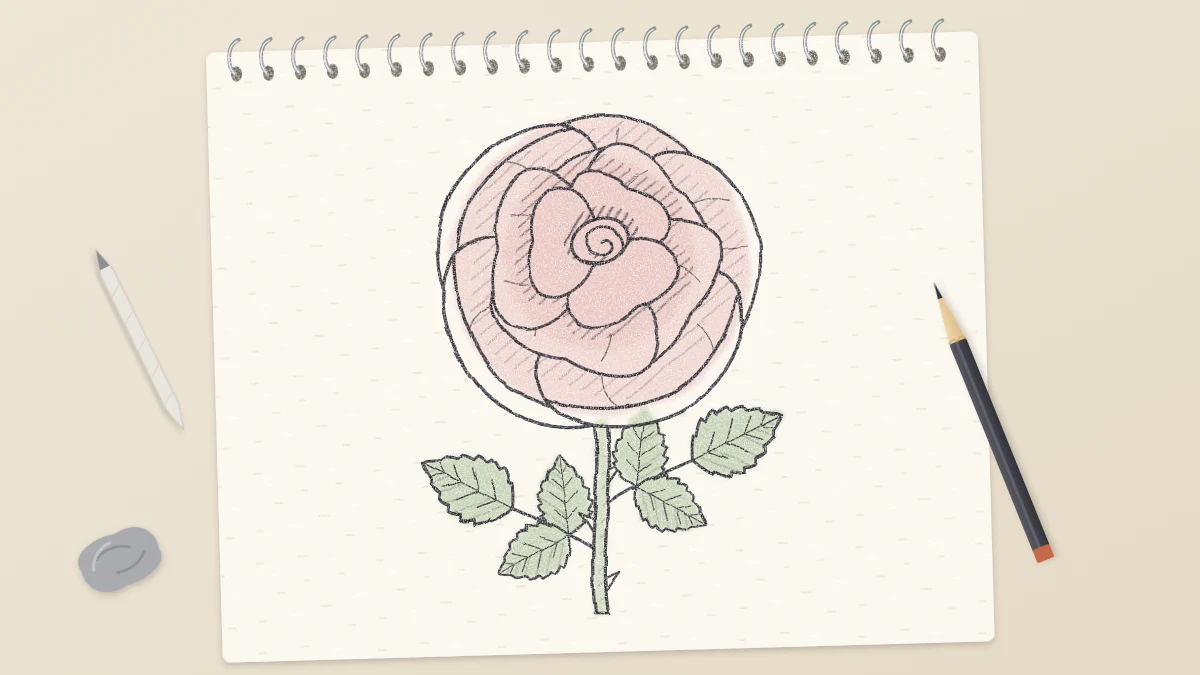
Draw an open rose from the inside out: a light circle and a small oval heart, a tight spiral, three wrapping petals, a middle ring and wide outer petals with rolled edges.
Tutorial at a glance
What you need
- HB pencil
- 2B pencil
- 4B pencil
- Kneaded eraser
- Pencil sharpener
- Sketchbook or drawing paper
A rose looks complicated because the eye tries to take in every petal at once. Drawn in the right order, it is a small spiral with petals wrapped around it in three loose rings, each ring larger and more open than the last.
This guide on how to draw a rose works from the inside out. You start with two light construction shapes, build the tight heart first, and let each new petal begin behind the one before it. The view is an open rose seen from slightly above.
Step 1: The circle and the heart
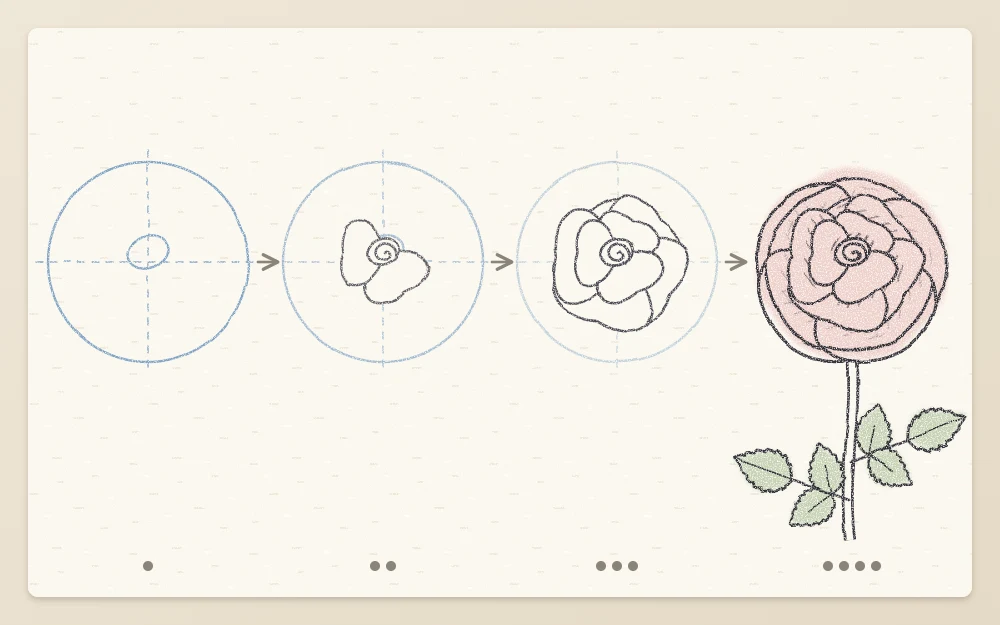
- Bloom circle. With a sharp HB pencil and very light pressure, draw a circle about 4 in (10 cm) across. It marks the outer limit of the whole rose. It does not need to be neat.
- Heart oval. Inside it, draw a small oval about a quarter of the circle’s width. Place it a little above the middle of the circle, and tilt it so its long axis leans roughly 20 degrees, like an egg lying on a slope. This is the heart, where the tightest petals sit.
Setting the heart above the middle is what gives the view from slightly above: you will see more of the front petals than the back ones.
Step 2: The spiral and the first wrapping petals
- Spiral. Switch to a 2B pencil but keep the pressure light. Starting in the middle of the heart oval, draw a tight spiral of about one and a half turns, ending at the oval’s edge. Let it be slightly squashed, like the oval itself. This is the rolled edge of the innermost petal.
- First petal. From the end of the spiral, draw a curved line that hugs the lower left of the heart oval and runs about a third of the way around it. Close it back to the heart with a short hooked line so it forms a thin crescent.
- Second petal. Start this one from behind the first petal, at about its midpoint, and wrap it around the lower right of the heart in the same way. Make it slightly wider than the first.
- Third petal. Begin behind the second petal and wrap over the top of the heart, closing the ring. Keep it the thinnest of the three, since it is at the back.
You now have a small knot of overlapping crescents about a third of the width of the bloom circle. From here on, every petal starts tucked behind the previous one.
Step 3: The middle ring
The middle ring has four or five larger petals. Each one is a wide, shallow cup shape that covers roughly a quarter of the way around the heart.
- Start at the lower left. From behind one of the small heart petals, draw a curve outward and around, reaching about halfway between the heart and the bloom circle, then back in to tuck behind where the next petal will begin.
- Begin the next petal from behind the middle of the one you just drew, so each overlaps its neighbor by about a third.
- Work your way around. Make the front petals, at the bottom of the drawing, the deepest: about as tall as the heart is wide. Make the back petals, at the top, narrow slivers about half that.
- Give each top edge a small dip or bump instead of a smooth arc. Real petal edges are slightly irregular, and no two should match.
If the forms of cupped and overlapping petals are new to you, the guide on drawing flat, cupped and overlapping petals explains them one at a time.
Step 4: The wide outer petals
Three to five outer petals finish the bloom. They are the largest, they open flat, and their edges roll back.
- Front petal. Starting behind a middle-ring petal at the lower left, draw a broad curve that swings out to touch the bloom circle at the bottom and returns behind the middle ring at the lower right. It should span nearly a third of the circle.
- Side petals. Add one on each side, each starting behind the front petal’s end. Let them reach the circle at the left and right.
- Back petals. Add one or two across the top. Only their upper edges show, as shallow arcs just inside the circle.
- Rolled edges. On two or three of these petals, draw a second line just inside the outer edge, starting at the edge, drifting inward by about the width of your pencil, and rejoining the edge after an inch or so. This thin lens shape is the lip of the petal curling back toward you.
Let one petal push slightly past the bloom circle and another stop short of it.
Common mistake
Drawing the petals as a row of matching scallops around the center. Change the width of every petal and stagger where each one starts, so the gaps in one ring fall behind the petals of the next.
Step 5: Clean up and shade
Press a kneaded eraser over the bloom circle and any leftover part of the heart oval to lift them. Then restate the contours with the 2B, pressing harder where one petal passes under another and more lightly on the outer edges that catch the light.
Shading a rose follows one rule: the darkest values go deep between the petals.
- With the 2B, lay light hatching at the base of each petal, where it disappears behind its neighbor. Follow the curve of the petal.
- Darken the gaps around the spiral and between the heart petals with a 4B pencil. These narrow wedges are the darkest places in the drawing.
- Add a thin shadow under each rolled edge.
- Leave the tops of the petals and the rolled lips as plain paper.
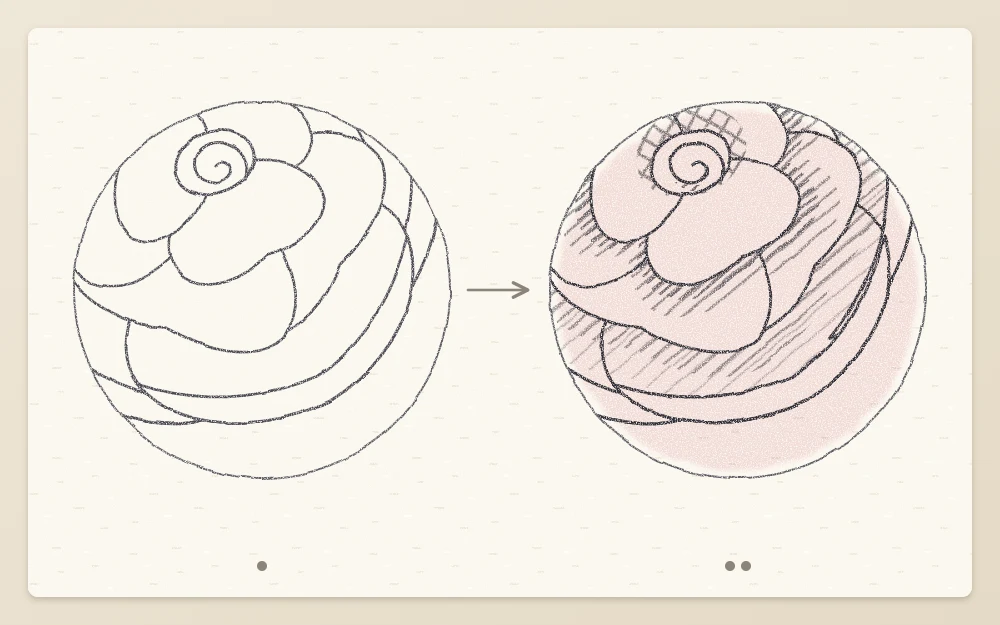
That is enough for a finished rose. For light direction, value scales and soft blending, see the guide on shading flowers with pencil.
Common problems
- It looks like a cabbage. The petals are all the same size. Keep the heart small and tight and let the outer petals be much wider.
- It looks flat. The heart is in the exact middle. Move it up a little and make the back petals thinner than the front ones.
- The outline is stiff. Break the smooth arcs with small dips, and vary the line weight.
Once the open bloom feels comfortable, the simpler closed forms make good companions on the same page. The next tutorial shows how to draw a rosebud and a half-open rose.
Frequently asked questions
Why start a rose from the center instead of the outline?
Each rose petal overlaps the one inside it, so the inner petals decide where the outer ones can go. Starting with the spiral and working outward means every new petal has something to tuck behind. Starting from the outline usually leaves an awkward empty space in the middle.
How many petals should I draw on a rose?
For this method, about ten to thirteen visible shapes is plenty: a spiral, three small wrapping petals, four or five in the middle ring and three to five outer petals. Adding more tends to clutter the heart. Varied sizes matter much more than the exact number.
My rose looks flat. What should I change?
Check two things. First, the heart should sit slightly above the middle of the bloom, with thin petals behind it and deeper ones in front. Second, the shading should be darkest in the narrow gaps between petals, with the upper surfaces and rolled edges left light.