How to Shade Flowers With Pencil: Light, Form and Soft Petals
A five-step method for shading flowers in pencil: choose one light direction, build a value scale, hatch along each petal, darken the overlaps and keep the highlights clean.
Tutorial at a glance
What you need
- HB pencil
- 2B pencil
- 4B pencil
- Kneaded eraser
- Blending stump (optional)
- Scrap sheet of paper
- Sketchbook or drawing paper
A clean outline tells you where each petal is. Value, meaning how light or dark a tone is, tells you which way the petal bends. If your flowers look like flat cutouts, the outline is usually fine and the tones are the missing part.
Learning how to shade flowers comes down to a few decisions made in a set order: where the light comes from, how many tones you will use, which direction your pencil strokes travel, and where the darkest darks belong. The steps below use one simple five-petal flower so you can concentrate on the shading alone.
What to Set Up First
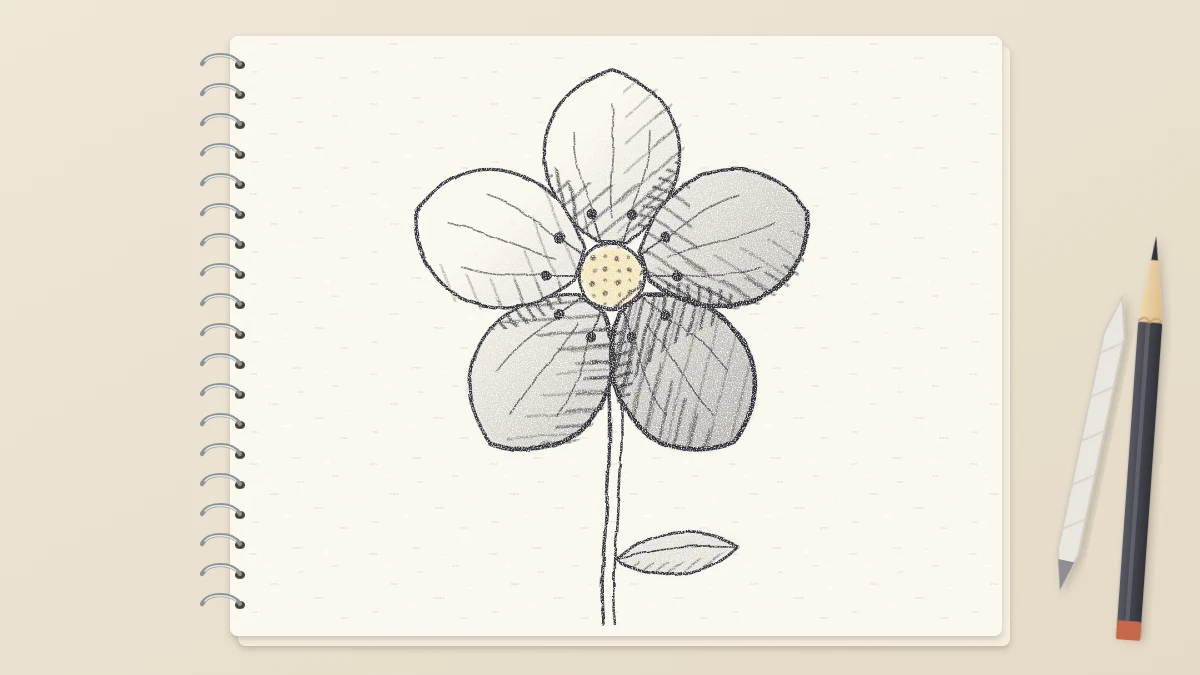
Start with a light drawing to shade. With an HB pencil and very little pressure, draw a guide circle about 4 in (10 cm) across and a small center circle about a fifth as wide. Fit five rounded petals between the two circles, 72 degrees apart, letting each petal overlap its neighbor on one side. Go over the contours once with a 2B, then lift the construction shapes with a kneaded eraser. If your outlines are still scratchy, work through the guide to clean contours and line weight before you add tone.
Lay a scrap sheet of paper under your drawing hand. It keeps the side of your palm from dragging graphite across finished areas, which is the usual cause of gray smudges.
Step 1: Pick One Light Direction
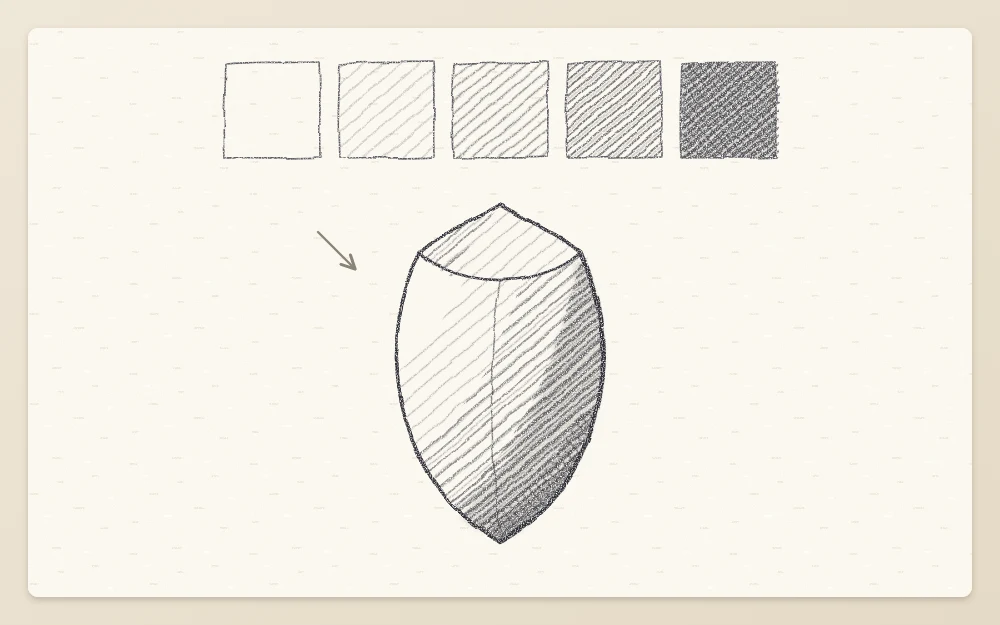
Decide where the light comes from and keep it there for the whole drawing. Upper left is a comfortable choice. Draw a small, faint arrow in the corner of the page as a reminder.
Now every petal has a simple logic. Surfaces that face the arrow stay light, surfaces that turn away get darker, and anything hidden under another petal is darker still.
Step 2: Build a Five-Step Value Scale
Beside the flower, draw a row of five squares, each about the width of your thumbnail. This is your range for the drawing.
- Leave the first square as bare paper. This is your lightest value.
- Fill the second with one layer of light, even hatching using the 2B, barely pressing.
- Give the third square two layers, the second laid at a slight angle to the first.
- Give the fourth three or four layers with a little more pressure.
- Fill the fifth with a 4B, layered until it is clearly the darkest square.
Squint at the row. Each square should be a visible step darker than the one before it.
Step 3: Shade Each Petal Along Its Length
The direction of your strokes matters as much as their darkness. Strokes that run from the base of a petal toward its tip, bending the way the petal bends, make the surface look curved. Strokes that cut straight across make it look like a flat striped shape.
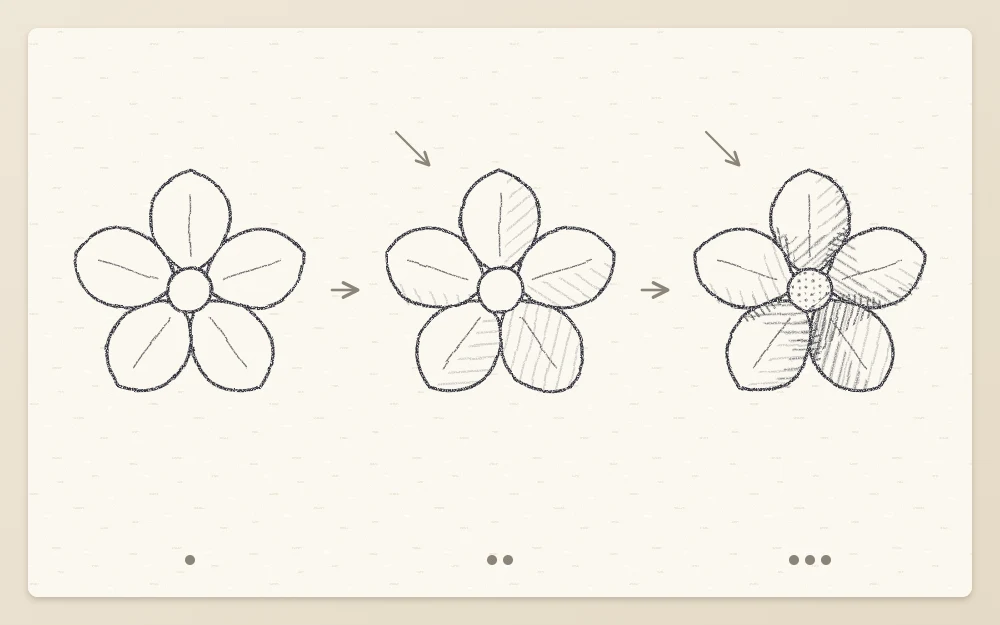
- On each petal, find the side that faces away from your light arrow. That is the shadow side.
- With the 2B, start at the base of the petal, next to the center circle, and pull a light stroke about two thirds of the way toward the tip, following the curve of the nearest edge. Lift the pencil as you finish so the stroke fades out.
- Lay more strokes beside it, covering roughly the shadow half of the petal. Match the second square of your scale.
- Leave the light half and the whole tip untouched for now.
Do this for all five petals before going darker anywhere. Petals on the lit side of the flower get only a narrow band of tone; petals on the far side get tone across most of their width. If a petal cups or folds, the article on drawing flat, cupped and curled petals shows where its surface turns, which is where your tone should change.
Step 4: Darken the Overlaps and the Center
A flower looks layered when small, dark shapes sit in exactly the right places.
- Where a petal tucks under its neighbor: add a second and third layer in a narrow wedge right against the edge of the petal on top, fading out within about a quarter of the petal’s width. This is the fourth value on your scale.
- Near the center: darken the base of every petal in a short band around the center circle, strongest on the shadow side.
- The deepest corners: switch to the 4B and place a few small accents where two petals and the center meet. Keep these marks tiny. They are the fifth value, and a little goes a long way.
Common mistake
Pressing hard to get a dark tone in one pass. Heavy pressure flattens the paper’s surface, leaves a shine and is very hard to lift. Three light layers give a deeper, smoother dark than one heavy one.
Step 5: Protect the Lights, Then Soften or Leave the Hatching
Check that the petal tips, and any ridge that runs down the middle of a petal, are still bare paper. If tone has crept over them, pinch the kneaded eraser into a thin edge and press it straight down on the spot to lift the graphite. Do not rub.
You now have two honest finishes to choose from:
- Soft: stroke a blending stump along each petal, in the same base-to-tip direction as your hatching, working from the light areas toward the dark ones so you do not drag dark graphite into the highlights.
- Textured: leave the hatching visible. Tidy strokes that follow the petal read as form on their own and keep the drawing crisp.
Finish by restating the darkest accents once more with the 4B, since blending tends to gray them out.
Common Problems and Quick Fixes
- Everything is the same mid gray. Compare the drawing with your scale. You probably have no bare paper and no fifth value. Lift some lights and deepen the overlaps.
- Petals look dirty, not shaded. The strokes are running in mixed directions. Re-lay them from base to tip.
- Shadows on both sides of the flower. Look at your arrow again and lighten the side that faces it.
Where to Use It Next
The same order works on any flower: light direction, light layer along the petals, dark overlaps, protected highlights. Flowers with many layers reward it most, so a good next subject is the step-by-step guide to drawing an open rose, where the darkest tones sit deep between the petals. Expect the first few attempts to look heavy or patchy; evenness usually improves with practice.
Frequently asked questions
Which pencil is best for shading flowers?
A 2B covers most of the work because it can go from a pale gray to a fairly deep tone depending on how many layers you add. Keep an HB for the light first drawing and a 4B for the few darkest accents where petals tuck under each other or meet the center.
Do I have to blend my shading?
No. Blending with a stump gives a soft, smooth petal, while visible hatching gives a crisper, more graphic drawing. Both work as long as the strokes follow the length of the petal. Many people blend the large soft areas and leave a few clean strokes near the edges.
Why does my shading look smudged and gray?
Usually the side of your hand has dragged graphite across the page, or the highlights have been covered. Rest your drawing hand on a scrap sheet, work from the top of the page downward where you can, and lift the petal tips back to white by pressing with a kneaded eraser.