Flower Proportions: How to Measure and Keep Petals Even
How to measure a flower before you draw it: compare the center with a petal, mark the outer limit, space petals like a clock face and adjust the guides when the flower tilts.
A flower can have beautiful petals and still look wrong. The center drifts to one side, the petals on the left are fat and the ones on the right are squeezed, or the last petal has nowhere to go. None of that is a problem with your line. It is a measuring problem, and it is solved before the first petal is drawn.
Getting flower proportions right means answering a few questions in light pencil first: how big is the center compared with a petal, where do the petals stop, and how are they spaced around the middle? A minute of marking with an HB pencil answers all three.
Why Flowers Come Out Lopsided
Most uneven flowers are drawn one petal at a time, clockwise. Each petal is judged only against its neighbor, so small errors add up, and the last gap is either too wide or too narrow.
The fix is to work from large to small: outer limit first, center second, a few key petals third, and everything else fitted between them. If lopsidedness is only one of several things bothering you, the list of common beginner problems and their fixes covers the rest.
Compare the Center With a Petal
Every open flower has one ratio that sets its character: the width of the center against the length of a petal. Look at your flower, or at a photo you took yourself, and ask how many center widths fit along one petal.
- If a petal is about one and a half times as long as the center is wide, the flower looks like a daisy.
- If the center is nearly as wide as the petals are long, the flower looks heavy-headed, like a sunflower.
- If the center is tiny and the petals are several times longer, the flower looks light and open.
Say the ratio to yourself, then build it into the guides in the next step.
Mark the Outer Limit First
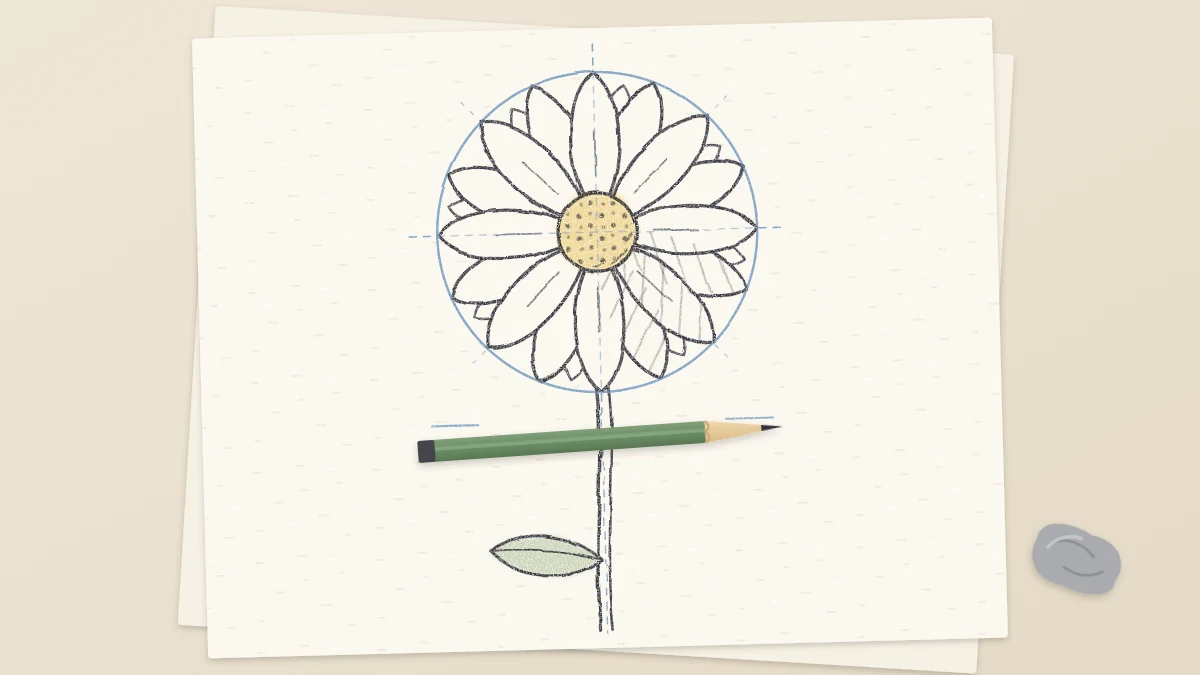
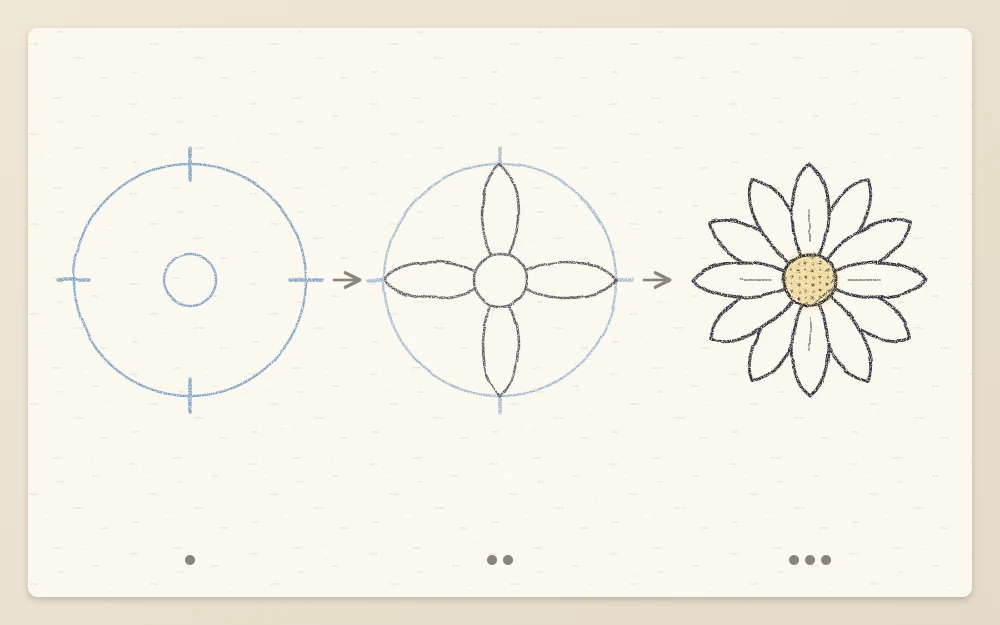
With an HB pencil and very light pressure, draw a circle for the petal tips. This is the outer limit: no petal crosses it, and most petals touch it. Then draw the center as a smaller circle in the exact middle, sized by the ratio you just worked out. For a daisy-like flower in a circle 4 in (10 cm) across, the center is about 1 in (2.5 cm) wide.
To find the middle, draw a faint vertical line and a faint horizontal line through the big circle so they cross at right angles. The crossing point is the center of the flower, and the four ends of the lines become your first petal positions. If you are unsure which construction shape suits your flower at all, the guide to circles, cups, cones and bells sorts that out.
Space the Petals Like a Clock Face
Think of the guide circle as a clock. Placing petals at a few fixed hours first means every later petal has a measured space to fit into.
- Make four small tick marks on the outer circle at 12, 3, 6 and 9 o’clock, where your cross lines touch it.
- Draw one petal on each mark, running from the edge of the center circle out to the tick. Check that all four are the same width before going on.
- Each gap between two petals is now a quarter of the circle. Place one petal exactly halfway across each gap. You now have eight petals, evenly spaced.
- If the flower needs more, put one petal in the middle of each remaining gap for sixteen.
For flowers with five or six petals, the same idea works with different marks. Five petals sit 72 degrees apart, so place one at 12 o’clock and the others a little past 2, a little before 5, a little past 7 and a little before 10. Six petals sit 60 degrees apart, on the even hours: 12, 2, 4, 6, 8 and 10.
Use Your Pencil as a Sighting Tool
When you draw from a real flower, your pencil can measure it. The method is simple, but it only works if you keep your arm in the same position each time.
- Hold the pencil upright at arm’s length with your elbow locked, and close one eye.
- Line up the tip of the pencil with one edge of the flower’s center.
- Slide your thumb along the pencil until it lines up with the other edge. The distance from tip to thumb is your unit: one center width.
- Without moving your thumb, turn the pencil to lie along a petal and count how many units fit. One and a half? Two?
You are not copying that distance onto the paper. You are collecting a ratio, which you then apply at whatever size you are drawing.
Relate the Flower Head to the Stem
Measure the stem in flower heads. Sight the width of the head on your pencil, then count how many of those fit along the visible stem.
On the page, mark the bottom of the stem with a small dash before you draw it, so you know the whole plant fits. Real plants vary a great deal, so trust what you measure over any rule.
When the Flower Tilts: Circle to Ellipse
A flower facing you fits a circle. Tilt it away and that circle becomes an ellipse: the width stays the same and the height shrinks.
Draw the ellipse lightly, then draw the center as a smaller ellipse with the same squashed proportions. Space the petals with the clock method as before, but let the ellipse set their lengths. Petals at 3 and 9 o’clock, along the long axis, keep nearly their full length. Petals at 12 and 6, pointing toward the back and the front, look much shorter. That shortening is called foreshortening.
Common mistake
Drawing a tilted flower with full-length petals all the way around a squashed center. The center and the outer limit must tilt together, or the flower looks bent in the middle.
A One-Minute Check Before You Draw Petals
- Is the center where the cross lines meet?
- Does the center-to-petal ratio match the flower you are looking at?
- Are the first four petals the same width?
- Will the stem fit on the page?
If all four answers are yes, press on with a 2B. To put the whole routine to work on a real subject, follow the step-by-step daisy tutorial, which uses two circles and the clock method from the first line.
Frequently asked questions
How do I keep the center of a flower in the middle?
Draw the outer guide circle first, then cross it with one light vertical and one light horizontal line. Where they meet is the middle, so build the center circle around that point. Checking that the gap between the two circles is equal on all four sides catches most drifting centers.
How do I space five petals evenly?
Five petals sit 72 degrees apart. Put the first at the top of the guide circle, then place the next two a little below the halfway line on each side, and the last two near the bottom with a gap between them. Mark all five with ticks and compare the gaps before drawing any petal.
Do I need a ruler or compass to get proportions right?
No. Light freehand circles and tick marks are enough, because the aim is even spacing by eye, not mechanical accuracy. Your pencil held at arm's length works as a measuring stick for comparing one part with another. Slightly irregular guides often give a more natural flower than ruled ones.