
How to Choose the Right Glue for Your Acoustic Tiles
Why Picking the Wrong Acoustic Foam Tile Adhesive Can Ruin Your Walls (and Your Foam)
Acoustic foam tile adhesive is the hidden variable that determines whether your soundproofing project lasts for years or falls off the wall in weeks.
Quick answer — best acoustic foam tile adhesives by use case:
| Use Case | Best Adhesive Type | Example |
|---|---|---|
| Permanent wall install | Spray adhesive | Foamtak™ |
| Large panels on drywall | Tube adhesive (water-based) | SONEX acouSTIC PA-02 |
| DIY / no-mess install | Double-sided gel squares | Foroomaco Mini Ear Tape |
| Ceiling tiles | Purpose-built tile adhesive | Titebond AcoustiGum |
| Temporary / removable | Heavy-duty Velcro or command strips | Various |
Not all glues play nicely with acoustic foam. Some solvent-based construction adhesives can actually dissolve the foam on contact. Others bond so permanently that removing panels later tears chunks out of your drywall.
For a busy home office worker, that’s a real problem. You want a quiet space — fast — without trashing your walls in the process.
The good news: there are adhesives built specifically for acoustic foam, in several formats, at prices ranging from a few dollars to around $30 per can or tube. Knowing which one fits your surface, your panel size, and your setup makes the whole job straightforward.
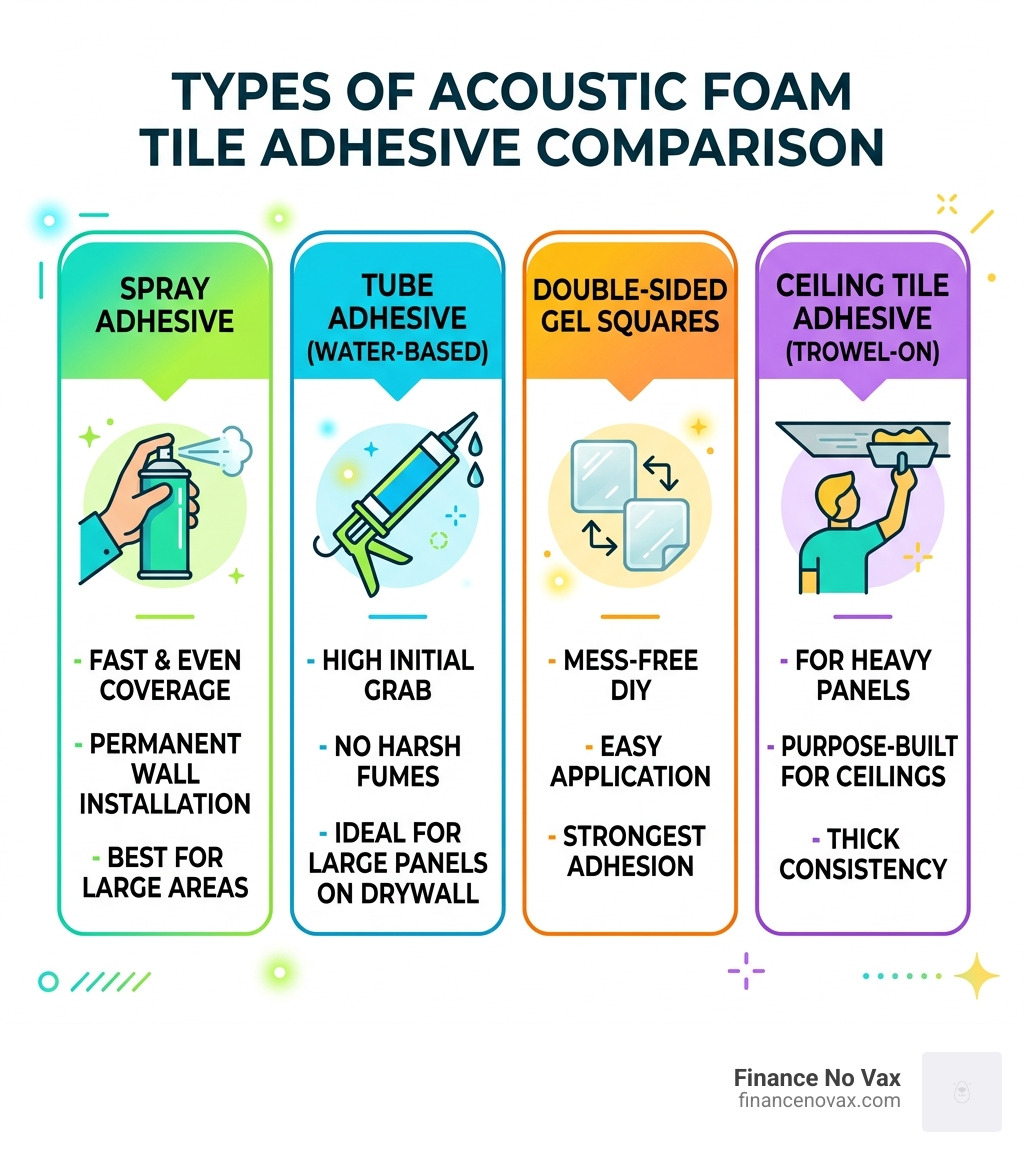
Handy acoustic foam tile adhesive terms:
Comparing the Best Types of Acoustic Foam Tile Adhesive
When we look at the market in April 2026, the sheer number of options can be overwhelming. A quick search on major retailers like Walmart shows over 51 different products listed under the acoustic adhesive category. To make sense of it all, we generally group these into four main categories: spray, tube (liquid), gel squares, and self-adhesive panels.
Spray Adhesives: The Speed Demon
If you are treating a large room, spray adhesives are often the preferred choice. A product like Foamtak™ Adhesive Spray is widely considered the fastest way to mount foam. It provides a wide, even coverage that prevents the “sagging” often seen with heavy liquid glues.
- Pros: Extremely fast application; covers up to 96 square feet per can; non-oxidizing formula.
- Cons: Can be messy if you don’t mask off your floors; generally permanent (very hard to remove without wall damage).
Polyurethane and Water-Based Tube Adhesives
These are applied using a standard caulking gun. They are thick, heavy-duty, and designed for permanent bonds on diverse surfaces like concrete or metal.
- Water-based (like SONEX acouSTIC PA-02): Low odor, easy water cleanup, and zero VOCs. Great for indoor air quality.
- Polyurethane (like PL Premium): Three times stronger than standard glue. Once this sets (usually in 24 hours), you’d need a “troupe of bodybuilders” to get it off.
Double-Sided Gel Squares and Tabs
For the DIYer who hates the idea of sticky sprays or heavy tubes, double-sided gel squares have become a revolution. These are often 1mm thick acrylic gel tabs that fill the “pores” of the acoustic foam to create a physical bond.
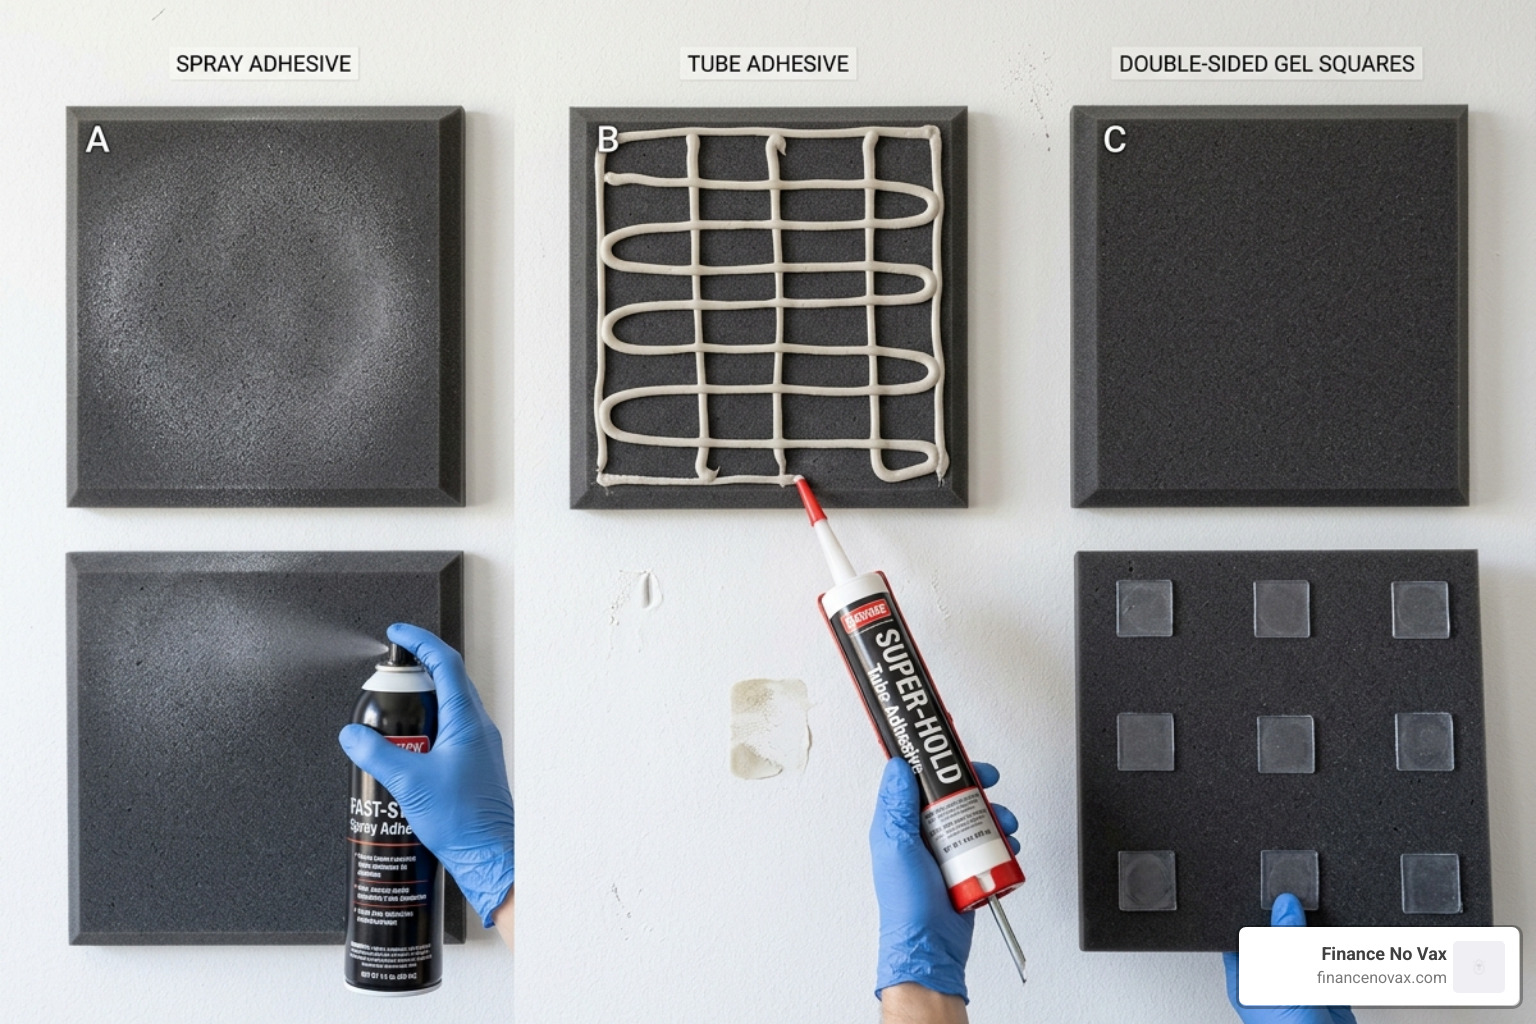
| Adhesive Type | Coverage | Best Surface | Permanent? |
|---|---|---|---|
| Spray (Foamtak) | ~96 sq. ft. / can | Drywall, Wood | Yes |
| Tube (acouSTIC) | ~16-24 sq. ft. / tube | Concrete, Metal, Gypsum | Yes |
| Gel Squares | ~75 panels / pack | Smooth Drywall, Glass | Semi-Permanent |
| Construction Glue | ~22 linear ft. / tube | Masonry, OSB | Extremely Permanent |
Calculating Your Acoustic Foam Tile Adhesive Needs
One of the biggest mistakes we see in studio setups is underestimating how much glue is actually required. If you use too little, the panels will peel at the corners. If you use too much, you’re just wasting money.
Based on industry standards for SONEX and Auralex products, here is a breakdown of what you’ll need for common panel sizes:
- 24″ x 24″ Panels: On standard gypsum board (drywall), you should plan for 0.33 to 0.5 tubes of liquid adhesive per panel. If you are mounting onto corrugated metal, that number jumps to 1.5 tubes per panel because of the uneven surface.
- 24″ x 48″ Panels: These larger panels require roughly 0.5 to 0.66 tubes on drywall.
- 48″ x 48″ Panels: Plan for 1 to 1.5 tubes per panel.
- Large 48″ x 96″ Sheets: You will need 2.5 to 3 full tubes to ensure the weight is supported.
If you are looking for a more cost-effective approach for a home setup, check out the ultimate guide to budget friendly soundproofing panels and foam to see how adhesive costs factor into your total budget. Generally, one 10.5-ounce tube of acoustic foam tile adhesive will cover approximately 16 to 24 square feet of wall panels.
Choosing Between Liquid Glue and Acoustic Foam Tile Adhesive Squares
Why not just use regular double-sided tape? We get this question a lot. The problem is that acoustic foam is “thirsty.” Because it is a porous, open-cell material, generic thin tapes often have their glue absorbed into the foam, leaving nothing to stick to the wall.
This is where specialized products like Acoustic Foam Mounting Tape (300 Pcs) – Heavy Duty Double Sided Squares | Foroomaco come in. These are designed with a 1mm thick acrylic gel. This thickness is crucial because it physically fills the pores of the foam, creating a “rock-solid” bond.
Another benefit of these squares is the “Mini-Ear” tab design. If you’ve ever spent three hours trying to peel the backing off 200 tiny squares of tape, you know the pain. These tabs allow you to grab and peel instantly, saving your fingernails and your sanity.
- Use Liquid Glue if: You are mounting heavy bass traps, working on a ceiling, or sticking foam to rough concrete.
- Use Adhesive Squares if: You are mounting standard 12×12 pyramid or wedge foam on smooth painted drywall and want a cleaner installation.
Application Techniques for a Professional Finish
You have the foam. You have the acoustic foam tile adhesive. Now, how do you actually put them together?
The “60-Second Rule” for Sprays
If you are using a spray like Foamtak, the most important step is waiting. After you spray the back of the foam and the wall, you must wait 60 to 90 seconds for the adhesive to become “tacky.” If you press the foam onto the wall immediately, it will slide down. We recommend testing the tackiness with your knuckle; if it feels like a sticky post-it note, you’re ready.
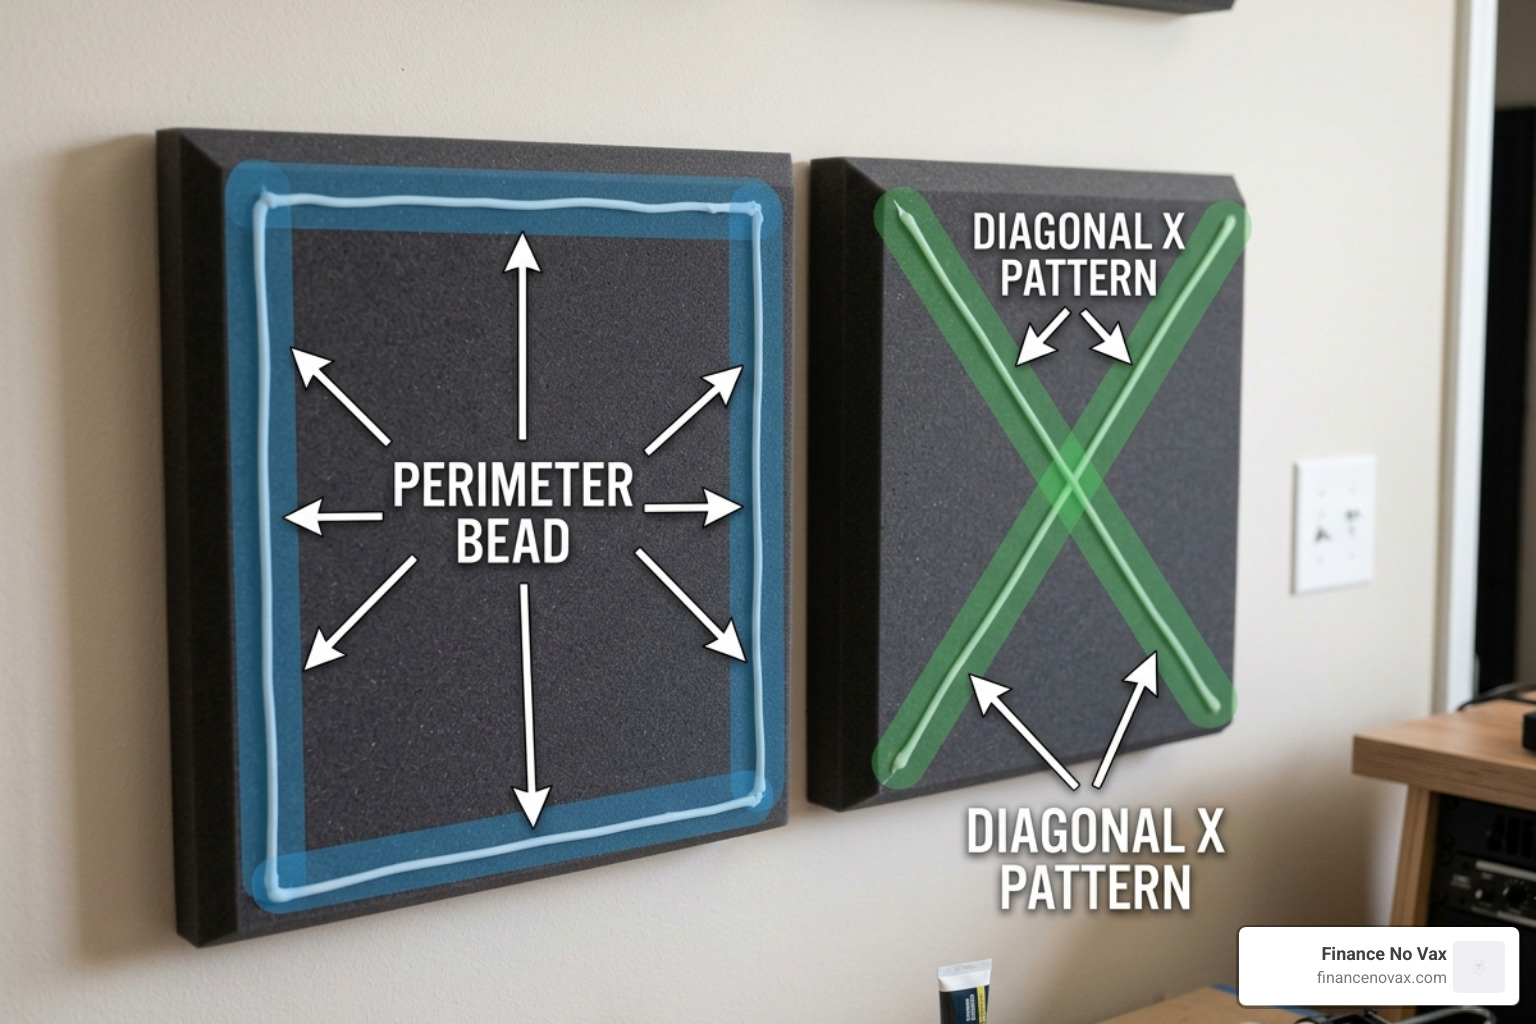
The Perimeter and “X” Pattern
For tube adhesives, don’t just glob it in the middle.
- Perimeter Bead: Run a continuous 1/4-inch bead of adhesive around the edge of the panel, about 1.5 inches in from the side.
- The X-Pattern: Run two diagonal beads from corner to corner, forming an “X.”
- Press and Smooth: Press the panel firmly against the wall and smooth it out with your hands to ensure the adhesive flattens and grips the surface.
For more detailed walkthroughs, we have a master your studio sound with this acoustic foam installation guide and a specific piece on how to install acoustic wall panels like a sound engineer.
Surface Compatibility and Safety Standards
Before you start squirting glue everywhere, we need to talk about what you’re sticking it to.
- Drywall/Gypsum: The most common surface. Most water-based and spray adhesives work perfectly here.
- Concrete and Masonry: These surfaces are porous and often cold/damp. You will need a heavy-duty polyurethane adhesive like PL Premium for a lasting bond.
- Metal: Requires an adhesive that can handle temperature fluctuations, as metal expands and contracts more than wood.
Safety and Certifications
In 2026, air quality is a major focus for home studios. Many traditional glues contain high levels of Volatile Organic Compounds (VOCs) that can cause headaches in small, unventilated rooms.
We recommend looking for adhesives that are VOC-compliant and contribute to LEED EQ Credit 4.1. For example, TITEBOND ACOUSTICAL CEILING TILE CONSTRUCTION ADHESIVE is a professional-grade choice that is non-flammable and has no offensive odor. This is vital because why studio foam insulation is the secret to professional audio often involves spending long hours in these treated spaces. You don’t want to be breathing in toxic fumes while you’re trying to mix a track.
Additionally, check for regional restrictions. Some polyurethane-based foams and adhesives cannot be shipped to California due to Prop 65 or other state-specific environmental regulations.
Frequently Asked Questions about Acoustic Foam Installation
Will regular construction adhesives damage my foam?
It depends on the base of the glue. Many “all-purpose” construction adhesives (like older versions of Liquid Nails) are solvent-based. These solvents can cause a chemical reaction that “eats” or oxidizes the acoustic foam, leaving you with a melted, gooey mess.
Always look for water-based or specialized foam-safe options. A safe bet is the acouSTIC Adhesive – 10.5-oz Tube, which is specifically formulated to be non-toxic and non-corrosive to melamine and polyurethane foam.
Can I mount acoustic foam tiles temporarily?
Yes, but it takes a bit more planning. If you are in a rental and need to avoid wall damage, direct gluing is your enemy. Removing glued foam usually results in the foam tearing and the wall’s paper layer coming off.
Instead, try these “renter-friendly” methods:
- Command Strips: Work well for light 12×12 foam, but you may need several per tile.
- Velcro: Apply one side to the wall and one to the foam. This allows you to reposition panels easily.
- The Wood Backing Method: Glue your foam panels to a thin sheet of plywood or MDF, then hang that “acoustic board” on the wall using standard picture hooks or screws. This keeps your foam intact and leaves only a few small holes in the wall.
For those on a tight budget, you can find more tips in the best studio acoustic foam tiles and panel sets for every budget.
How long does the adhesive take to cure?
Most acoustic foam tile adhesive products have a “working time” of about 15 to 30 minutes, meaning you can still move the panel around if you didn’t get it quite straight.
However, a full cure usually takes 24 to 72 hours. Factors like high humidity or cold temperatures (below 50°F) can significantly slow this down. Products like HENRY 237 AcoustiGum Acoustical Ceiling Tile Adhesive are popular because they offer a fast initial grab, which is essential for ceiling work where gravity is working against you.
Conclusion
Choosing the right acoustic foam tile adhesive is the difference between a professional-looking studio and a DIY disaster. Whether you opt for the speed of a spray like Foamtak, the brute strength of a polyurethane tube, or the convenience of gel squares, the key is matching the adhesive to your specific surface and your long-term goals.
At Finance No Vax, we want to ensure your soundproofing journey is as smooth as possible. Remember to always clean your walls before application, respect the “tack time” of your sprays, and choose VOC-compliant products to keep your workspace healthy.
For more deep dives into the tools and materials that make a professional sound possible, explore our full range of guides at https://financenovax.com/category/materials/. Happy mounting!
