How to Draw a Poinsettia: A Winter Flower Made of Leaves
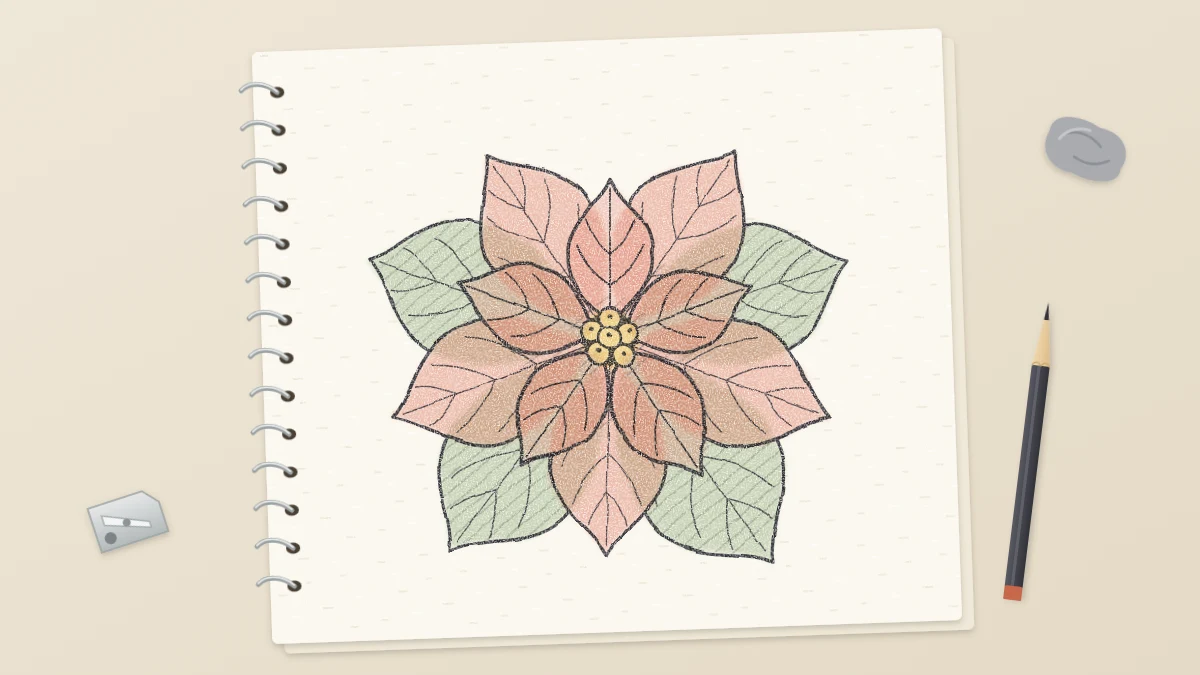
Draw a poinsettia from the middle outward: a cluster of small round buds, a star of pointed bracts, a larger star behind it in the gaps, and a few green leaves underneath.
Tutorial at a glance
What you need
- HB pencil
- 2B pencil
- 4B pencil
- Kneaded eraser
- Pencil sharpener
- Sketchbook or drawing paper
- Colored pencils (optional)
A poinsettia is the rare flower drawing that is mostly leaves. That makes it friendlier than it looks: if you can draw one pointed leaf with a center vein, you can draw the whole plant by repeating that shape in two layers.
This guide to how to draw a poinsettia works from the middle outward, seen from above. A small cluster of buds comes first, then a star of short bracts, then a larger star behind it, and finally a few green leaves underneath. It suits a sketchbook page or the front of a handmade winter card.
What you are actually drawing
The showy red parts of a poinsettia are not petals. They are colored leaves called bracts. The true flowers are the tiny round buds clustered in the middle.
For drawing, this means two things. Every large shape is a leaf, with a center vein and side veins. And the center is a small group of separate round forms, not a single disc.
Step 1: guide circle and center cluster
- With an HB pencil and very light pressure, draw a guide circle about 5 in (13 cm) across. It does not need to be neat; it only sets the size of the plant.
- In the middle, draw a cluster of five to seven small circles, each about the size of a pea. Group them tightly so some overlap, with one or two in front. The whole cluster should be about one-sixth as wide as the guide circle.
- Inside each small circle, add a tiny dot or a short curved mark near the top.
Step 2: the first star of bracts
The first layer is five pointed bracts, spaced 72 degrees apart like the arms of a star, with one pointing straight up.
- From the edge of the center cluster, draw five light center lines outward. Each should reach about two-thirds of the way to the guide circle.
- Around each center line, draw a pointed leaf shape. Start at the cluster, swell outward until the bract is widest about one-third of the way along, at roughly half as wide as it is long, then narrow in a long taper to a sharp tip.
- Let neighboring bracts touch or overlap slightly near the center, so no white gap shows around the buds.
Five gives the clearest star. For a fuller plant, use six bracts spaced 60 degrees apart instead.
Step 3: the second, larger star
The second layer sits behind the first and fills its gaps.
- Find the midpoint of the gap between each pair of first-layer bracts. From there, draw a center line outward all the way to the guide circle.
- Build a bract around each line as before, but larger: its tip touches the guide circle and its widest part is about one and a half times the width of a first-layer bract.
- Draw only the parts you can see. Each back bract emerges from behind the two front bracts beside it, so its lines start at their edges, not at the center.
Turn one or two tips a little to the side and make one bract slightly shorter than the rest. Small differences keep the star from looking stamped.
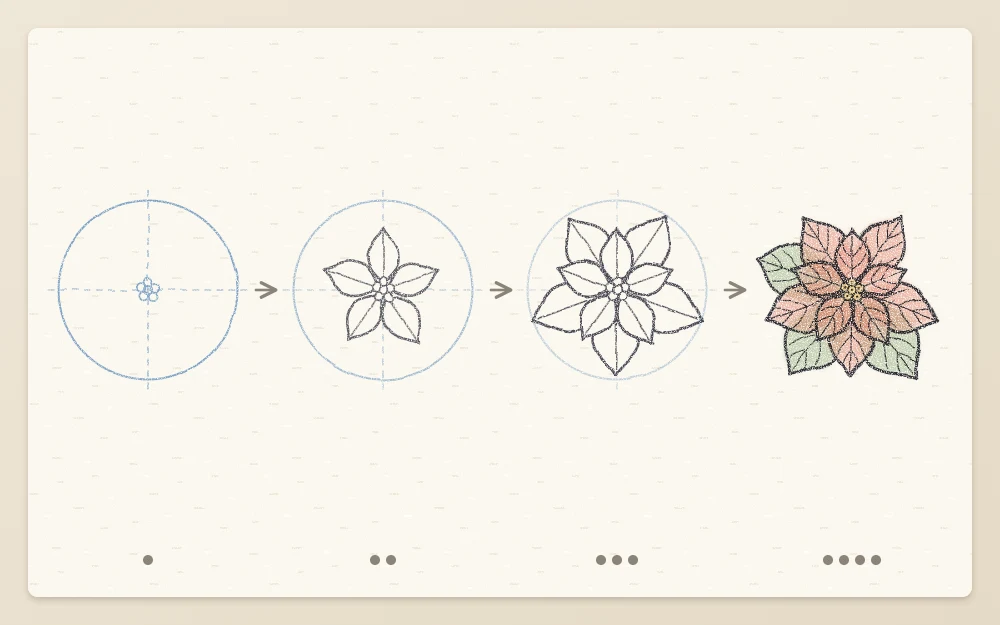
Step 4: veins and wavy edges
Switch to a 2B pencil and finish one bract at a time, starting with the front layer.
- Redraw the center vein from base to tip as one confident line, pressing a little harder near the base.
- Add four or five side veins on each side. Each leaves the center vein at a shallow angle and curves toward the tip, stopping just short of the edge. Space them wider near the base and closer near the tip.
- Redraw the contour with a slightly wavy line: two or three shallow ripples per side. Keep the tip sharp.
- Add light hatching along one side of the center vein, following the direction of the side veins, so each bract looks gently folded down the middle.
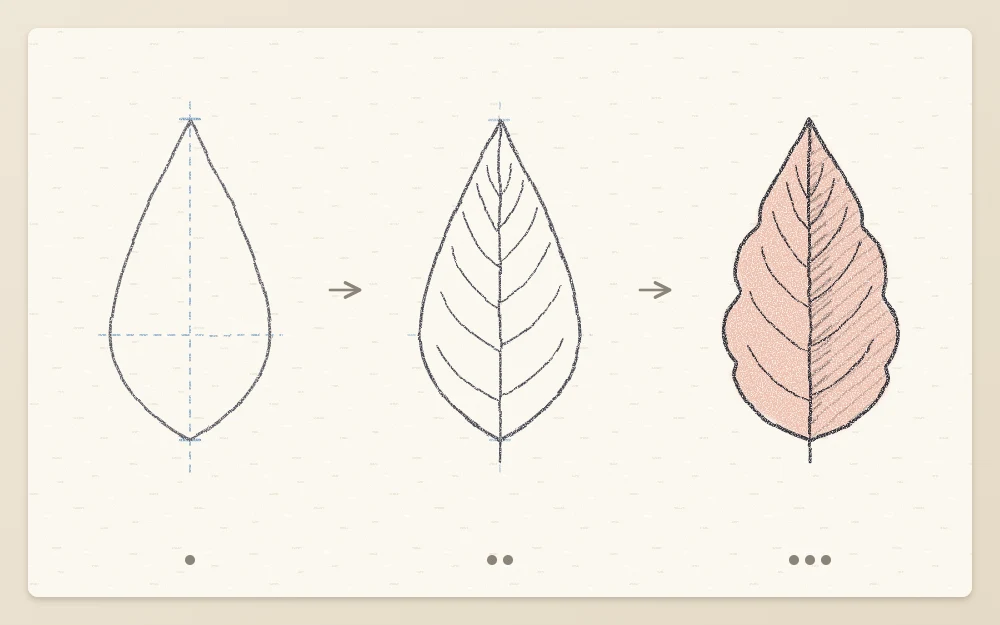
The same vein pattern applies to most broad leaves, and the tutorial on how to draw leaves with a midrib and side veins covers it in full.
Tip
Draw the veins on the back layer with lighter pressure and fewer lines than the front layer. Less detail behind pushes those bracts back without any extra shading.
Step 5: green leaves underneath
Below the bracts sit the ordinary green leaves. Add two or three, peeking out from behind the second layer and extending beyond the guide circle by about a quarter of its width.
Make them broader than the bracts, about two-thirds as wide as they are long, and place them unevenly: for example, one at the lower left, one at the lower right and one at the upper right. Their edges can carry one or two shallow points on each side. Other outlines that pair well with flowers are compared in the guide to leaf shapes for flower drawings.
Finish by darkening the small spaces between the buds with a 4B pencil and lifting the guide circle with a kneaded eraser. If you add colored pencils, keep the bracts red, the lower leaves green and the buds a yellow-green, and let the pencil veins show through.
Common problems and variations
- It looks like a daisy: the bracts are rounded and equal. Sharpen the tips, add the center veins and make the back layer clearly larger.
- It looks flat: both layers have the same line weight. Lighten the back layer and darken the gaps near the center.
- The star is lopsided: the first five center lines were uneven. Check that the gaps between them match before drawing any outlines.
- The center looks like a button: the buds merged into one shape. Redraw them as separate circles with dark gaps.
For a card, try a half plant entering from one corner, or add a third, smaller layer of three bracts tight around the buds. Results vary with practice, and a second attempt on the same page usually spaces the star more evenly. When spring comes around, the same five-part spacing carries over to drawing cherry blossoms on a branch.
Frequently asked questions
Are the red parts of a poinsettia petals?
No. They are colored leaves called bracts, and the true flowers are the small round buds in the middle. That is useful for drawing, because every large shape can be handled as a leaf with a center vein and side veins instead of as a soft petal.
How many bracts should a poinsettia drawing have?
A first layer of five or six and a second, larger layer of the same number behind it works well. Five in each layer gives a clear star and is easiest to space. Add a small third layer near the center if you want a fuller plant.
How do you make the layers of a poinsettia look separate?
Draw the back layer larger, start its lines at the edges of the front bracts, and give it lighter lines with fewer veins. Darkening the small gaps close to the center also helps, because it suggests the front bracts are casting a little shadow.