How to Draw Cherry Blossoms on a Branch
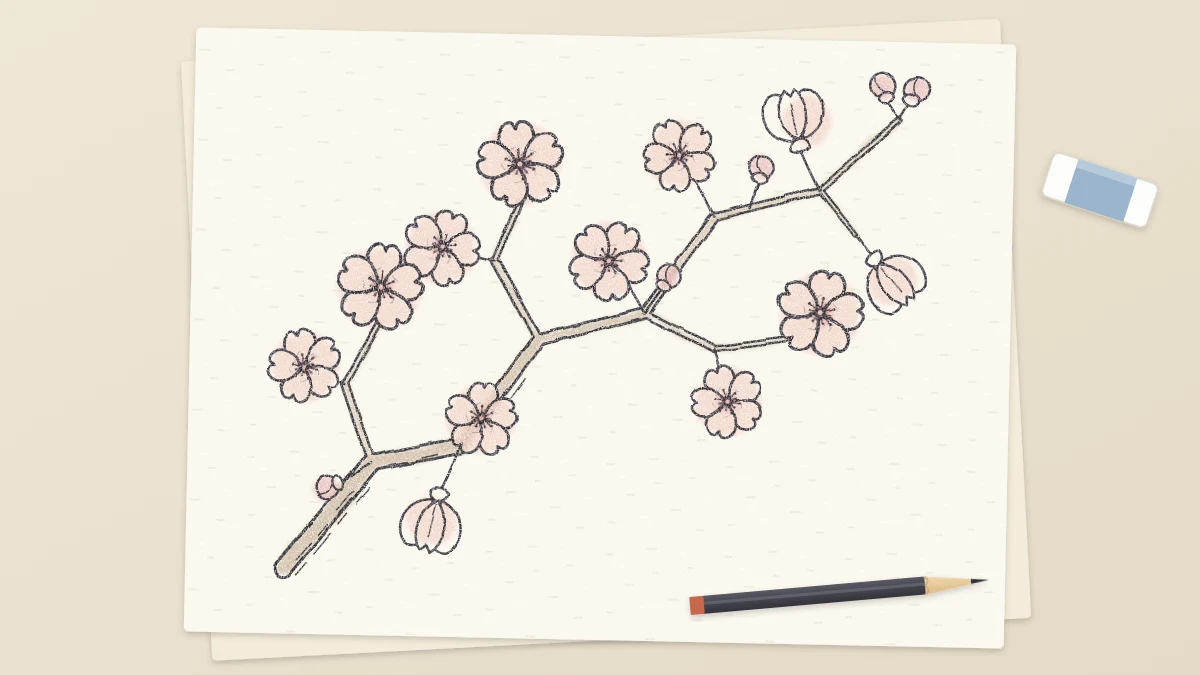
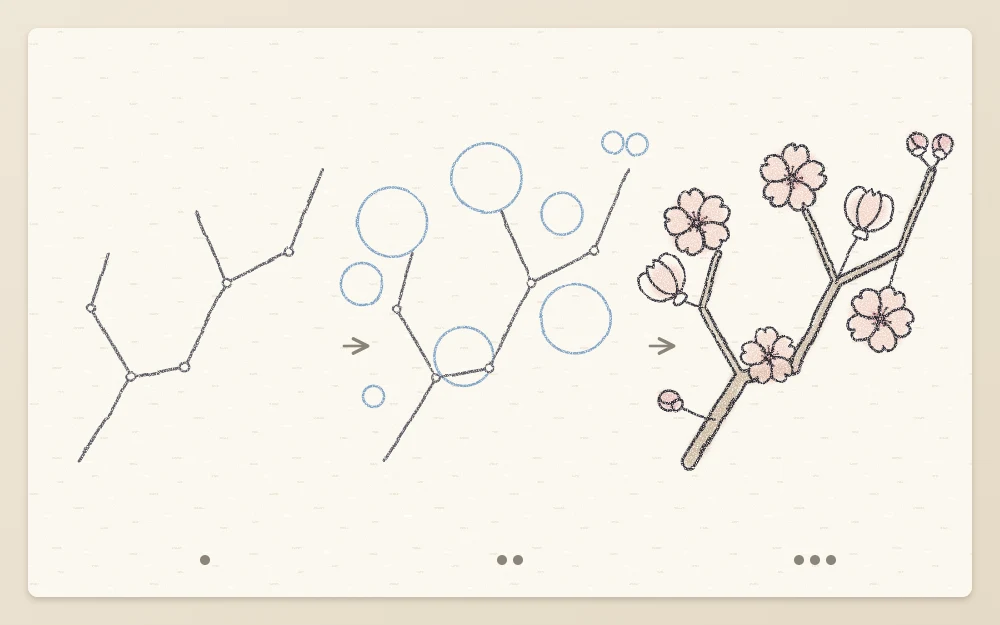
Draw an angular, tapering branch, mark the clusters with circles, then build five-petal blossoms with notched tips and fine stamens, mixing front views, side views and buds.
Tutorial at a glance
What you need
- HB pencil
- 2B pencil
- Kneaded eraser
- Pencil sharpener
- Sketchbook or drawing paper
A blossom branch looks intricate, but it is built from two simple ideas: a branch that changes direction in short, angular stretches, and one small five-petal flower repeated in clusters. Learn those two parts and the rest is arrangement.
This tutorial on how to draw cherry blossoms starts with the branch, marks where the clusters will sit, and then builds each blossom on a light circle. Use an HB pencil for all of the planning and save the 2B for the final lines.
Step 1: the branch
A blossom branch is angular, not a smooth curve. It grows in a fairly straight stretch, reaches a joint, and sets off again at a slightly different angle.
- With light pressure, draw a line from the lower left of the page toward the upper right, about 7 in (18 cm) long, in four or five straight stretches of unequal length. Change direction by a small angle at each joint.
- From two or three of the joints, add side twigs, each a third to a half as long as the main branch and bent once along the way.
- Turn the line into a branch by adding a second line beside it. At the base, make the branch about as thick as a pencil; narrow it steadily until the two lines meet at the tip. Twigs start thinner than the branch they leave.
- At each joint, draw a small bump or a short curved line across the branch to mark the node.
A diagonal branch leaves open space above and below it. For more on placing a subject on the page, see the guide to composition for flower drawings.
Step 2: mark the clusters
Cherry blossoms grow in clusters, with several thin stalks leaving the branch from the same point. Mark their positions before drawing any petals.
At four or five joints, lightly draw two to four circles grouped close together, each about three-quarters of an inch (2 cm) across. Let the circles in a cluster overlap one another, and let at least two overlap the branch itself. Add a few smaller circles, about a third of that size, near the twig tips for buds.
Leave one or two joints empty. Uneven spacing looks more natural than a cluster at every node.
Step 3: build one blossom on a circle
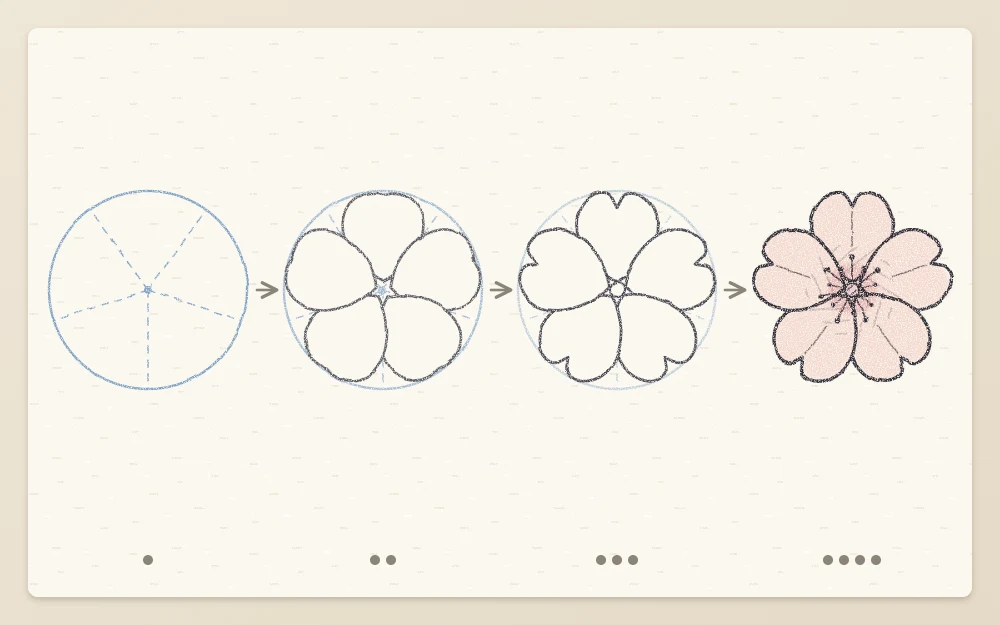
Each full-front blossom has five rounded petals, spaced 72 degrees apart, often with a small notch at the tip.
- Put a dot in the center of one circle. Draw five light spokes from the dot to the edge, evenly spaced, like a five-pointed star with one spoke pointing straight down. The spokes mark the gaps between petals.
- Draw a petal between each pair of spokes. Start at the center dot, curve out along one spoke, round over at the circle’s edge, and return along the next spoke. Each petal is widest about two-thirds of the way out.
- In the middle of each petal’s outer edge, draw a small V-shaped notch, no deeper than one-tenth of the petal’s length, and round off its two corners.
- Around the center dot, draw a tiny circle. From it, pull eight to twelve fine lines outward to about half the petal length, each ending in a small dot. These are the stamens.
Petals overlap a little at their edges on a real blossom, so let one or two cross their neighbors. The tutorial on drawing petals and their overlaps covers that in more depth.
Common mistake
Cutting the notch too deep. A deep notch turns each petal into a heart and the flower starts to look like clover. Keep it a small nick.
Step 4: side views, buds and stalks
A branch with only front-facing flowers looks flat. In each cluster, keep one or two full-front blossoms and change the rest.
- Side view: inside the circle, draw a small cup. Two or three petals show as overlapping rounded shapes fanning upward, and a small pointed green base sits where the cup meets its stalk. A few stamen tips may show above the rim.
- Three-quarter view: squash the circle into an ellipse and build the five petals inside it. The petals nearest and farthest from you are foreshortened, so they look shorter than the ones at the sides.
- Bud: keep the small circle, add a slight point at the top and one curved line across it to show a petal wrapped around the others. Add a small cup-shaped base.
Now connect everything. From the back of each blossom and bud, draw a thin stalk, about as long as a blossom is wide, back to the joint. All the stalks in one cluster meet at the same point on the branch, spreading like the ribs of a small fan.
Step 5: final lines
Switch to a 2B pencil. Redraw the blossoms first, with a light, slightly broken contour so the petals stay delicate. Where a blossom overlaps the branch, finish the flower and stop the branch lines at its edge.
Then draw the branch with firmer pressure and a heavier line weight than the flowers, adding a few short marks along its length for bark. Darken the underside of the branch slightly. The contrast between a dark, rough branch and pale blossoms does most of the work.
Lift the circles and spokes with a kneaded eraser. If you add color, a very light pink toward each petal’s base is enough.
Common problems
- The branch looks like a hose: it curves smoothly and keeps the same thickness. Break it into straight stretches and taper it.
- The blossoms look like stickers: none overlap. Let flowers cross each other and the branch.
- The petals are uneven: the spokes were not evenly spaced. Redraw them before the petals; each gap should match.
- The drawing looks heavy: the flower lines are as dark as the branch. Lighten them with the kneaded eraser.
Spacing five petals evenly takes a few tries, and results vary with practice. Fill a corner of the page with single blossoms before starting a full branch. For another seasonal subject built on a star of five, try drawing a poinsettia from layered bracts.
Frequently asked questions
How many petals does a cherry blossom have?
A simple cherry blossom has five petals, and each often has a small notch at its tip. In a drawing, the five petals sit 72 degrees apart around a small center. Five evenly spaced spokes on a circle make that spacing much easier to judge.
Should you draw the branch or the blossoms first?
Start with the branch. It sets the direction and rhythm of the whole drawing and shows where the joints are, which is where clusters grow. Once the branch and cluster circles are in place, each blossom has a clear position and size to fit.
How do you make a blossom branch look natural instead of stiff?
Vary three things: the length of each straight stretch of branch, the number of flowers in each cluster, and the direction the flowers face. Mixing full-front blossoms with side views and closed buds, and letting some overlap the branch, breaks up any regular pattern.