How to Draw Flower Stems That Look Natural
Draw stems from one light gesture curve, thicken them so they widen toward the base, and join the head with a small cup or swelling so the flower stops floating.
Tutorial at a glance
What you need
- HB pencil
- 2B pencil
- Kneaded eraser
- Pencil sharpener
- Sketchbook or drawing paper
The stem is usually the last thing added to a flower drawing and the first thing that gives it away. Two ruler-straight lines dropped from the petals make the head look like it is balanced on a stick, or floating just above one.
Learning how to draw flower stems that look natural comes down to three habits: start with a single curved line, thicken it unevenly, and join it to the flower with the small parts that are really there. This tutorial walks through each one.
What you need
- An HB pencil for the gesture line
- A 2B pencil for the finished stem
- A kneaded eraser
- A sketchbook page with room below the flower
Start with a simple flower head already sketched near the top of the page: a circle about 2 in (5 cm) across is enough to practice on.
Step 1: Draw one gesture curve
- Find the center of the flower head, not its lower edge. Imagine a point in the middle of the circle.
- With the HB pencil, draw one light line from that point downward. Make it about three times as long as the flower head is wide.
- Give it one gentle bend, like a shallow C, or a slow S with a soft curve near the top and an opposite one near the bottom. Draw it in a single movement from the elbow.
- Erase the part of the line that lies inside the flower head. Because the line began at the center, the stem now points into the flower instead of hanging off its rim.
If long curves come out shaky, a few minutes of pencil control exercises before you start usually helps.
Step 2: Thicken the line into a stem
- Draw a second line beside the gesture curve, following every bend. Under the flower, keep the two lines close together, about one tenth of the head’s width apart.
- Let the lines drift apart very slowly as they go down, so the stem is about one and a half times as wide at the base as at the top.
- Keep them nearly parallel, not exactly. A slight swelling here and there looks more like something that grew.
- Go over both edges with the 2B pencil. Press a little harder on the side away from the light and keep the other edge thinner.
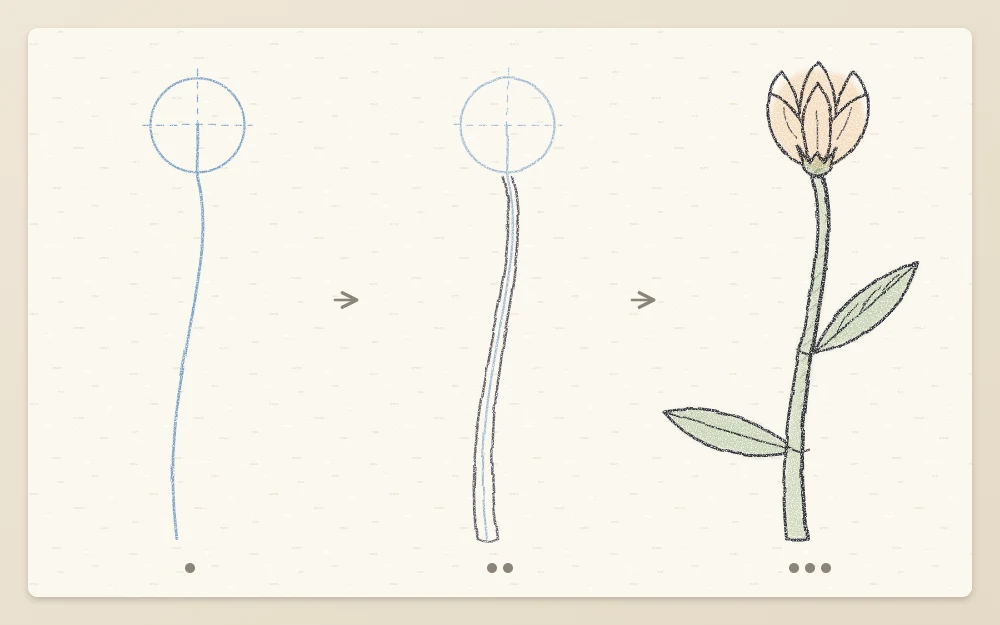
Step 3: Connect the head to the stem
A flower does not sit on a flat stem end. There is always a transition, and drawing it is what stops the head from floating.
The green cup
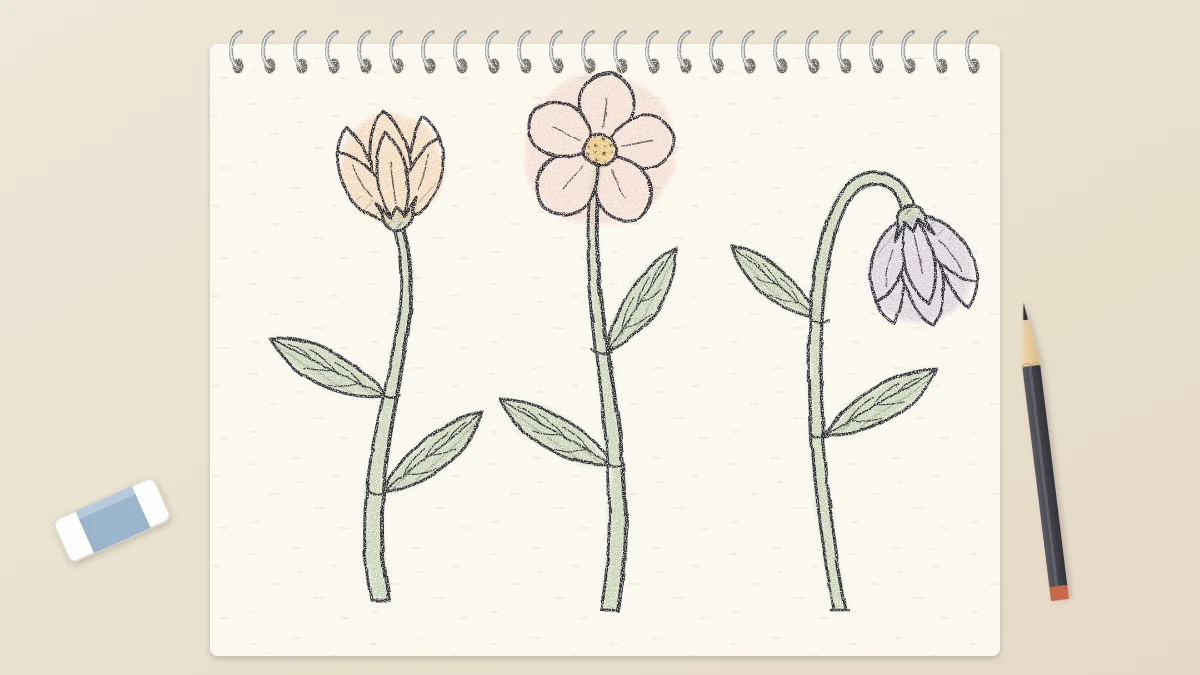
Many flowers have a small green cup under the petals, called the calyx. Draw it as a short cup shape at the top of the stem, about twice as wide as the stem and about as tall as it is wide. Its rim hugs the base of the petals, and you can cut the rim into three or four small pointed tips that lie against them. On a flower seen from the side, such as a rose, the cup is clearly visible.
The swelling
On other flowers, such as a tulip, there is no obvious cup. The stem simply widens a little as it meets the flower. Flare the two stem lines outward over the last short stretch so they run smoothly into the base of the petals.
For a flower seen from the front, the join is hidden behind the petals. Let the stem disappear behind the lowest petals and leave a tiny gap of shadow there with the 2B pencil.
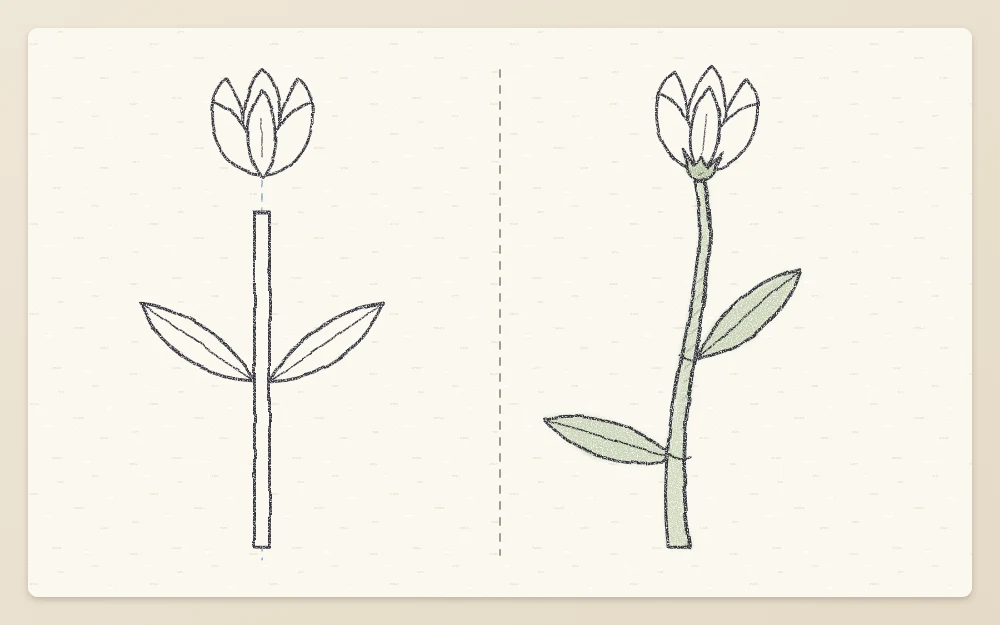
Common mistake
Starting the stem at the bottom edge of the outermost petal. The stem should aim at the center of the flower, even when most of that path is hidden.
Step 4: Add nodes where leaves attach
- Choose one or two points along the stem, for example one third and two thirds of the way down. Avoid spacing them perfectly evenly.
- At each point, draw a small bump on the stem outline, no taller than half the stem’s width. This joint is called a node.
- Give the stem a very slight change of direction at the node, a degree or two, as if it paused and set off again.
- Start the leaf stalk from the node, leaving at an upward angle. Add a short curved line in the corner where stalk and stem meet to show the joint.
The leaf itself, with its midrib, veins and edge, is covered step by step in the guide on how to draw a leaf.
Step 5: Let stems and leaves overlap
Overlap is the quickest way to give a plant depth. Let one leaf pass in front of the stem: draw the leaf whole and break the stem lines where they meet it. Let another leaf come from behind: draw the stem whole and stop the leaf at the stem’s edge.
The same rule applies when stems cross. Finish the front stem, interrupt the back one, and add a small touch of tone on the back stem right beside the crossing. This matters most in a bunch, where many stems meet in one place, as in the tutorial on drawing a simple bouquet.
Variations: thick, thin and bending stems
- Thin stems. For small or delicate flowers, a single line of varying pressure can be the whole stem. Press harder at the base and at each node, lighter in between.
- Thick stems. A large head such as a sunflower needs a stem about one sixth as wide as the head. Draw both edges with a slightly rough, broken line to suggest a coarse surface.
- Heavy heads. When a flower is large for its stem, the stem bends under the weight. Keep the lower two thirds fairly upright, then curve the top third over like the handle of a cane so the head nods forward or to one side.
- Buds. A bud is light, so its stem can be thinner and more upright than the stem of the open flower beside it.
Common problems
- The stem looks like a pipe. The two edges are exactly parallel. Widen it toward the base and add one node.
- The curve looks limp. One clear bend is stronger than several small ones. Redraw the gesture line with a single sweep.
- The head still floats. Check that the stem aims at the flower’s center and add the cup or the swelling at the join.
Frequently asked questions
Why do my flower heads look like they are floating?
The stem probably starts at the edge of the petals and has no visible join. Aim the stem line at the center of the flower, then add the small cup under the petals or a slight widening where the stem meets the head. That short transition anchors the flower.
Should a flower stem be drawn straight or curved?
A gentle curve nearly always looks more natural. Real stems lean toward light and bend under the weight of the head, so even an upright stem has a slight sweep. One clear bend is enough; several small wiggles tend to look weak instead of lively.
How thick should a flower stem be?
It depends on the flower, so compare it with the head. As a rough starting point, a stem about one tenth of the head's width suits a medium flower, with a little extra width toward the base. Large heavy flowers need thicker stems, and tiny ones can be a single line.