How to Draw a Simple Flower Bouquet
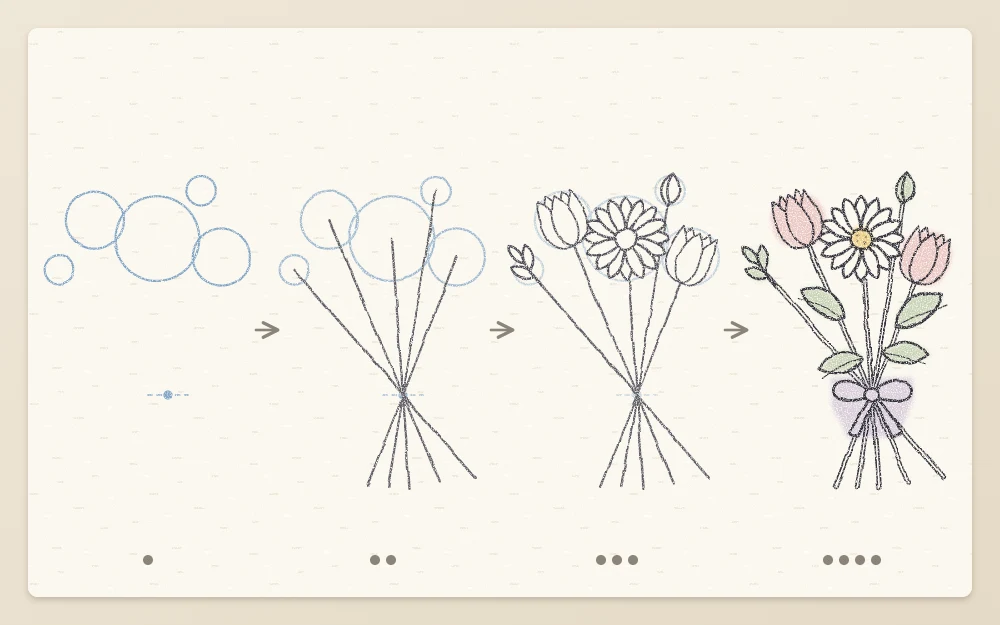
Plan a hand-tied bouquet with a few circles and one tie point, then draw the front flowers, tuck the rest behind and finish with leaves and a ribbon.
Tutorial at a glance
What you need
- HB pencil
- 2B pencil
- Kneaded eraser
- Pencil sharpener
- Sketchbook or drawing paper
A bouquet looks complicated because there is so much in it, but the plan underneath is short: a few circles, one point where the stems meet, and a clear order for what goes in front. If you can draw a single flower, you already have the hard part.
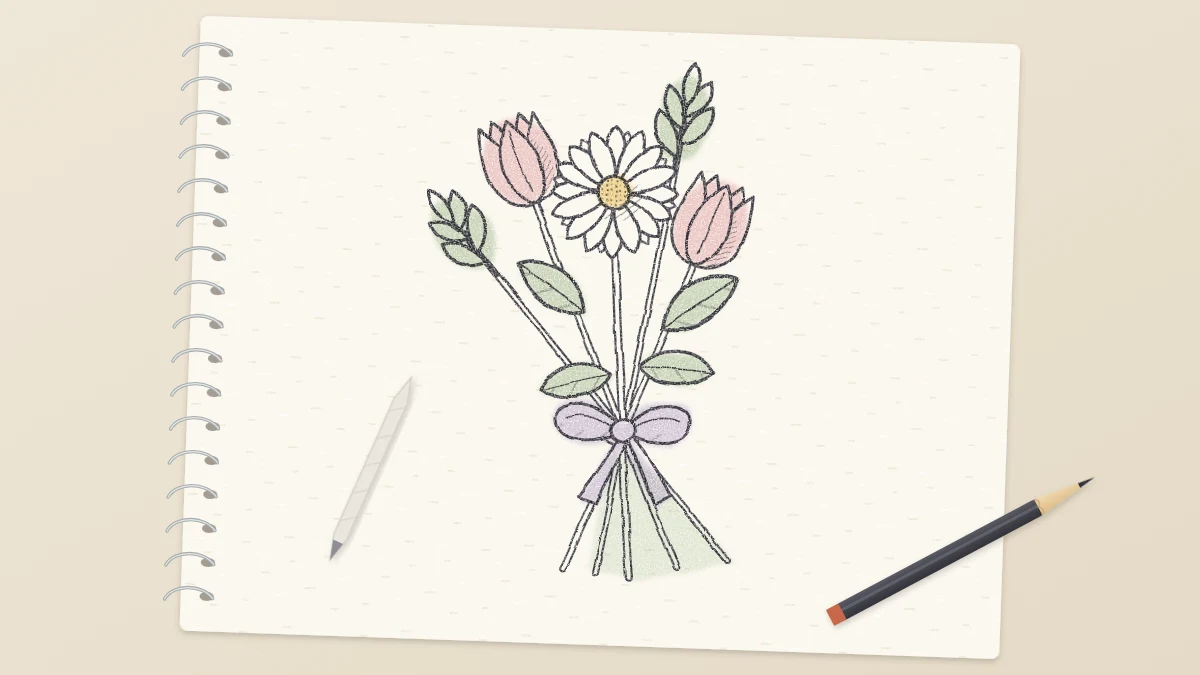
This guide on how to draw a flower bouquet uses a small hand-tied bunch as the example: one daisy, two tulips and a couple of leafy sprigs. Swap in any flowers you like once the structure makes sense.
What you need
- An HB pencil for the construction shapes
- A 2B pencil for the finished lines
- A kneaded eraser
- A sketchbook page, turned upright
Plan for a drawing about 6 in (15 cm) tall, with the flower heads filling the top half of that height.
Step 1: Plan the dome with circles
All of the planning is done with the HB pencil, pressing very lightly.
- In the upper half of the page, draw one circle about 2 in (5 cm) across. Place it slightly left or right of the middle, not dead center. This is the focal flower, the daisy.
- Add two circles about two thirds the size of the first, one on each side of it and a little higher or lower. Let each one overlap the big circle by a small sliver. These are the tulips.
- Add two small circles, about one third the size of the first, in the gaps along the outer edge. These will become buds or leafy sprigs.
- Check the outline of the whole group. The tops of the circles should follow a loose dome, like the top of an umbrella, and no two circles should sit at exactly the same height.
Three circles work just as well as five for a smaller bunch. Odd numbers are easier to arrange without the group splitting into pairs, an idea covered in more depth in the guide to composing a flower drawing.
Step 2: Mark the tie point and run the stems
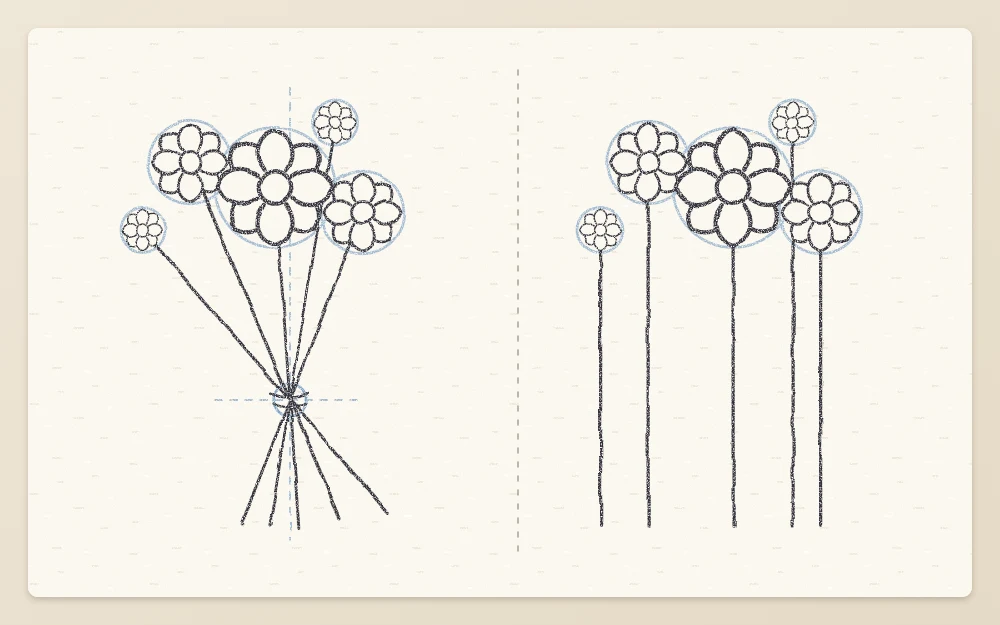
- Make a small dot directly below the middle of the dome. The distance from the lowest circle down to the dot should be about the same as the width of the big circle. This is the tie point.
- From the center of each circle, draw one light line down to the dot. The outer lines will lean inward more steeply than the middle ones.
- Carry each line straight on through the dot and let it continue below for about the same distance again. Lines that came from the left now end on the right, so the stems fan out beneath the tie point like a mirror image of the top, only narrower.
Common mistake
Drawing every stem straight down from its flower. Parallel stems never meet, so the bunch looks like a row of separate flowers. Every stem line must pass through the same dot.
Step 3: Draw the front flowers completely
Decide which flowers sit in front. The big circle always does, and usually one of the medium circles as well.
- Inside the big circle, draw the daisy: a small center disc about one quarter of the circle’s width, then narrow petals running from the disc out to the circle’s edge. Draw every petal in full.
- In the front medium circle, draw a tulip as a cup that fills the circle, with one petal in front and two wrapping around from the sides. Point the cup away from the tie point, so its base faces the stem line. The tulip tutorial explains the petal overlaps.
Keep the pressure light to medium for now. The lines only need to be clear enough to see where one flower ends.
Step 4: Tuck the other flowers behind
- Draw the second tulip in its circle, but stop each line where it meets a flower you have already drawn. Part of this tulip is hidden, and that hidden part is what puts it behind.
- Turn the two small circles into simple shapes: a closed bud drawn as a pointed oval, or a sprig of three or four small leaves along a short line. Stop these lines at the edges of the front flowers too.
If you want different fillers, the list of simple flowers to sketch has several that work at this small size.
Step 5: Fill the gaps with leaves and buds
Look for the empty wedges between flower heads and around the lower edge of the dome. Fill three or four of them with leaves that start from a stem line and point outward. Make them different lengths, and let one or two droop over the tie point area. Leave a few small gaps open so the bunch does not turn into a solid mass.
Now thicken the stem lines into real stems by adding a second line beside each one, about the width of a pencil point apart above the tie and slightly wider below. Where stems cross, finish the front one and break the one behind it. The guide to drawing natural flower stems covers joints and thickness.
Step 6: Wrap the tie point and finish
- At the dot, draw two short, slightly curved lines across the bundle of stems, about a pencil’s width apart. Add a third line between them to suggest wraps of ribbon or twine.
- For a bow, draw two teardrop loops leaving one side of the wrap and two tails hanging below, each about as long as a loop.
- Switch to the 2B pencil. Go over the daisy with firm, clean lines and add detail there: dots in the center disc and a center line on a few petals.
- Go over the other flowers and leaves with lighter pressure and fewer lines. Outline only, no inner detail.
- Lift the circles, the dot and any leftover stem guides with the kneaded eraser.
Common problems and easy fixes
- The bunch looks flat. Increase the overlap. At least two flowers should hide part of another one.
- It looks like a lollipop. The dome is too round and even. Raise one circle and push a leaf or bud outside the outline.
- The stems look too thin for the heads. Move the tie point closer to the flowers and let the stems below it spread a little wider.
- Everything competes for attention. Soften the lines on the back flowers with the kneaded eraser and darken only the focal flower.
Frequently asked questions
How many flowers should a drawn bouquet have?
Three or five flower heads are a comfortable number for a first bouquet. Odd numbers are easier to arrange in a loose dome without the group dividing into matching pairs. Leaves, sprigs and small buds then fill the spaces, so the bunch looks full without many more full flowers.
Why do the stems in my bouquet drawing look wrong?
Usually because they run straight down side by side. In a tied bunch every stem passes through the same narrow point and spreads out again below it. Mark that point with a dot first and aim every stem line at it, and the flowers will look held together.
Which flowers go well together in a simple bouquet drawing?
Mix shapes rather than kinds: one round, open flower such as a daisy, one or two cup shapes such as tulips, and something thin and upright such as a leafy sprig or a bud. Different outlines keep the flowers easy to tell apart, even when they overlap.