How to Draw a Sunflower Step by Step
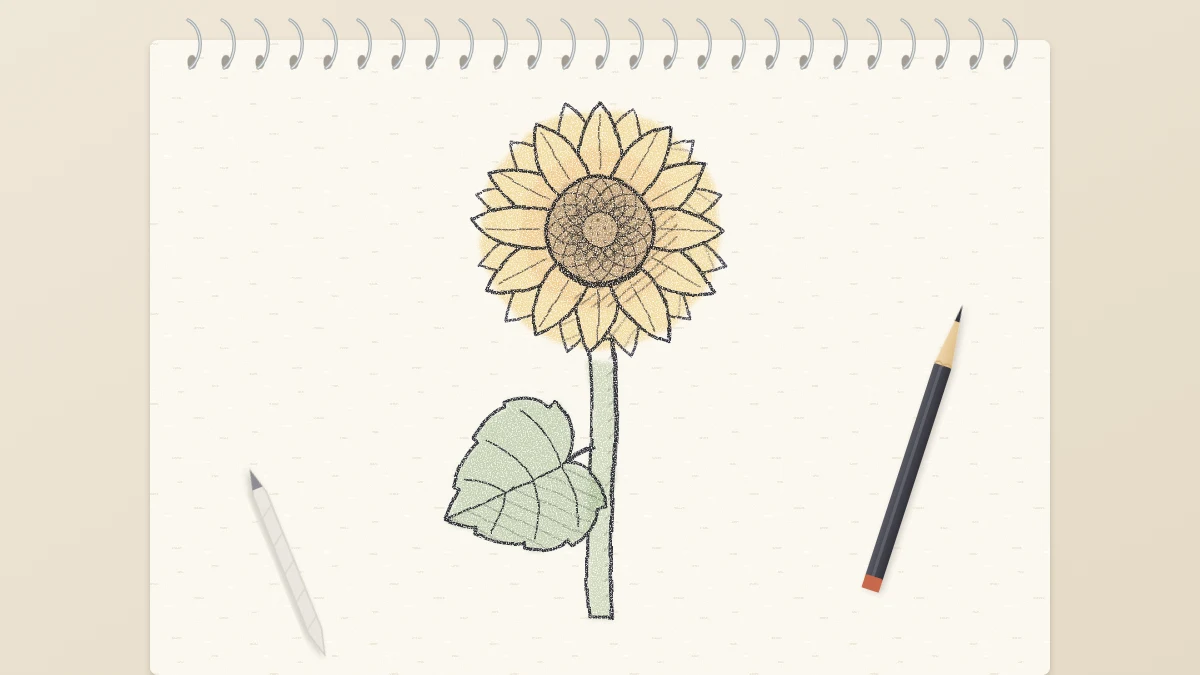
Draw a sunflower from two circles: a large center disc, two rows of pointed petals, a seed pattern made from crossing curves, a thick stem and heart-shaped leaves.
Tutorial at a glance
What you need
- HB pencil
- 2B pencil
- 4B pencil
- Kneaded eraser
- Pencil sharpener
- Sketchbook or drawing paper
A sunflower is hard to mistake for anything else. The huge dark center, the double ring of pointed petals and the heavy stem give it a strong outline even in a quick sketch, which is why it is such a satisfying flower to draw.
This guide explains how to draw a sunflower from the front in seven steps. The method is close to the one used for a daisy, with two differences that do most of the work: a much larger center and a seed pattern that is suggested with a few crossing curves instead of drawn seed by seed.
Use an HB pencil for the construction shapes, a 2B for the final lines and seed marks, a 4B for the darkest part of the center, and a kneaded eraser. If you have not drawn a round, front-facing flower before, the daisy tutorial is a gentler warm-up with the same two-circle start.
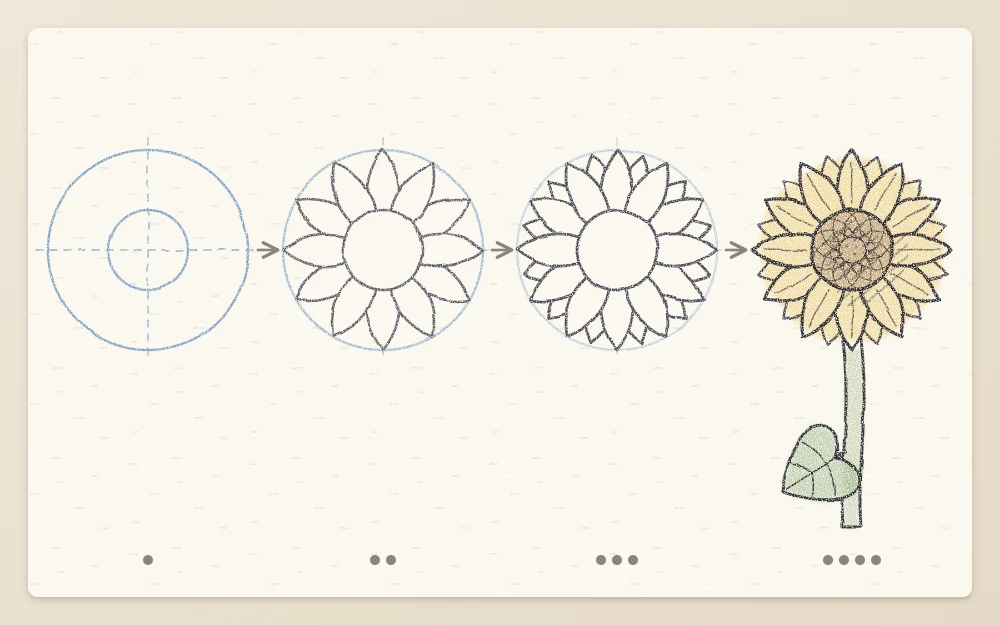
Step 1: Two Circles
- With the HB and light pressure, draw a circle about 2 in (5 cm) across. This is the center disc.
- Around it, with the same middle point, draw a guide circle two and a half times as wide, about 5 in (13 cm) across. The petal tips will end here.
The disc now takes up a little under half the width of the flower head. Anywhere from a third to a half looks right. The gap between the circles, which is the petal length, should be about three quarters of the disc’s width.
Step 2: First Row of Petals
Sunflower petals are shaped like a narrow leaf: they start fairly wide at the disc, swell a little, then taper to a point.
- Draw the first petal at the top. Start two lines on the rim of the disc, about a quarter of the disc’s width apart. Let them bulge slightly outward, then bring them together in a point on the guide circle.
- Draw matching petals at the bottom, left and right.
- In each of the four gaps, draw two more petals, evenly spaced. You now have twelve petals whose bases touch or nearly touch all the way around the disc.
Before moving on, let two or three tips curve to one side, and stop a couple just short of the guide circle.
Step 3: Second Row Behind
- Find the V-shaped gap between each pair of neighboring petals.
- In each gap, draw a pointed tip rising from behind: two short lines that start on the edges of the front petals, about halfway along their length, and meet in a point on or just inside the guide circle.
- Do this in all twelve gaps, or leave one or two empty for variety.
Stop every one of these lines at a front petal’s contour so the back row looks tucked behind.
Step 4: Map the Seed Pattern
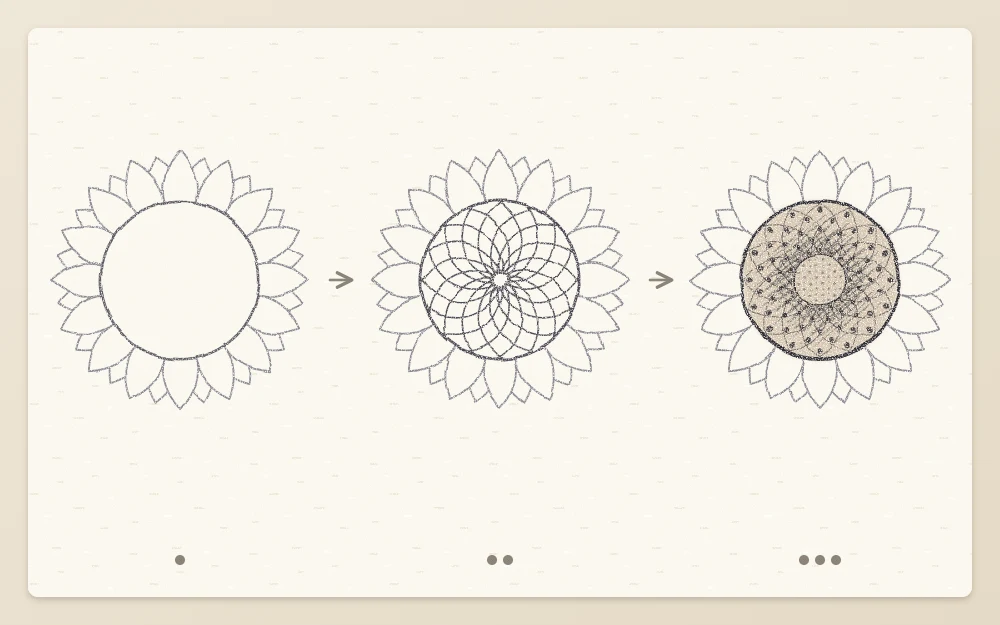
Sunflower seeds sit in crossing spirals. A net of curved lines gives that impression without drawing every seed.
- Inside the disc, lightly draw a small circle around the middle point, about a third of the disc’s width. Leave it empty for now.
- With the HB, draw a curved line from the rim of the disc inward to that small circle, bending to the right like a shallow C.
- Repeat all the way around the disc, spacing the curves about the width of a pencil apart at the rim. They will crowd together as they approach the middle.
- Now draw a second set the same way, bending to the left. The two sets cross and form small diamond shapes, large at the rim and tiny near the middle.
Step 5: Seed Marks and the Dark Ring
- Switch to the 2B. In the diamonds near the rim, make one small mark each: a dot or a short curved dash. You do not need to fill every diamond; about two out of three is plenty.
- Work inward. As the diamonds shrink, make the marks smaller and closer together.
- With the 4B, shade a soft ring just outside the small inner circle, about a fifth of the disc’s width wide. This darker band is the deepest tone in the drawing.
- Fill the small inner circle with fine, light dots and leave it paler than the ring around it.
- Darken the rim of the disc on the side away from your light so the center looks slightly domed.
Other flowers need very different middles. The guide to discs, stamens and seed pods covers them.
Common mistake
Filling the disc with straight cross-hatching, like a waffle. The lines must curve, and both sets must head toward the middle, or the center looks flat.
Step 6: Thick Stem and Heart-Shaped Leaves
- From behind the lowest petals, draw two lines downward for the stem, about a quarter of the disc’s width apart.
- Give the stem a slight bend just under the head, as if the flower’s weight is tipping it forward, then let it run fairly straight for about one and a half times the width of the flower head.
- About halfway down, draw a short stalk leaving the stem at an upward angle.
- At the end of the stalk, draw a large heart shape, roughly as wide as the center disc, with the notch of the heart at the stalk and the point aimed away from the stem.
- Break the edge of the heart into a row of small, shallow teeth. Add a midrib from the notch to the point and three or four side veins curving off it toward the edge.
For veins, edges and attachment in more detail, see how to draw leaves.
Step 7: Final Lines
- Go over the petals with the 2B. Use a firmer line near the disc and where a back petal meets a front one, and a lighter line at the tips.
- Lift the guide circle with the kneaded eraser, dabbing between the petal tips.
- Draw one center line down each front petal, from the disc to about two thirds of the way along, with a fainter line on either side. These suggest the creases that run the length of the petal.
Common Problems and Variations
- It looks like a daisy. Enlarge the disc and sharpen the petal tips.
- The petals look like spikes. Their sides are straight. Let each petal swell before it tapers.
- Variation: for a tilted sunflower, draw both circles as ellipses and shorten the petals at the front and back.
Frequently asked questions
How big should the center of a sunflower be?
Make the center disc between a third and a half of the width of the whole flower head. That large middle is the main thing that separates a sunflower from a daisy in a drawing. If the petals come out longer than the disc is wide, the center is probably too small.
Do I have to draw every sunflower seed?
No. Lightly draw two sets of curved lines that run from the rim toward the middle in opposite directions, then put a small mark in most of the diamond shapes they create. The eye fills in the rest, and the result looks more natural than a disc packed with individual seeds.
How do I stop my sunflower petals looking stiff?
Vary them. Let a few tips bend sideways, make some petals slightly shorter, and leave one or two gaps in the back row. Give each petal sides that swell before tapering to the point. A ring of identical straight-sided petals is what makes a sunflower look like a symbol.