
Professional Drum Studio Soundproofing Solutions That Actually Work
Why Drum Room Soundproofing Is One of the Hardest Noise Problems to Solve
Drum room soundproofing is the process of reducing or blocking the sound and vibrations produced by a drum kit from escaping into surrounding spaces — and it’s significantly harder than soundproofing for most other noise sources.
Here’s a quick summary of what actually works:
| Goal | What You Need |
|---|---|
| Block sound from escaping | Mass, decoupling, sealed air gaps |
| Reduce echo/reverb inside | Acoustic panels, bass traps |
| Stop floor vibrations | Rubber underlayment, floating floor |
| Quiet the kit itself | Low-volume cymbals, electronic kit, mute pads |
| Full isolation (professional) | Room-within-a-room build, STC 60+ walls |
Drums are uniquely brutal to contain. A drummer playing hard can generate 110–120 decibels — roughly the volume of a chainsaw or a jet flying overhead. That’s not a problem you solve with a few foam panels and good intentions.
There are also two very different challenges at play, and most people confuse them:
- Soundproofing = stopping sound from leaving the room
- Sound absorption = controlling echo and reverb inside the room
You need both. But they require completely different materials and approaches.
The good news? Even a 10dB reduction makes the sound half as loud to the human ear. That means you don’t necessarily need a $20,000 professional build to make a meaningful difference for neighbors or family members down the hall.
Whether you’re a remote worker trying to carve out a quiet home environment, or a drummer looking to practice without sparking a neighborhood dispute, this guide covers every level — from budget DIY fixes to full structural builds.
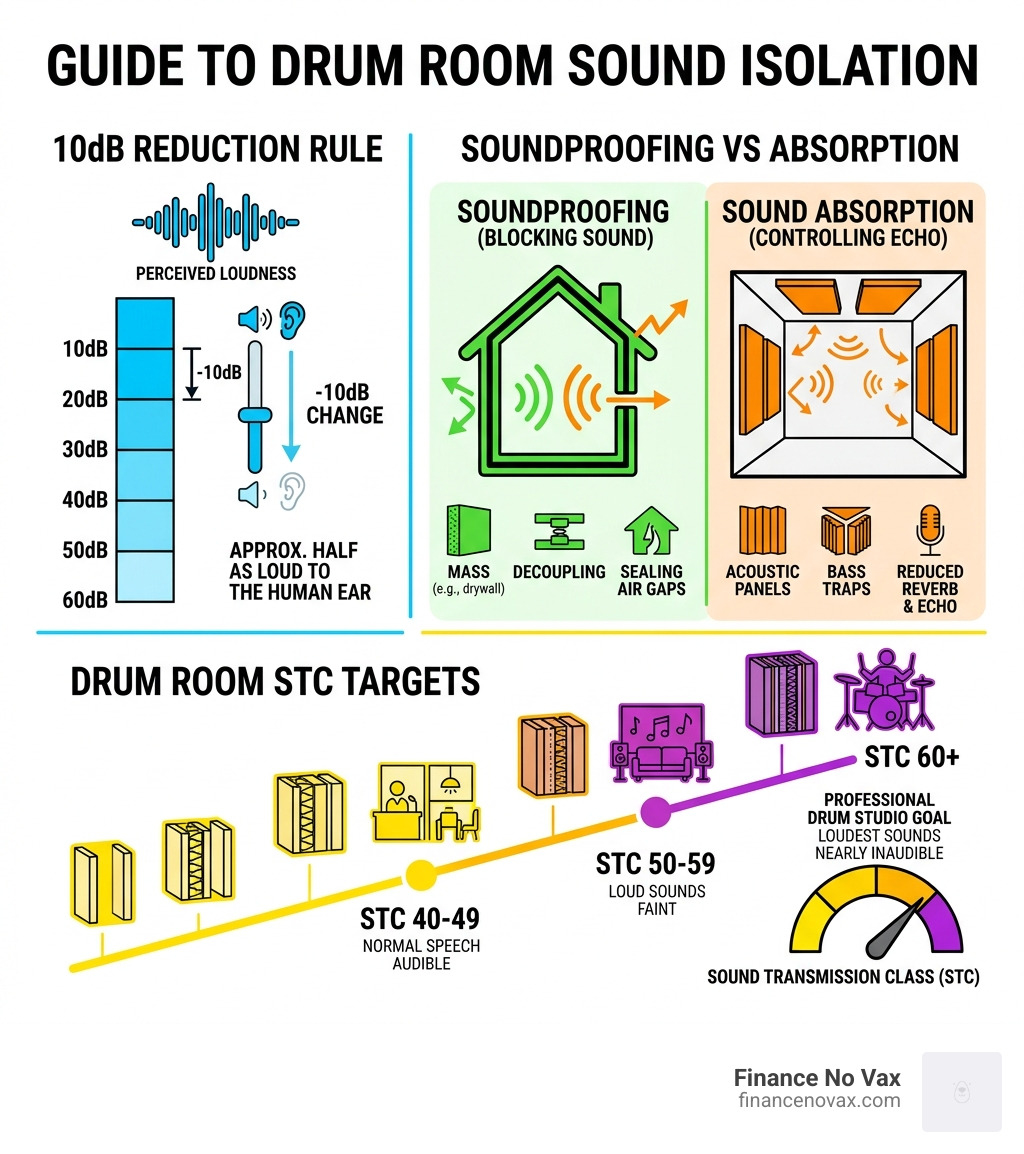
Drum room soundproofing basics:
The Physics of Drum Room Soundproofing: Blocking vs. Absorbing
To master drum room soundproofing in 2026, we first have to understand the science. Sound is like water; if there is a hole, it will leak through. If there is a solid connection, it will vibrate through.
When we talk about blocking sound, we look at the Sound Transmission Class (STC). A typical residential wall has an STC rating of about 30–34. For a drum room, that’s like trying to stop a flood with a screen door. To truly isolate a drum kit, we need to aim for an STC rating of 60 or higher.
On the other hand, we have the Noise Reduction Coefficient (NRC), which measures how well a material absorbs sound within the room. While soundproofing requires heavy, dense mass to block airborne sound, absorption requires porous materials to soak up energy. If you only soundproof the room without adding absorption, you’ll create an “echo chamber” where the drums sound harsh and muddy. To get the balance right, check out our guide on how to use drum sound absorbing panels for studio quality audio.
Why Drums Require Specialized Treatment
Drums aren’t like guitars or vocals. They produce a massive range of frequencies and, more importantly, a huge amount of vibration energy.
The kick drum is the biggest offender. It creates low-frequency sound waves with wavelengths that can be over 30 feet long. These waves don’t just travel through the air; they strike the floor and walls, turning the entire structure of your house into a giant speaker. This is known as structure-borne noise or flanking transmission.
While cymbals produce high-frequency “airborne” noise that can be blocked with mass, the kick drum requires decoupling—physically separating the room’s surfaces so the vibration can’t pass through. For a deeper dive into why standard materials often fail here, see why studio foam insulation is the secret to professional audio.
Acoustic Treatment for Internal Clarity
Once we’ve stopped the sound from escaping, we have to make sure it sounds good inside. Professional studios follow the Rule of 40%: you should aim to cover roughly 40% of your wall and ceiling surface area with acoustic treatment.
- Echo and Reverb Control: High-frequency reflections make cymbals sound “washy.” Acoustic panels (usually 2 inches thick) help clean this up.
- Bass Traps: Because low frequencies congregate in corners, we place thick triangular traps there to prevent “boomy” buildup.
- Ceiling Clouds: Suspending panels above the kit prevents sound from bouncing directly off the ceiling into your overhead mics.
For curated sets that handle these issues, explore these studio acoustic panel sets for serious sound dampening.
Structural Strategies for Professional Drum Room Soundproofing
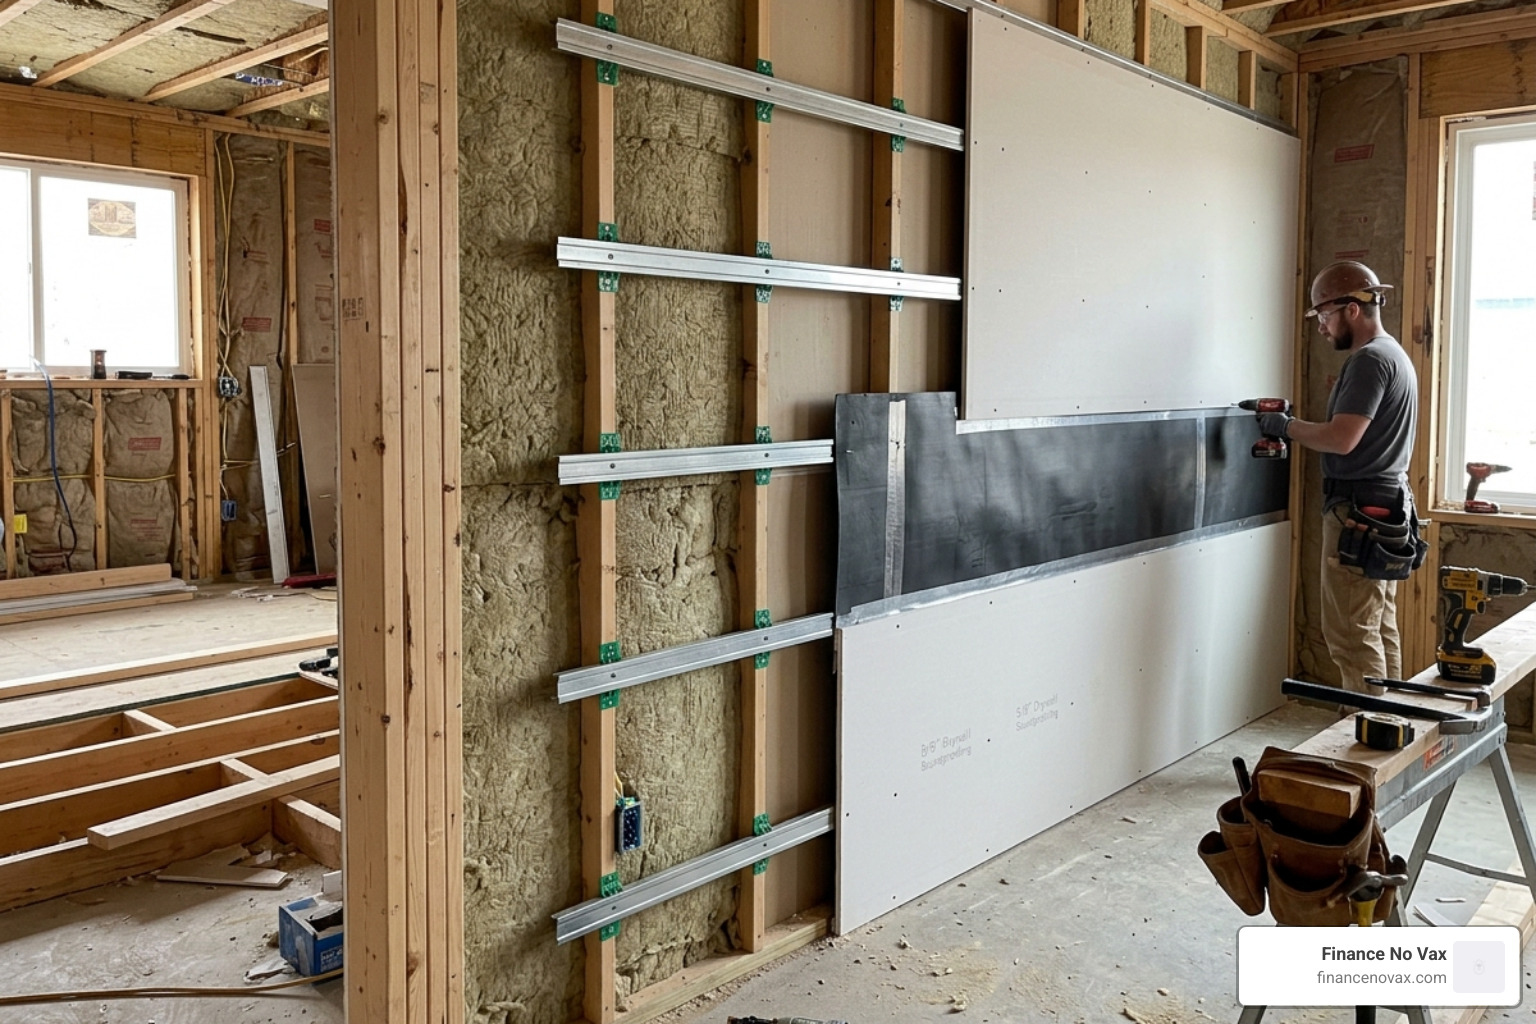
If you are serious about drum room soundproofing, you eventually have to look at the bones of the room. Adding “mass” is the first rule of soundproofing, but mass alone isn’t enough for drums—you need decoupling.
Decoupling involves breaking the direct physical path between the inside wall and the outside wall. We often do this using RSIC clips (Resilient Sound Isolation Clips) and metal hat channels. Instead of screwing drywall directly to the studs, you attach the clips to the studs, snap in the hat channels, and screw the drywall to the channels. This creates a “floating” wall that absorbs vibration like a car’s shock absorbers.
Another essential material is Mass Loaded Vinyl (MLV). This is a heavy, flexible material that adds incredible density without adding much thickness. When sandwiched between layers of 5/8″ fire-rated drywall, it creates a formidable barrier. To learn more about the best core materials for these walls, read up on Rockwool or bust: finding the best insulation for your studio walls.
The “Room Within a Room” Approach to Drum Room Soundproofing
The gold standard for drum room soundproofing is the “room within a room” build. This is exactly what it sounds like: you build a completely independent timber or steel frame inside your existing room, ensuring it doesn’t touch the original walls or ceiling.
- Floating Floors: We build a deck on top of U-shaped rubber isolators or high-density rubber mats.
- Isolated Ceilings: The inner ceiling is supported by the inner walls, not the original joists.
- Air Gaps: A 1-to-2-inch air gap between the old and new structures acts as a buffer.
- Insulation: We pack the cavities with acoustic mineral wool (like Rockwool) to dampen any resonance.
This is the most effective way to keep neighbors happy, especially in basements. For more specific layout ideas, see our basement drum room build suggestions for happy neighbors.
Cost Analysis for Drum Room Soundproofing Projects
Soundproofing a drum room can range from a weekend DIY project to a major construction undertaking. Here is how the costs break down in April 2026:
| Tier | Estimated Cost | What You Get |
|---|---|---|
| Budget | $500 – $800 | Heavy rugs, door seals, moving blankets, and basic acoustic foam. |
| Moderate | $3,000 – $5,000 | Adding a second layer of drywall with Green Glue, professional bass traps, and window inserts. |
| Professional | $10,000 – $20,000+ | Full “room within a room” construction, floating floors, and HVAC silencers. |
While $20,000 sounds steep, it’s often the price of total freedom to play at 2:00 AM. For many, the “Moderate” tier offers the best ROI, providing a perceived volume reduction of roughly 50–70%.
Essential Components for Sealing and Decoupling
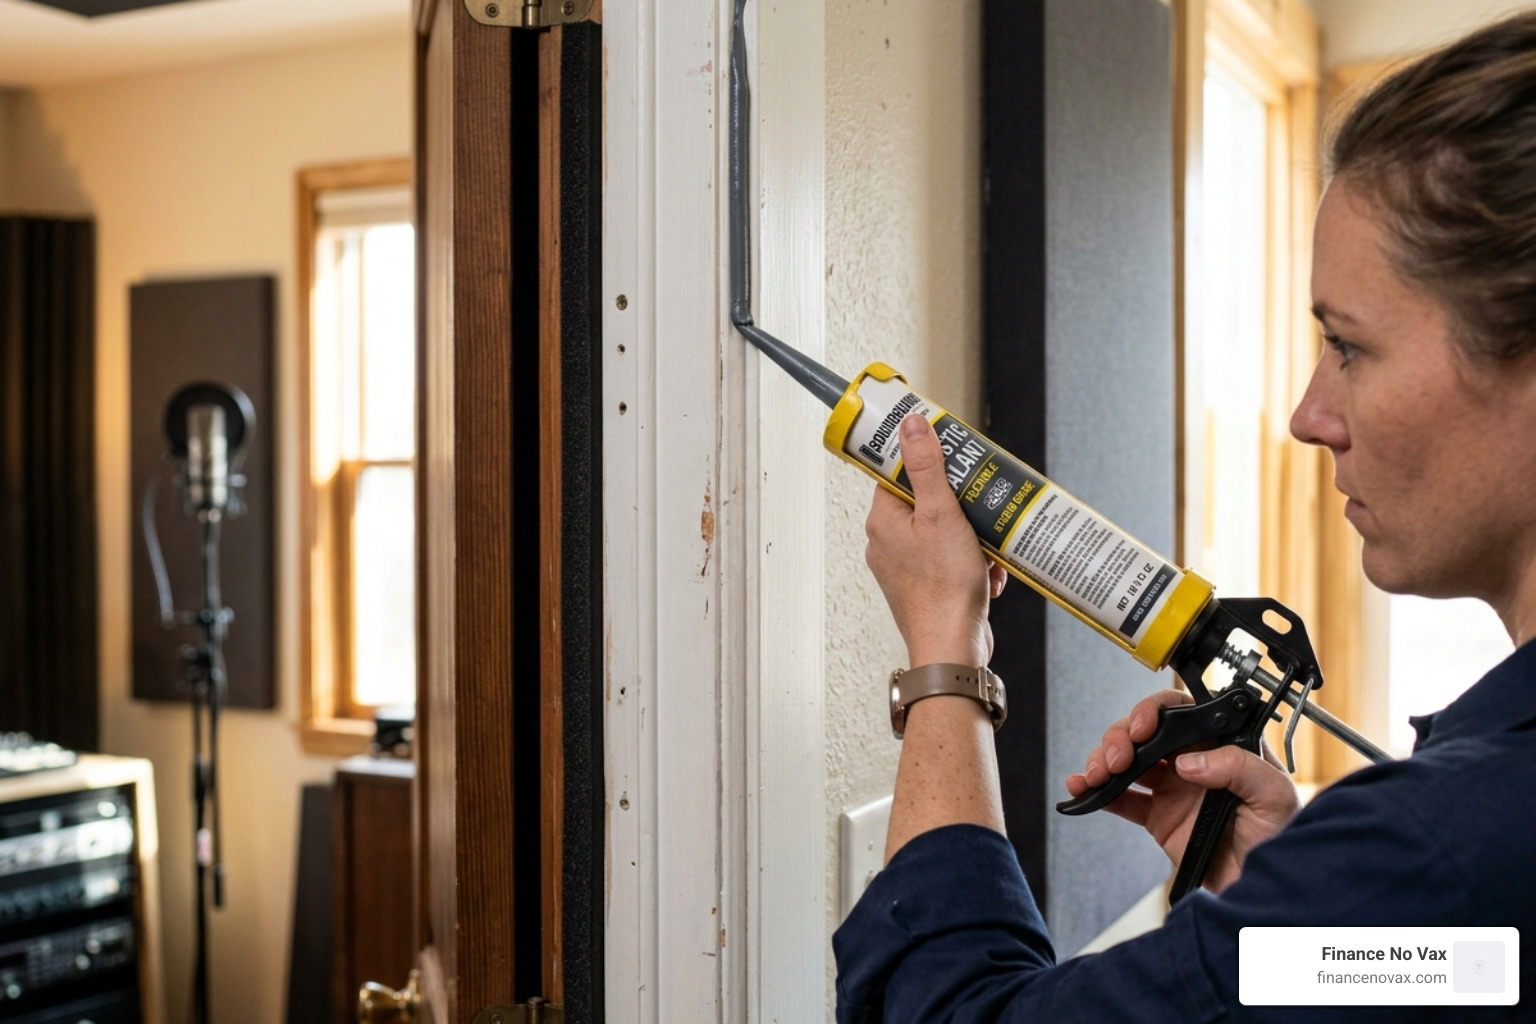
You can have the thickest walls in the world, but if there’s a 1/4-inch gap under your door, the sound will pour out like water through a hole in a bucket.
Acoustic caulk is your best friend here. Unlike standard hardware store caulk, acoustic sealant stays flexible forever. It won’t crack as the house shifts, ensuring that the airtight seal around your electrical outlets, vents, and baseboards remains intact. To make sure you’re applying these materials correctly, follow our master your studio sound with this acoustic foam installation guide.
Doors and Windows: The Weakest Links
Most residential doors are hollow-core, which have almost zero sound-blocking value. To fix this:
- Swap for Solid Core: Replace your door with a heavy, solid-wood or fire-rated door.
- Automatic Door Bottoms: These mechanical seals drop down when the door closes to seal the gap at the floor.
- Window Inserts: If you can’t brick up your windows, use thick acrylic window inserts (like Fantastic Frames) or heavy soundproof blankets.
- The Double Door System: If space allows, installing two doors with a small “air lock” between them is incredibly effective—this is a staple in professional recording studios.
Ventilation and Airflow Management
A soundproof room is an airtight room. If you don’t manage airflow, you’ll overheat in 20 minutes (and eventually run out of fresh air).
The solution is an acoustic baffle box or “maze.” This is a lined box that forces air to take several 90-degree turns before entering the room. Sound waves struggle to navigate these turns and get absorbed by the internal lining, while air flows through freely. For more on maintaining air quality without ruining your recordings, check out don’t let your room ruin the mix: acoustic foam for instruments and video.
Budget-Friendly and DIY Drum Room Soundproofing Hacks
Not everyone can tear down their walls. If you’re renting or on a tight budget, you can still make significant progress with drum room soundproofing using these “MacGyver” methods.
- The Drum Riser: This is the single best DIY project for drummers. By building a platform out of plywood and “tennis ball” isolators or high-density foam, you decouple the kit from the floor. This stops the kick drum from vibrating the neighbor’s floor joists.
- Massive Furniture: A wall-to-wall bookshelf filled with books acts as a natural sound diffuser and adds mass to the wall.
- Heavy Drapes: Triple-layered soundproof curtains can reduce high-frequency bleed through windows by up to 10-15dB.
For more budget-specific gear recommendations, check out the best studio acoustic foam tiles and panel sets for every budget.
Reducing Volume at the Source
Sometimes the best drum room soundproofing is simply making the drums quieter.
- Silent Stroke Heads: Mesh heads that feel like real drums but produce almost no sound.
- Low-Volume Cymbals: Perforated metal cymbals that retain the “feel” but reduce volume by 80%.
- Muffle Pads: Rubber pads that sit on top of your acoustic heads.
- Electronic Kits: The ultimate solution for apartment dwellers. While the pads are quiet, the “thump” of the kick pedal still needs a riser!
Vibration Isolation for Kick Drums
If you’ve ever lived below a drummer, you know it’s not the snare that drives you crazy—it’s the “thump-thump-thump” of the kick.
- ImpactoMat: Specialized rubber mats designed to absorb impact energy.
- Neoprene Pads: Placing these under the legs of your throne and your kick spurs can reduce vibration transfer.
- Tennis Ball Riser: A classic DIY hack involving two sheets of plywood with tennis balls sandwiched between them. It sounds ridiculous, but the physics are sound!
For more on choosing the right isolation products, see finding the best drum isolation booth to save your marriage.
Frequently Asked Questions about Drum Room Soundproofing
How much does a 10dB reduction actually help?
In acoustics, a 10dB reduction is perceived by the human ear as 50% quieter. While it doesn’t make the drums silent, it can be the difference between a neighbor hearing a faint “tap” and a neighbor calling the police.
Can I use egg cartons to soundproof my drum room?
No. This is the most common myth in drumming. Egg cartons are thin, light, and flammable. They do not block sound (no mass) and they barely absorb it. In fact, they can actually make your room more dangerous in a fire. Stick to real acoustic materials.
What is the best location in a house for a drum studio?
The basement is almost always the best choice. The surrounding earth acts as a massive natural sound barrier for the walls. If you must be on a higher floor, choose a room far away from shared walls and living areas, and prioritize a high-quality drum riser.
Conclusion
By April 2026, drum room soundproofing has evolved into a science that is more accessible than ever. Whether you are building a professional-grade “room within a room” or just trying to survive in a townhouse with a budget DIY riser, the key is understanding the difference between blocking sound and absorbing it.
At Finance No Vax, we believe that every musician deserves a space to play without limits. By combining heavy mass, structural decoupling, and strategic acoustic treatment, you can create a studio that sounds professional on the inside and stays silent on the outside.
Ready to start your build? Head over to https://financenovax.com/ for more expert guides on studio design and acoustic optimization. Stay loud (inside) and stay quiet (outside)!
