How to Draw Curled and Folded Leaves
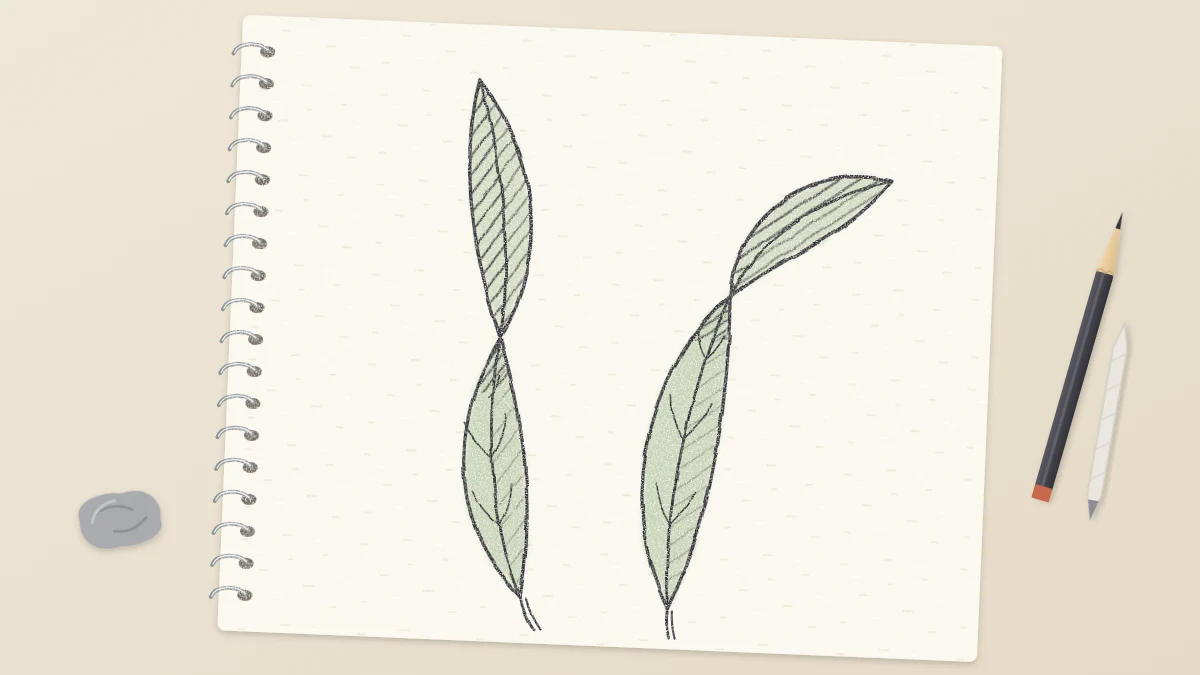
Use the ribbon method to draw leaves that twist, fold and curl: a flowing midrib, two edge lines that cross where the leaf turns over, and a darker underside.
Tutorial at a glance
What you need
- HB pencil
- 2B pencil
- 4B pencil
- Kneaded eraser
- Pencil sharpener
- Sketchbook or drawing paper
- Strip of scrap paper as a model
A flat leaf seen from above is a good first exercise, but real leaves rarely pose that way. They twist toward the light, fold along the middle, droop at the tip and show their undersides. Drawing that can feel like a guessing game until you have a method for it.
The method here is to think of the leaf as a ribbon. Once you see it that way, how to draw curled leaves becomes a matter of three lines: one for the midrib and one for each edge. Wherever those lines cross, the leaf turns over.
What you need
- An HB pencil for the construction lines
- A 2B pencil for final lines and shading, and a 4B pencil for the darkest accents
- A kneaded eraser
- A strip of paper about 1 in (2.5 cm) wide and as long as your hand
The paper strip is your model. Draw a line down the middle of both sides, twist it once and look at it. Everything in this tutorial can be checked against it. If you are new to midribs and veins, work through the basic guide on drawing a flat leaf first.
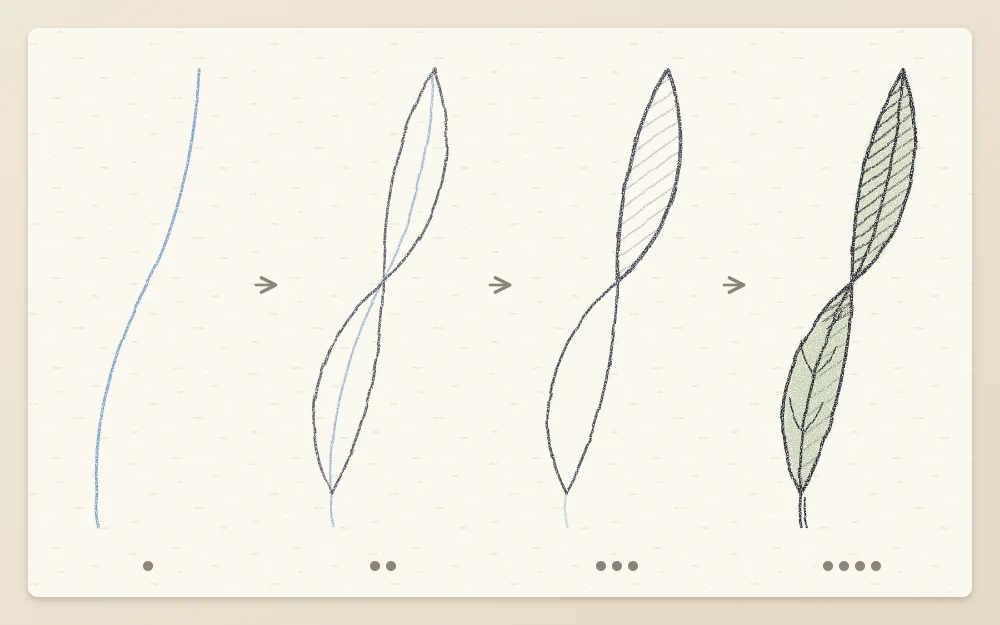
Step 1: Draw the midrib as a flowing curve
- With the HB pencil, draw a long S-shaped line about 5 in (13 cm) from base to tip. Press lightly.
- Make the two bends of the S unequal: a broad curve in the lower two thirds and a tighter one near the tip.
- Mark a small tick on the line where the curve changes direction, a little past halfway. This is where the leaf will twist.
Step 2: Add the two edges as separate lines
Do not draw an outline around the midrib. Draw each edge as its own line, from base to tip.
- First edge. Start at the base and travel up the left side of the midrib, moving away from it until the gap is about one tenth of the leaf’s length. As you approach the tick, bring the line back in, cross the midrib at the tick, and continue up the right side to the tip.
- Second edge. Start at the base again and travel up the right side, the same distance out. Cross the midrib at the same tick and continue up the left side to the tip.
- Both edges meet in a point at the tip and close together at the base.
You now have a shape like a long, stretched figure eight with the midrib running through its waist. Below the crossing you are looking at the top surface of the leaf. Above the crossing the leaf has turned over, and you are looking at its underside.
Common mistake
Pinching the leaf to nothing at the twist. At the crossing the leaf is seen edge-on, so it looks very thin, but it is still there. Keep a sliver of width by letting the two edges cross at a shallow angle, not head-on.
Step 3: Outline the underside and clean up
- Decide which edge is in front at the crossing. The edge that was nearer to you before the twist passes in front. Draw that line through unbroken and stop the other edge just short of it on both sides.
- Switch to the 2B pencil and go over the contour of the upper, turned-over section with a firm line, so it reads as a separate surface.
- Draw the midrib as a clear line on the top surface. On the underside, draw it as two close lines, because the midrib stands out as a ridge there.
- Add four or five side veins on the top surface only, curving toward the tip. On the underside, two or three faint ones are enough.
- Lift the leftover construction lines with the kneaded eraser.
Step 4: Shade the underside and the cast shadow
Tone is what finally separates the two surfaces.
- With the 2B pencil, cover the whole underside with even hatching that runs along the length of the leaf. Aim for a middle gray value.
- Leave the top surface mostly as clean paper, with a light strip of tone beside the midrib.
- Right at the twist, where the leaf rolls over itself, add a narrow cast shadow on the top surface just below the crossing. Use the 4B pencil, press firmly, and keep the shadow no longer than the leaf is wide.
This is all the shading a line study needs. For smoother tones and reflected light, see the guide on shading flowers and leaves.
Folded leaves and curled tips
The same thinking works for two other common poses.
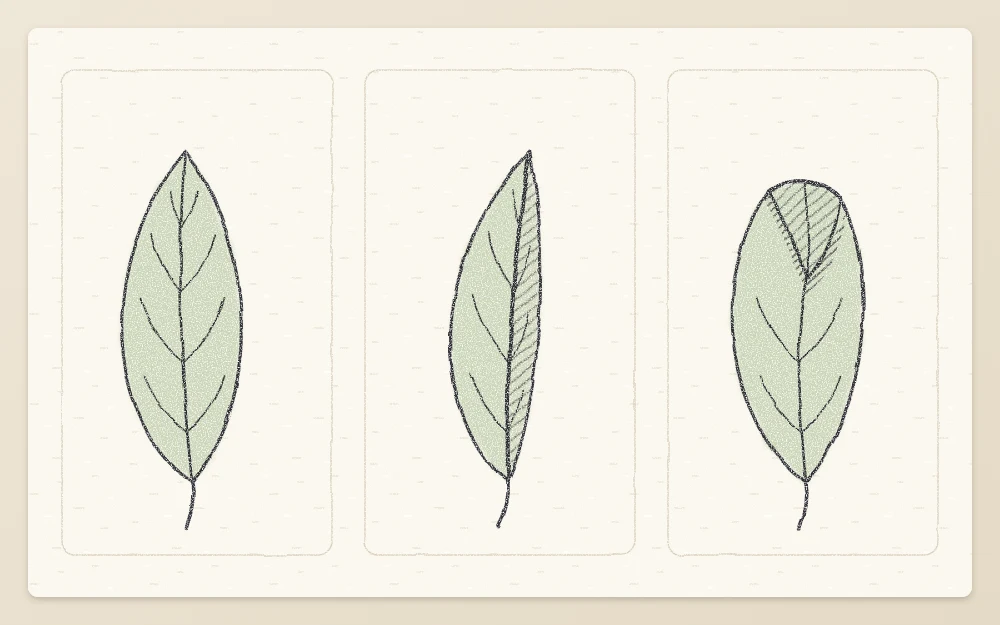
A leaf folded along its midrib
- Draw a gently curved midrib.
- On the side facing you, draw the half-leaf at its full width, about one quarter as wide as the leaf is long.
- On the far side, draw the other half as a narrow sliver, about one third as wide as the near half. This is foreshortening: the far half tilts away from you, so it looks compressed.
- Shade the sliver a tone darker than the near half.
A curled tip
- Draw a flat leaf, but stop both edges about one fifth of the length short of the tip.
- Join the two edges with a curved line across the leaf, bulging toward the tip. This is the fold where the tip rolls over.
- From the two ends of that fold line, draw a small pointed flap aimed back toward the base, about as long as the missing tip would have been.
- Shade the flap as underside and add a thin cast shadow beneath it on the leaf.
Practice with long strap leaves
Long, narrow leaves are the easiest place to practice, because they behave most like the paper strip. Tulip and lily leaves both twist and arch along their length, and their veins run lengthwise, so there is no branching pattern to wrap around the curve. The lily tutorial is a good place to try a twisting leaf beside a finished flower.
Work from a real leaf when you can, or from photos you took yourself.
Common problems
- The twist looks like a knot. The edges cross at too steep an angle. Stretch the crossing out along the midrib.
- Both surfaces look the same. Increase the value difference: keep the top surface light and the underside clearly darker.
- The leaf looks like two leaves. The midrib is broken at the twist. Make sure it runs through as one continuous curve.
Frequently asked questions
What is the ribbon method for drawing leaves?
It treats a leaf like a strip of ribbon. You draw the midrib as one flowing curve, then each edge as its own line from base to tip. Wherever the edge lines cross over the midrib, the leaf has turned, and the surface beyond that point is the underside.
Which side of a twisted leaf should be darker?
In most drawings the underside is shaded darker, because it usually faces away from the light. Keeping the top surface light and the underside a clear step darker also helps the viewer read the twist. Add a small, dark cast shadow where the leaf rolls over itself.
Which leaves are easiest for practicing twists and curls?
Long, narrow strap leaves such as those of a tulip or a lily. They bend much like a strip of paper, and their veins run lengthwise, so there is no branching vein pattern to redraw around each curve. Broad, lobed leaves are better left for later.