
Why Soundproof Walls for Studio Use Are the Foundation of Great Audio
Soundproof walls for studio spaces are the single most important upgrade you can make if noise is ruining your recordings — or your focus.
Here’s a quick breakdown of your best options, from simplest to most effective:
| Approach | Best For | Estimated STC Gain |
|---|---|---|
| Add mass-loaded vinyl (MLV) + drywall layer | Renters, budget builds | STC 40s |
| Resilient channels + double 5/8″ drywall | Home studio owners | STC 50s |
| RSIC-1 clips + double drywall + Green Glue | Serious producers | Mid-60s STC |
| Full room-within-a-room build | Professional level | STC 60-70 |
Most people searching for studio soundproofing solutions start in the wrong place. They buy a pack of foam panels, stick them to the wall, and wonder why they can still hear the neighbor’s TV through every take.
Here’s the hard truth: acoustic foam does not block sound. It absorbs echoes inside the room. That’s a completely different problem.
Blocking sound transmission requires mass, decoupling, and airtight sealing. Typical residential walls sit at an STC rating of around 28-34 — meaning loud sounds pass right through. Professional recording studios target STC 60-70. That gap is enormous, and foam panels don’t close it.
The good news? You don’t need to spend a fortune. A well-planned DIY build using materials like mineral wool, mass-loaded vinyl, and resilient channels can get you into the STC 50s without demolishing your budget. One real-world DIY studio build achieved a 50-60 dB sound reduction — enough to make a full rock band playing at full volume below the level of normal conversation outside the room.
This guide covers everything: the science, the materials, the step-by-step process, and smart options for renters who can’t touch the walls permanently.
Key terms for soundproof walls for studio:
The Core Principles of Soundproof Walls for Studio Environments
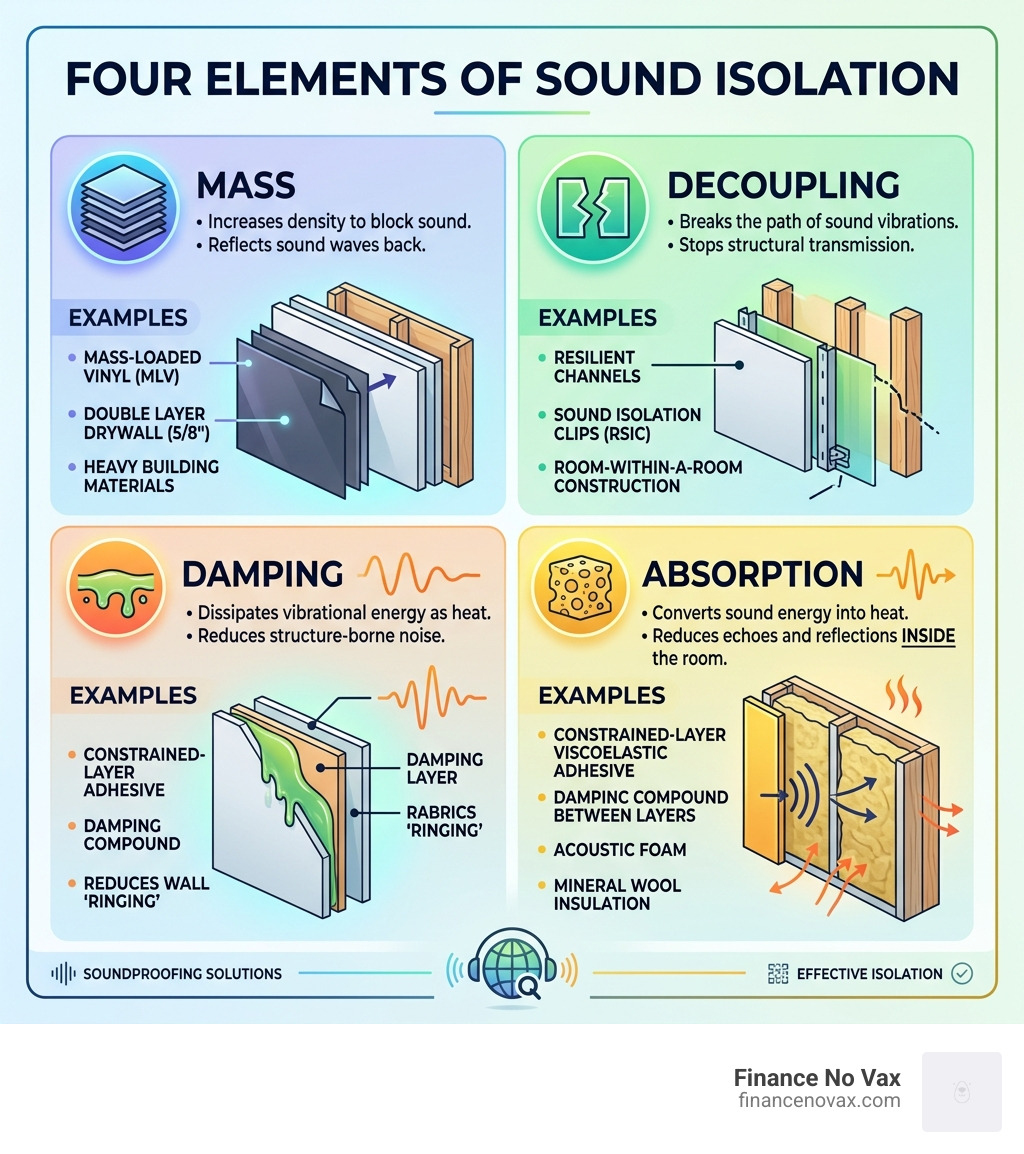
To truly master soundproof walls for studio use, we have to look past the marketing hype and focus on physics. In April 2026, the industry still relies on four pillars of sound isolation: mass, decoupling, damping, and absorption.
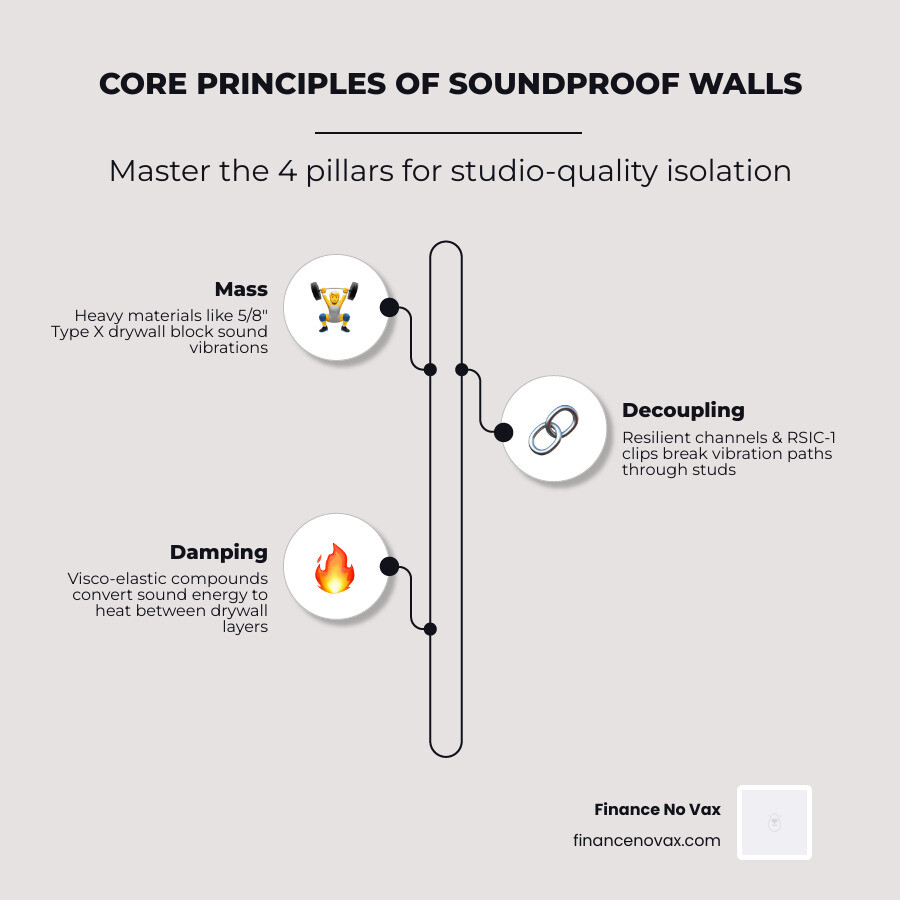
- Mass: This is the “heavy lifting” part. Sound is a vibration; the heavier the wall, the harder it is for sound waves to move it. This is why we use 5/8″ Type X drywall instead of the standard 1/2″ stuff.
- Decoupling: Think of this as breaking the physical connection between the inside and outside of the wall. If the studs are shared, vibrations travel through the wood like a telephone wire. Using staggered studs or resilient channels “breaks” that path.
- Damping: This involves using visco-elastic compounds to convert sound energy into heat. When you sandwich a compound between two layers of drywall, it prevents the wall from “ringing” like a bell.
- Absorption: While mass blocks sound, we still need something inside the wall cavity to soak up the air-borne noise that gets through. This is where dense mineral wool comes into play.
- Airtight Sealing: Sound behaves like water. If there is a tiny crack under the door or a gap around an electrical outlet, the sound will pour through.
For a deep dive into these mechanics, check out The Ultimate Guide To Soundproofing Your Walls/ and discover why Double Wall Soundproofing Is The Secret To A Silent Home/.
Understanding STC Ratings for Soundproof Walls for Studio Quality
STC stands for Sound Transmission Class. It is a single-number rating of how well a building partition attenuates airborne sound. In a typical home, your walls probably have an STC of 28 to 34. At this level, you can hear your neighbor’s loud conversation clearly.
For a “serviceable” home studio, you want to hit at least STC 45-49. At this stage, loud speech is audible but not intelligible. For a professional level where you can record drums without the police showing up, you need to aim for STC 60+.
Decoupling and Damping: The Secret to Professional Isolation
If mass is the muscle, decoupling is the brains. One of the most effective ways to decouple is using resilient channels—long metal rails that you screw to the studs, then screw the drywall to the rails. This creates a “spring” effect that stops vibrations.
Even better are RSIC-1 clips (Resilient Sound Isolation Clips). These heavy-duty rubber-and-steel mounts hold the metal furring channels and provide much higher isolation than standard resilient channels.
When you combine these with a damping compound, you’re playing in the big leagues. Damping materials like visco-elastic polymers are applied between layers of drywall. If you want to Stick It To Your Noisy Neighbors With Green Glue Noiseproofing Compound/, you’ll find that this single step can drastically reduce the “shudder” of low-frequency bass.
Essential Materials and Budget-Friendly Alternatives
Building soundproof walls for studio use doesn’t have to mean taking out a second mortgage. By choosing the right materials, you can maximize every dollar.
- Mass-Loaded Vinyl (MLV): This is a heavy, flexible material (often called “Luxury Liner”) that adds incredible mass without much thickness. Installing MLV behind a layer of 5/8″ drywall can get you into the high 40s STC range.
- 5/8″ Type X Drywall: It’s denser and more fire-resistant than standard drywall. It’s also surprisingly affordable for the amount of mass it provides.
- Mineral Wool: Brands like Rockwool are the gold standard here. Unlike pink fiberglass, mineral wool is incredibly dense and excellent at soaking up mid-to-low frequencies. You can read more about why it’s Rockwool Or Bust Finding The Best Insulation For Your Studio Walls/.
- Acoustic Sealant: This is non-hardening caulk. It stays flexible for decades, ensuring that as your house shifts, your airtight seals don’t crack.
If you’re working with a tight budget, look into Silence On A Shoestring 5 Ways To Soundproof Your Walls For Less/.
Why Acoustic Foam Isn’t Enough for Soundproof Walls for Studio Use
We see this mistake every day: someone buys 96-packs of pyramid foam from Amazon and expects silence. Acoustic foam is for treatment, not proofing.
- NRC (Noise Reduction Coefficient): This measures how much sound is absorbed within a room. High-quality panels, like those from Audimute, have an NRC of 0.95, meaning they soak up 95% of the echoes.
- STC (Sound Transmission Class): This measures how much sound is blocked. Foam has almost zero mass, so its STC rating is negligible.
Foam is great for making your vocals sound “dry” and professional, but it won’t stop the garbage truck outside from ruining your take. To understand the difference, see Why Studio Foam Insulation Is The Secret To Professional Audio/.
High-Performance Systems for Serious Producers
For those who need to move beyond “good enough,” integrated systems are the answer. These often involve:
- Double Drywall Layers: Staggering the seams between two layers of 5/8″ drywall.
- Isolation Clips + Hat Channel: The most robust way to decouple a wall.
- Homasote Panels: These are unique because they offer both mass for soundproofing and some internal absorption. Products like Homasote DesignWall 440 can achieve STC 50+ when installed with resilient channels.
Step-by-Step DIY Guide to Building a Soundproof Studio Wall
Building a soundproof wall for studio use is a labor of love, but the results are worth it. Here is a simplified 8-step process.
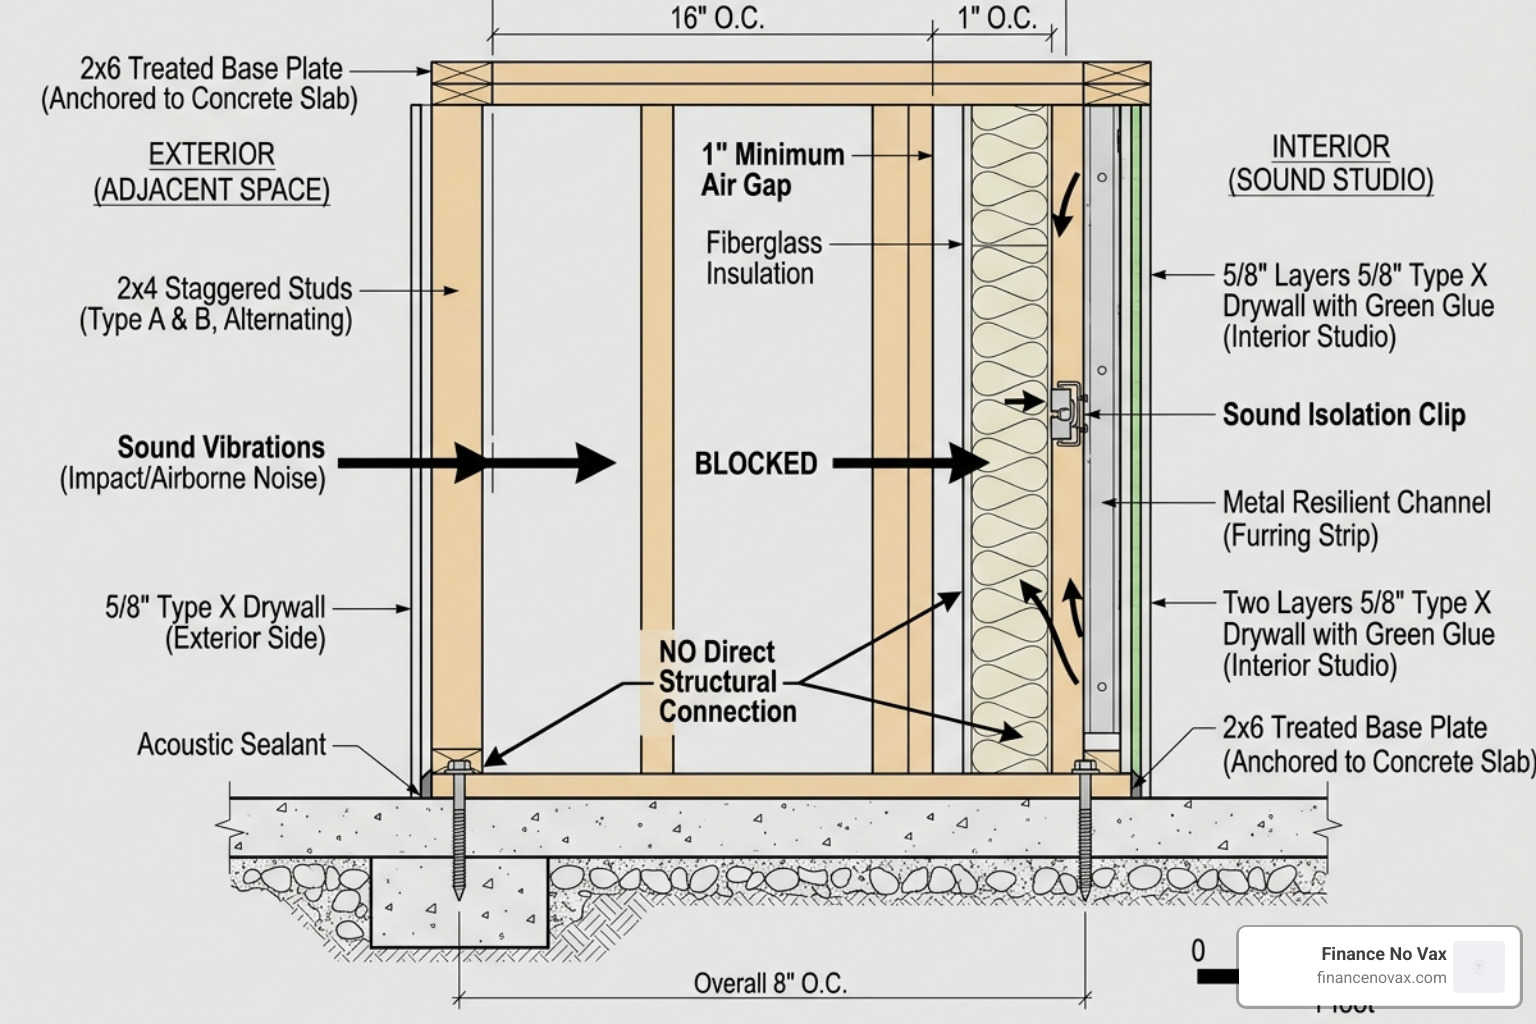
- Framing: If you have the space, a staggered stud wall is king. You use a wider base plate (like a 2×6) and alternate 2×4 studs so that the drywall on one side doesn’t touch the studs of the other side.
- Insulation: Pack the cavities tightly with mineral wool. Don’t leave gaps, but don’t compress it so much that it loses its loft.
- MLV Installation: Staple mass-loaded vinyl directly to the studs. Overlap the seams and seal them with PVC tape.
- Resilient Channels: If you aren’t doing staggered studs, screw resilient channels horizontally across your studs.
- First Drywall Layer: Screw your 5/8″ drywall into the channels (not the studs!). Leave a 1/4″ gap at the floor and ceiling.
- Damping Compound: Apply Green Glue or a similar visco-elastic polymer to the back of your second drywall sheet.
- Second Drywall Layer: Hang the second sheet, making sure the seams don’t line up with the first layer.
- Seal Everything: Use acoustic sealant on every single edge and gap.
For more visual learners, we have a Diy Soundproof Panels For Walls A Step By Step Guide/ that covers the finer details.
Sealing the Gaps: Acoustic Sealant and Flanking Paths
You can build the thickest wall in the world, but if you have a “flanking path,” you’ve wasted your money. Flanking is when sound travels around the wall—through the ceiling, under the floor, or through electrical boxes.
- Putty Pads: Wrap these around the back of your electrical outlet boxes before you hang drywall.
- Acoustic Caulk: Apply this to the 1/4″ gap you left at the floor and ceiling. This “floats” the wall and prevents vibrations from traveling into the structure of the house.
Learn more about these finishing touches in our guide on Acoustically Coating For Walls Benefits And Best Buys/.
Managing Ventilation and HVAC Without Leaks
A soundproof room is an airtight room. If you can’t hear the neighbors, you also can’t breathe! You need a way to move air without moving sound.
The solution is a Baffle Box. This is an S-shaped tunnel lined with acoustic foam or duct liner. Air has to bounce around the corners to get in, but sound waves (which prefer traveling in straight lines) get absorbed by the lining. For a DIY setup, you can use a “tube within a tube” design—like a 4-inch duct inside a 6-inch insulated tube—to create a silent airflow system.
Advanced Solutions: Room-Within-a-Room and Renter Options
The “Room-Within-a-Room” (RWAR) is the holy grail. It involves building a completely new set of four walls, a floor, and a ceiling that do not touch the existing structure at all. This is the only way to achieve STC 70+, but it requires significant space and a healthy budget.
Mobile and Non-Permanent Soundproof Walls for Studio Use
What if you’re in an apartment? You can’t exactly build a staggered stud wall in a rental.
- Partition Walls: Heavy-duty, mobile acoustic walls (like those made with Basotect G+ foam) can be moved into place during a session. They are over 2 meters high and weigh about 23kg, providing significant “acoustic segregation.”
- Acoustic Blankets: While they don’t block as much sound as a wall, heavy industrial blankets can reduce noise by 7-10 dB—enough to make a difference in a bedroom studio.
- Window Inserts: Products like Fantastic Frames can reduce window noise by up to 80% without permanent changes.
For more renter-friendly ideas, check out Cheap And Chic Affordable Soundproof Panels For Your Apartment/.
Frequently Asked Questions about Studio Soundproofing
How much does it cost to soundproof a 10×10 studio?
A basic DIY build for a 10×10 room (walls and ceiling) typically costs between $1,500 and $3,000 depending on the materials used. If you use reclaimed timber and shop online for insulation, you can stay on the lower end. A professional-grade build with RSIC clips and double drywall will lean closer to $4,500 – $5,000.
Can I use egg cartons or cheap foam to block sound?
No. Egg cartons are a myth; they have no mass and very little absorptive quality. Cheap foam panels are great for reducing “flutter echo” (that zingy sound when you clap), but they will not stop outside noise from entering your studio.
What is the difference between soundproofing and acoustic treatment?
Soundproofing is about isolation (keeping sound in or out). It requires heavy, airtight materials. Acoustic treatment is about quality (making the sound inside the room better). It requires soft, porous materials like Studio Acoustic Panel Sets For Serious Sound Dampening/.
Conclusion
Building soundproof walls for studio use is one of the most rewarding DIY projects a musician or producer can undertake. By focusing on the fundamentals—mass, decoupling, and airtight sealing—you can create a professional-grade space on a hobbyist’s budget.
Before you start swinging a hammer, make a checklist:
- Identify the noise source (is it low-frequency bass or high-frequency speech?).
- Calculate your square footage and order 10% more drywall and insulation than you think you need.
- Address the “weakest links” first (doors and windows). A solid core door can gain up to 20 STC points just by adding a proper seal kit.
Ready to transform your space? Explore our other resources at Finance No Vax to find the perfect balance of performance and price for your dream studio.
