Basic Flower Shapes: Circles, Cups, Cones and Bells
Learn the seven simple construction shapes hiding inside flowers, how to spot them in a real bloom and how to set up a center point and axis before drawing petals.
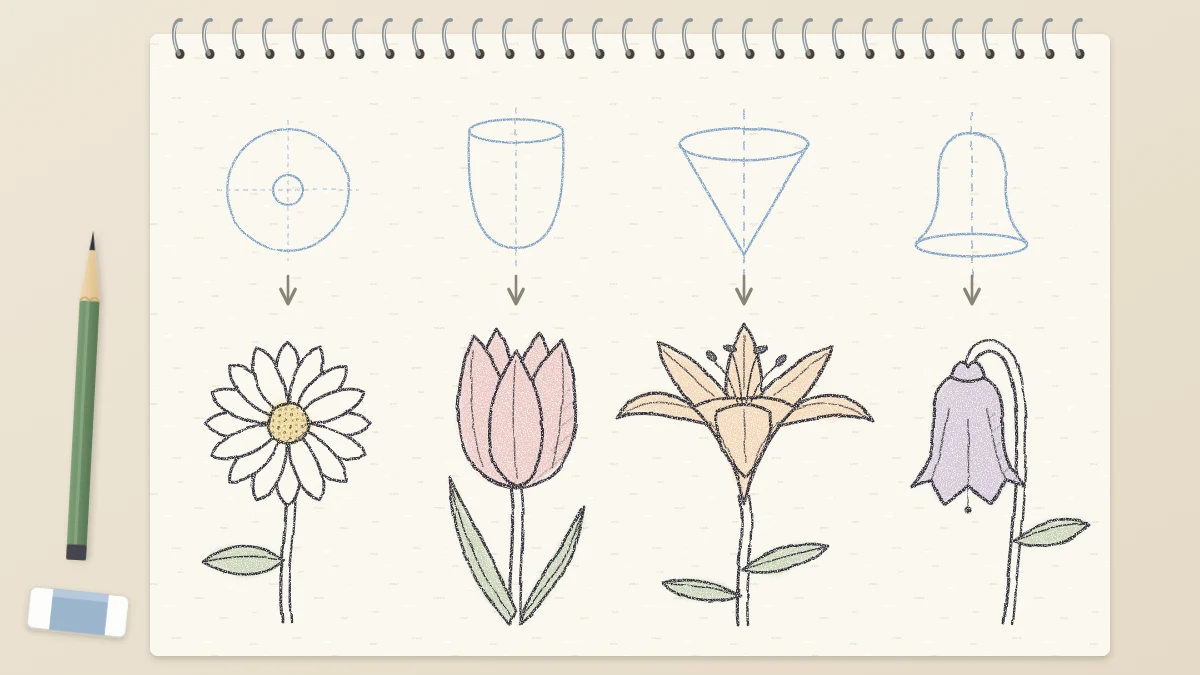
Every flower, however frilly, sits inside a simple form. A daisy is a flat disc. A tulip is a cup. A lily is a cone that opens at the mouth. Learning these basic flower shapes is the quickest way to stop drawing petals that drift, crowd or point the wrong way.
The shape comes first because it answers the big questions early: how large the flower is, where it sits on the page and which way it faces. Petals are then fitted onto the shape rather than invented one at a time.
Why a construction shape comes before petals
A construction shape is a light guide drawn with an HB pencil and very little pressure. It is not part of the finished drawing. Its job is to hold the proportions steady while you work out the details.
The seven shapes to know
Most flowers you will want to draw fit one of these forms.
Disc or circle
A flat flower seen straight from the front, such as a daisy or a sunflower. Draw a circle for the petal tips and a smaller circle inside it for the center. The petals run between the two like spokes.
Ellipse
This is the same disc, tilted away from you. A tilted circle always appears as an ellipse, wider than it is tall. The center becomes a small ellipse too and sits a little toward the back edge. Petals at the front and back look shorter through foreshortening, while those at the sides keep their full length.
Cup or bowl
A rounded form that is closed at the bottom and open at the top, like a tulip or a poppy. Draw an egg or a U shape, then add a narrow ellipse across the top for the rim. Petals wrap around the cup, and the ones at the back show only their tips above the rim.
Cone or trumpet
A narrow tube that widens to an open mouth, like a lily. Draw a V with a rounded point, then close the wide end with an ellipse. The petals grow out of the rim of that ellipse and curve back.
Bell
A cup turned upside down that flares slightly at the rim. Bell-shaped flowers usually hang, so the rim ellipse is at the bottom and the stem meets the top of the dome.
Sphere
A round cluster of many small flowers. Draw one circle for the whole ball and fill it with small repeated flower marks, larger and clearer in the middle and smaller and closer together near the edge.
Spike
A tall, narrow, tapered form with small buds stacked along a stem, like lavender. Draw a long thin shape that is widest near the bottom and comes to a soft point at the top.
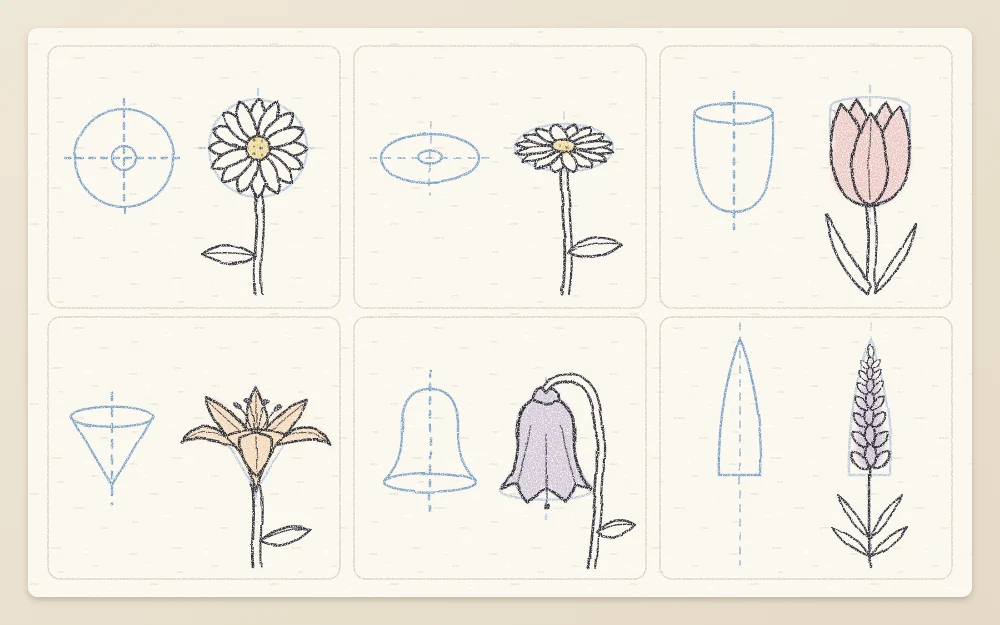
Matching shapes to flowers
| Shape | Flowers it fits | What to draw first |
|---|---|---|
| Disc or circle | Daisy, sunflower from the front | Large circle, small center circle |
| Ellipse | The same flowers tilted | Wide ellipse, center set toward the back |
| Cup or bowl | Tulip, poppy | Egg or U shape with a rim ellipse |
| Cone or trumpet | Lily | Rounded V closed by an ellipse |
| Bell | Hanging bell-shaped flowers | Dome with a flared rim at the bottom |
| Sphere | Round flower clusters | One circle for the whole cluster |
| Spike | Lavender | Tall tapered shape along the stem |
How to spot the shape in a real flower
Looking comes before drawing. Hold the flower, or stand in front of it, and take a moment before the pencil moves.
- Squint. Half-closed eyes blur the petal edges and leave only the overall outline. That outline is your construction shape.
- Look from the side. A flower that looks like a circle from the front may turn out to be a shallow bowl or a deep cup in profile. The side view tells you which.
- Find where the petals meet. Every petal attaches at one point or around one small ring. That is the center point of your shape.
- Follow the stem. Note the angle at which the stem enters the flower. That line continues through the middle of the shape as its axis.
Draw the shape, the center point and the axis
Three light marks set up any flower.
- The shape. Sketch it with an HB pencil in two or three loose passes, moving from the shoulder rather than the fingers. A slightly uneven circle is fine. Keep it large enough to work in, about 3 in (8 cm) across.
- The center point. Mark a dot where the petals attach. On a disc it is in the middle. On a tilted ellipse it sits slightly toward the back. On a cup or cone it is at the bottom of the form, where the stem joins.
- The axis line. Draw one straight light line through the center point in the direction of the stem and let it run out below the shape. On a cup, cone or bell this is the center line of the form, and the two sides should balance across it. Below the flower, this line becomes the start of the stem.
Hang the petals on the shape
With the guide in place, each petal gets a start and an end. It starts at the center point and its tip touches the outer edge of the shape. On a disc, draw a light line from the center to the rim for each petal, then build the petal around that line.
On a cup, the petals follow the curve of the wall. The front petal is drawn whole, the side petals wrap around behind it, and the back petals peek over the rim. The tutorial on drawing a tulip from an egg shape walks through this in full.
Petals themselves bend, cup and overlap in ways that deserve their own practice. Once your guides feel steady, the guide to drawing flat, cupped and curled petals is the natural next step.
Common problems with construction shapes
- The guide is too dark. If it leaves a groove or will not lift with a kneaded eraser, the pressure was too high. The guide should be hard to see from arm’s length.
- The ellipse has pointed ends. An ellipse is rounded all the way around, including its narrow ends. Slow down at the turns.
- The center has wandered. Petals on one side come out longer than on the other. Checking the width of the center against the length of a petal fixes this, and the article on measuring flower proportions explains how.
Frequently asked questions
What shape should I start with when drawing a flower?
Start with the overall form of the bloom rather than a petal. For a flat flower facing you that is a circle, for a tilted one an ellipse, and for deeper flowers a cup, cone or bell. Squinting at the flower blurs the petal edges and makes the right guide easier to see.
Why does my circle become an ellipse when the flower tilts?
A flat disc turned away from you appears squashed along one direction, which is foreshortening. The width stays the same while the height shrinks. The more the flower tilts, the narrower the ellipse gets, until a flower seen exactly from the side is almost a straight line with petals above and below.
Do I erase the construction shape at the end?
Usually, yes. Once the petals are drawn with firmer lines, press a kneaded eraser gently over the guide to lift it without damaging the paper. If the guide was drawn lightly enough, a faint trace can also be left in place, since soft shading tends to hide it.